Beginner's Guide to Etching
During February I went on an etching course at BiP Art Brighton with Ann d'Arcy Hughes, and what a fantastic time I had! There are a few different processes in etching and it also involves a fair bit of manual labour so it'll certainly get those guns in shape if you're thinking about taking it up!
I'm going to take you through the very basics of etching.
Materials needed:
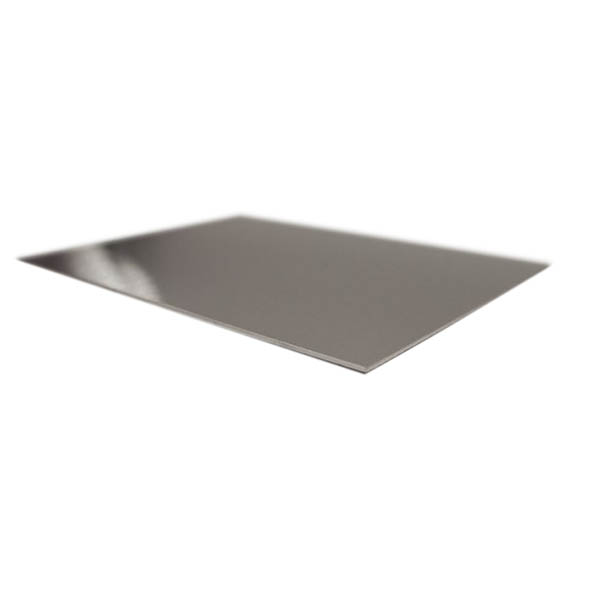 Zinc sheet[/caption]
The first step is to prepare your surface for etching. Copper, zinc or steel are most commonly used. Zinc and copper sheets are available on our website and come in several pre-cut sizes. Student zinc needs polishing before use. Copper takes more time to etch in the acid, in my examples I used zinc and steel plates. Steel has a tone and will create a grey background, zinc produces a white background. The edges of the plates are quite sharp, so we need to smooth them in order to handle the plate without damaging ourselves!
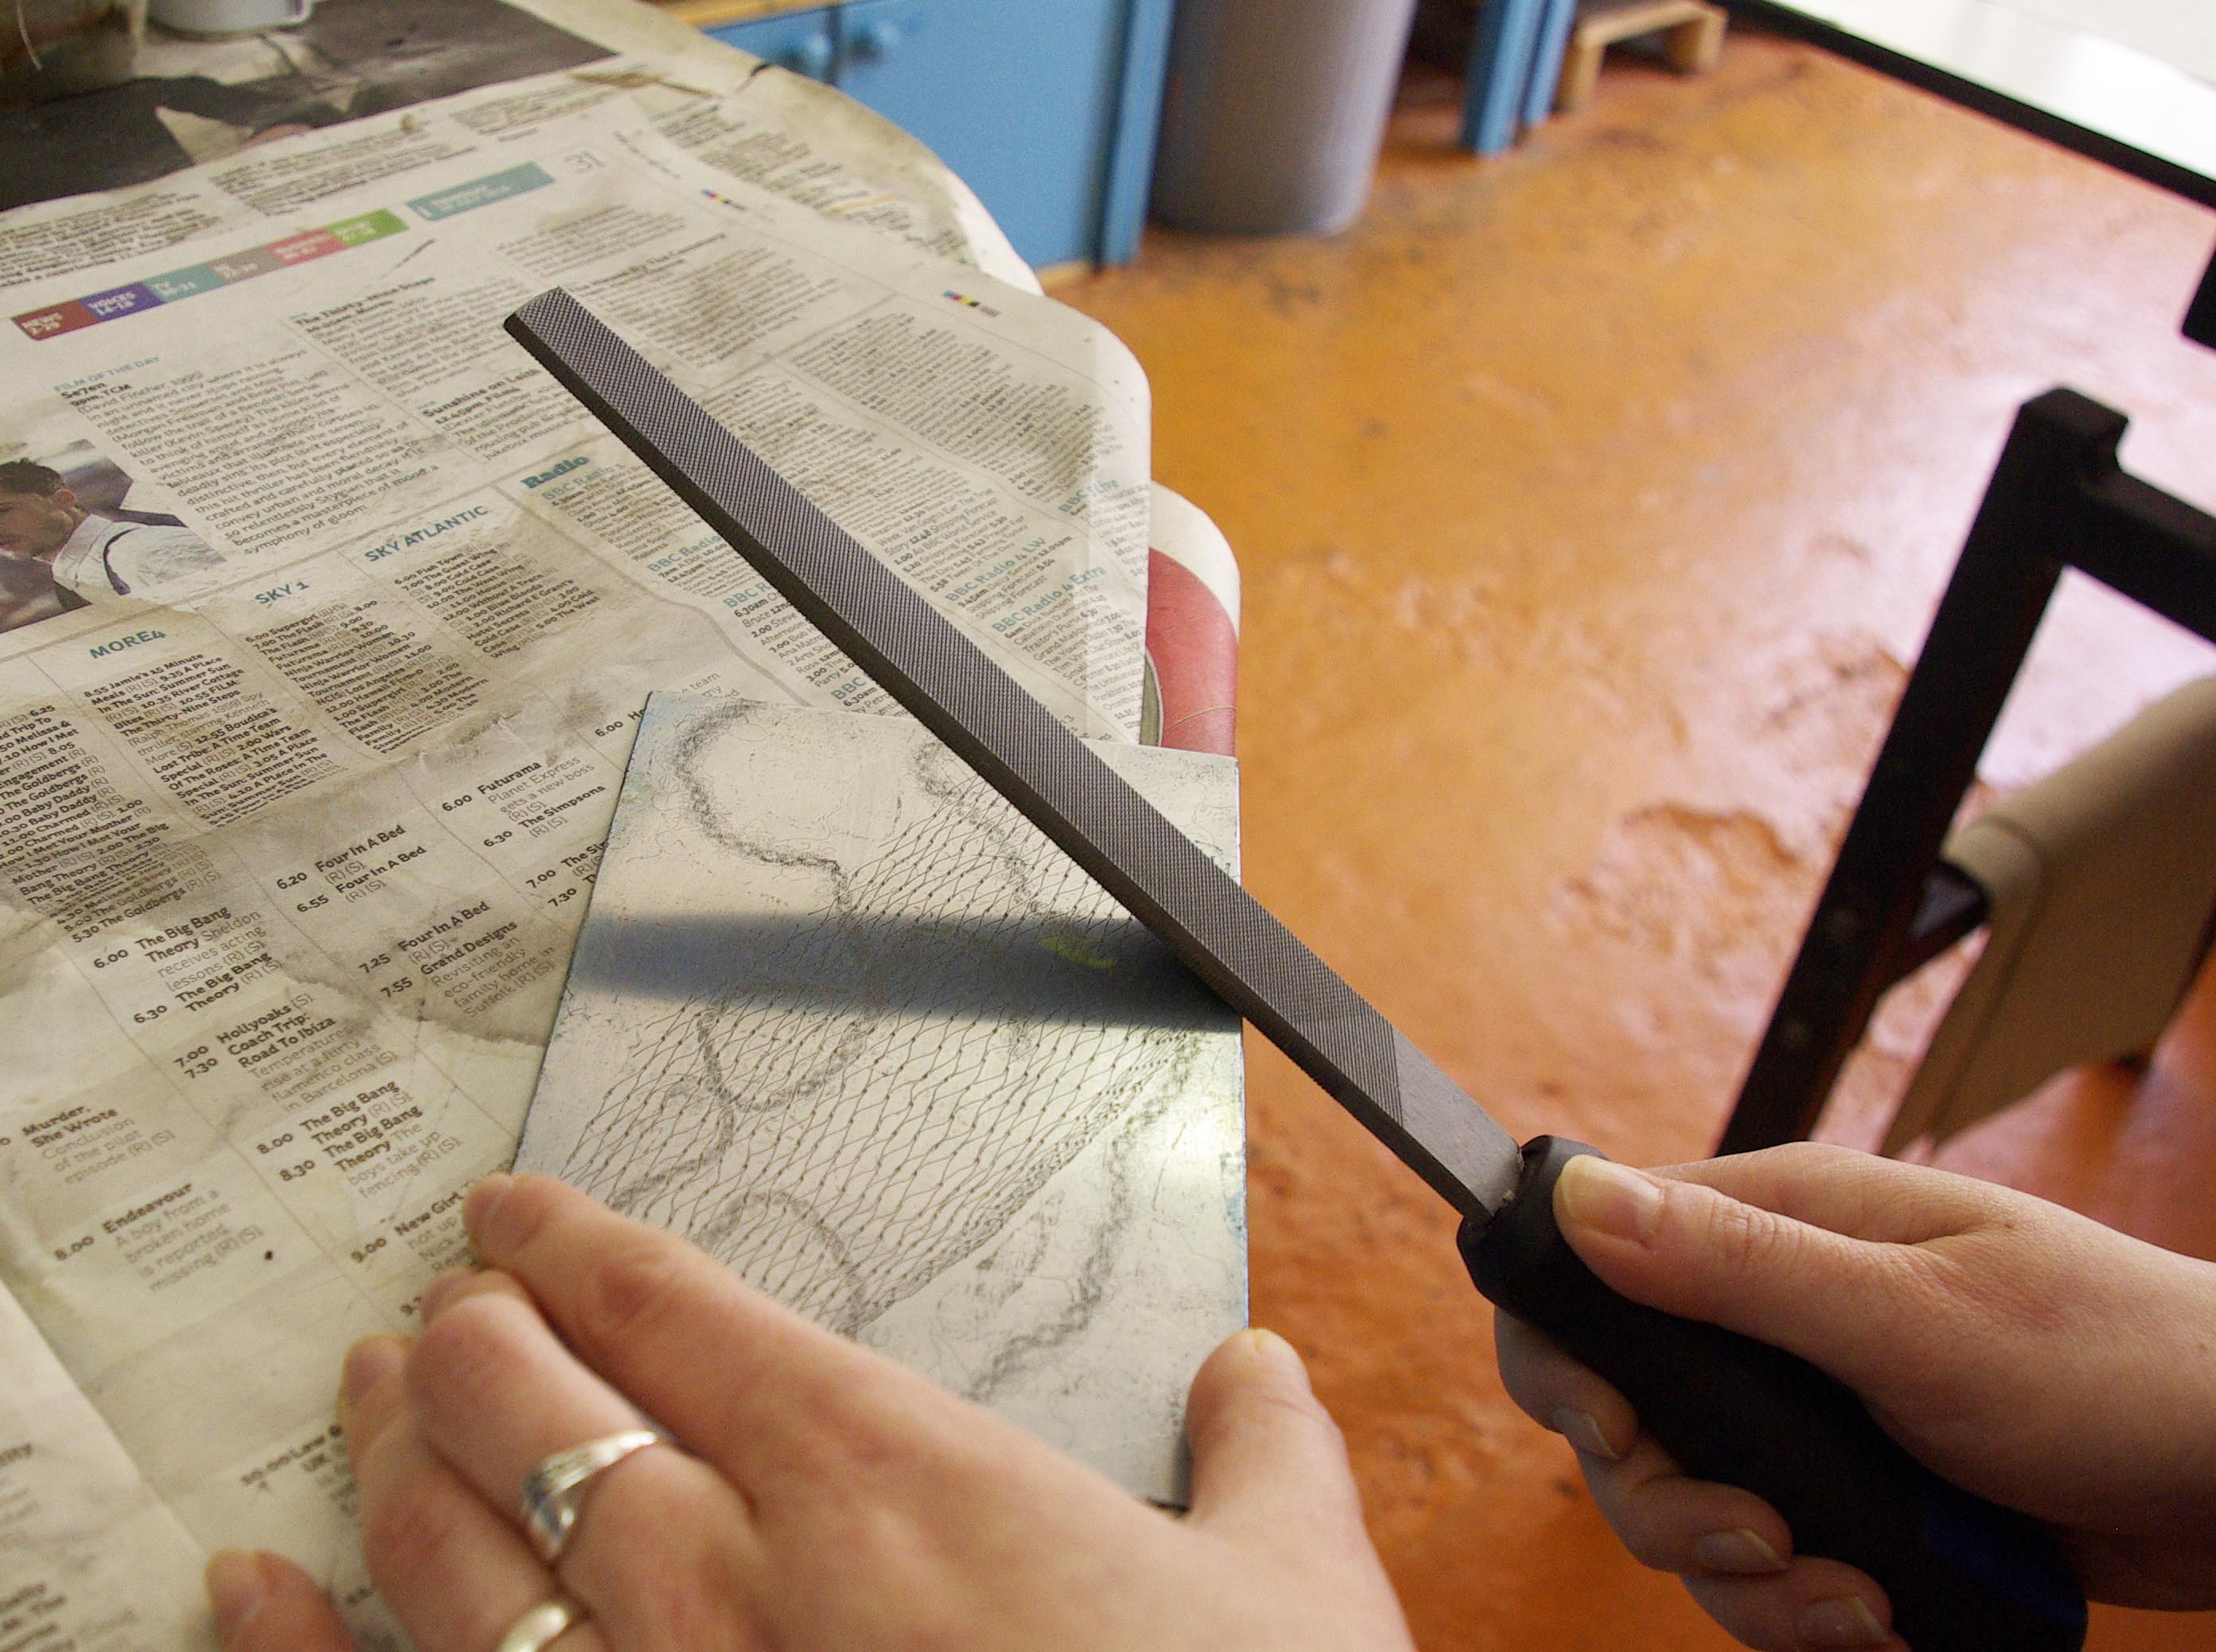
First use a file to smooth the edges down. Use the edge of a surface that you don't mind working on and overhang the plate slightly so you can work on it. Scrape the edges at a 45 degree angle so you create a small bevel along the edge of the plate. This is quite hard work and you'll need to put your back into it! Always scrape away from your body to avoid any unpleasant accidents.
You're going to need to use your imagination a little with our demo images, taking photos whilst doing the course proved difficult as I was too busy learning! Luckily the lovely people at BiP allowed myself and a colleague to go and take some mimed photos!
Zinc sheet[/caption]
The first step is to prepare your surface for etching. Copper, zinc or steel are most commonly used. Zinc and copper sheets are available on our website and come in several pre-cut sizes. Student zinc needs polishing before use. Copper takes more time to etch in the acid, in my examples I used zinc and steel plates. Steel has a tone and will create a grey background, zinc produces a white background. The edges of the plates are quite sharp, so we need to smooth them in order to handle the plate without damaging ourselves!
First use a file to smooth the edges down. Use the edge of a surface that you don't mind working on and overhang the plate slightly so you can work on it. Scrape the edges at a 45 degree angle so you create a small bevel along the edge of the plate. This is quite hard work and you'll need to put your back into it! Always scrape away from your body to avoid any unpleasant accidents.
You're going to need to use your imagination a little with our demo images, taking photos whilst doing the course proved difficult as I was too busy learning! Luckily the lovely people at BiP allowed myself and a colleague to go and take some mimed photos!
 Then use a scraper or scraper burnisher to smooth the bevel you have created with the file. I found the scraper with 3 edges handy as a beginner as you're able to use the flat side to rest your finger on, almost like a vegetable peeler!
[caption id="attachment_1214" align="aligncenter" width="300"]
Then use a scraper or scraper burnisher to smooth the bevel you have created with the file. I found the scraper with 3 edges handy as a beginner as you're able to use the flat side to rest your finger on, almost like a vegetable peeler!
[caption id="attachment_1214" align="aligncenter" width="300"] Small scraper with 3 edges[/caption]
You will know when the plate is ready because if you gently run your finger along the edge it will be smooth.
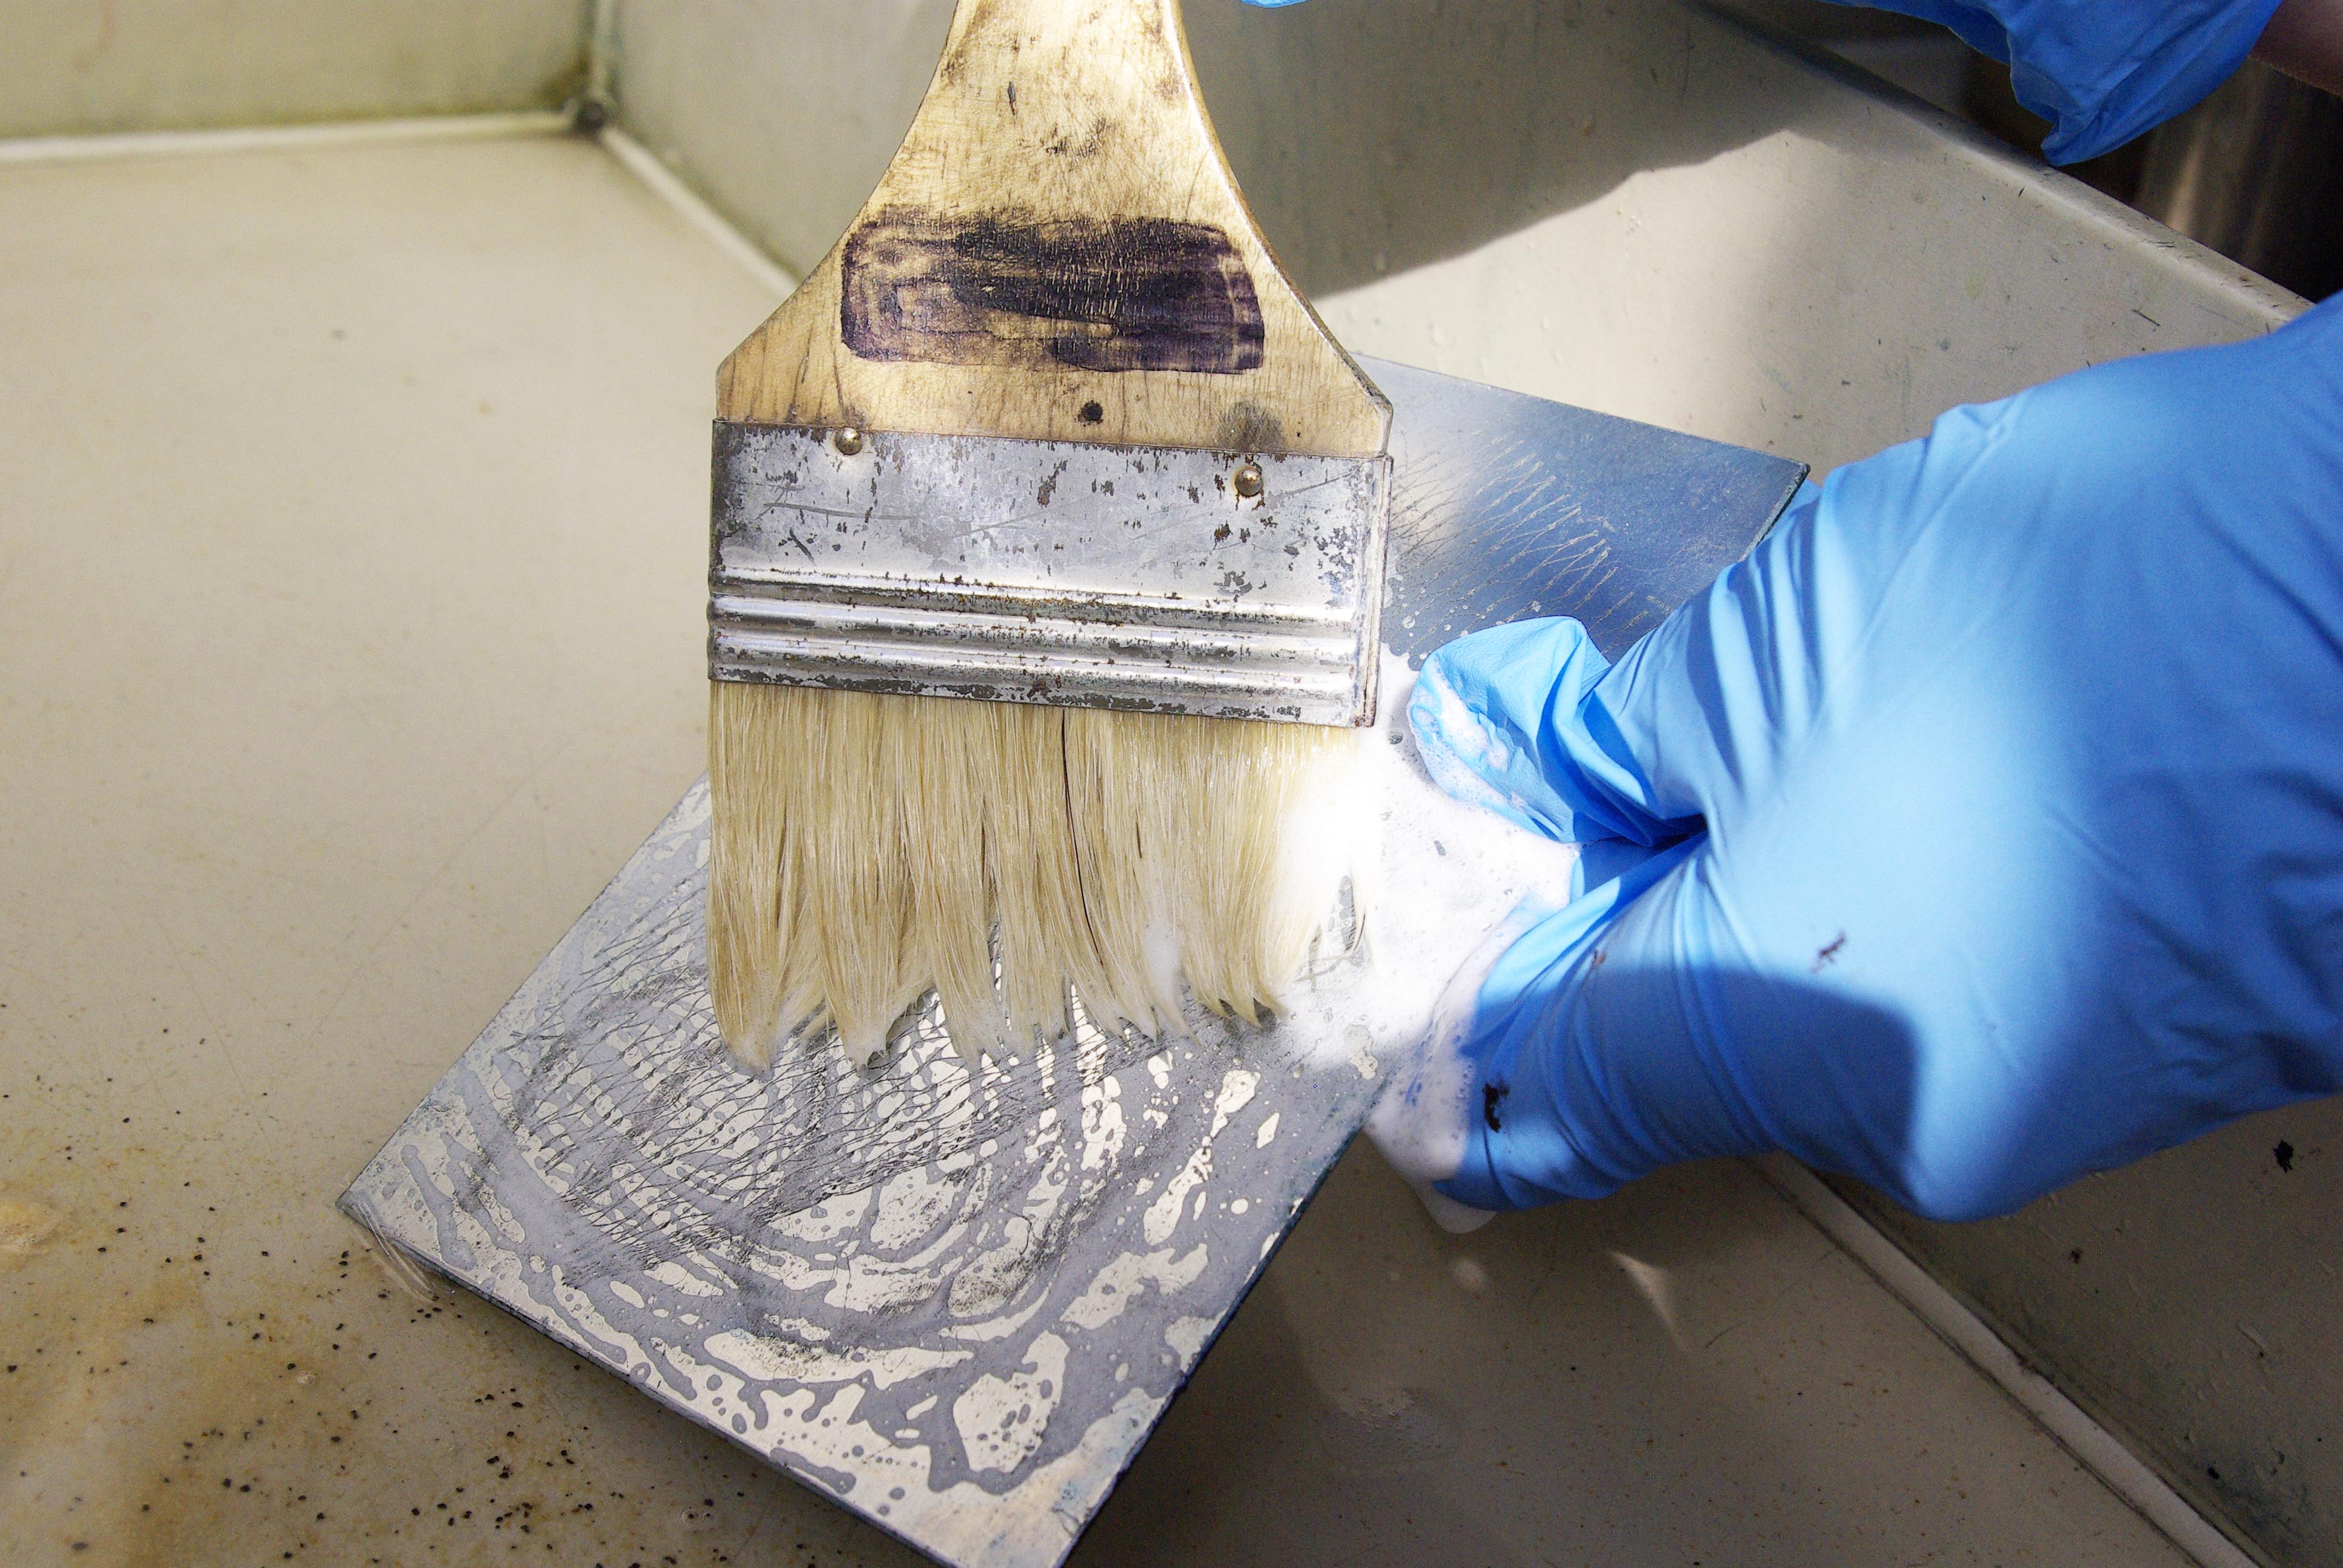
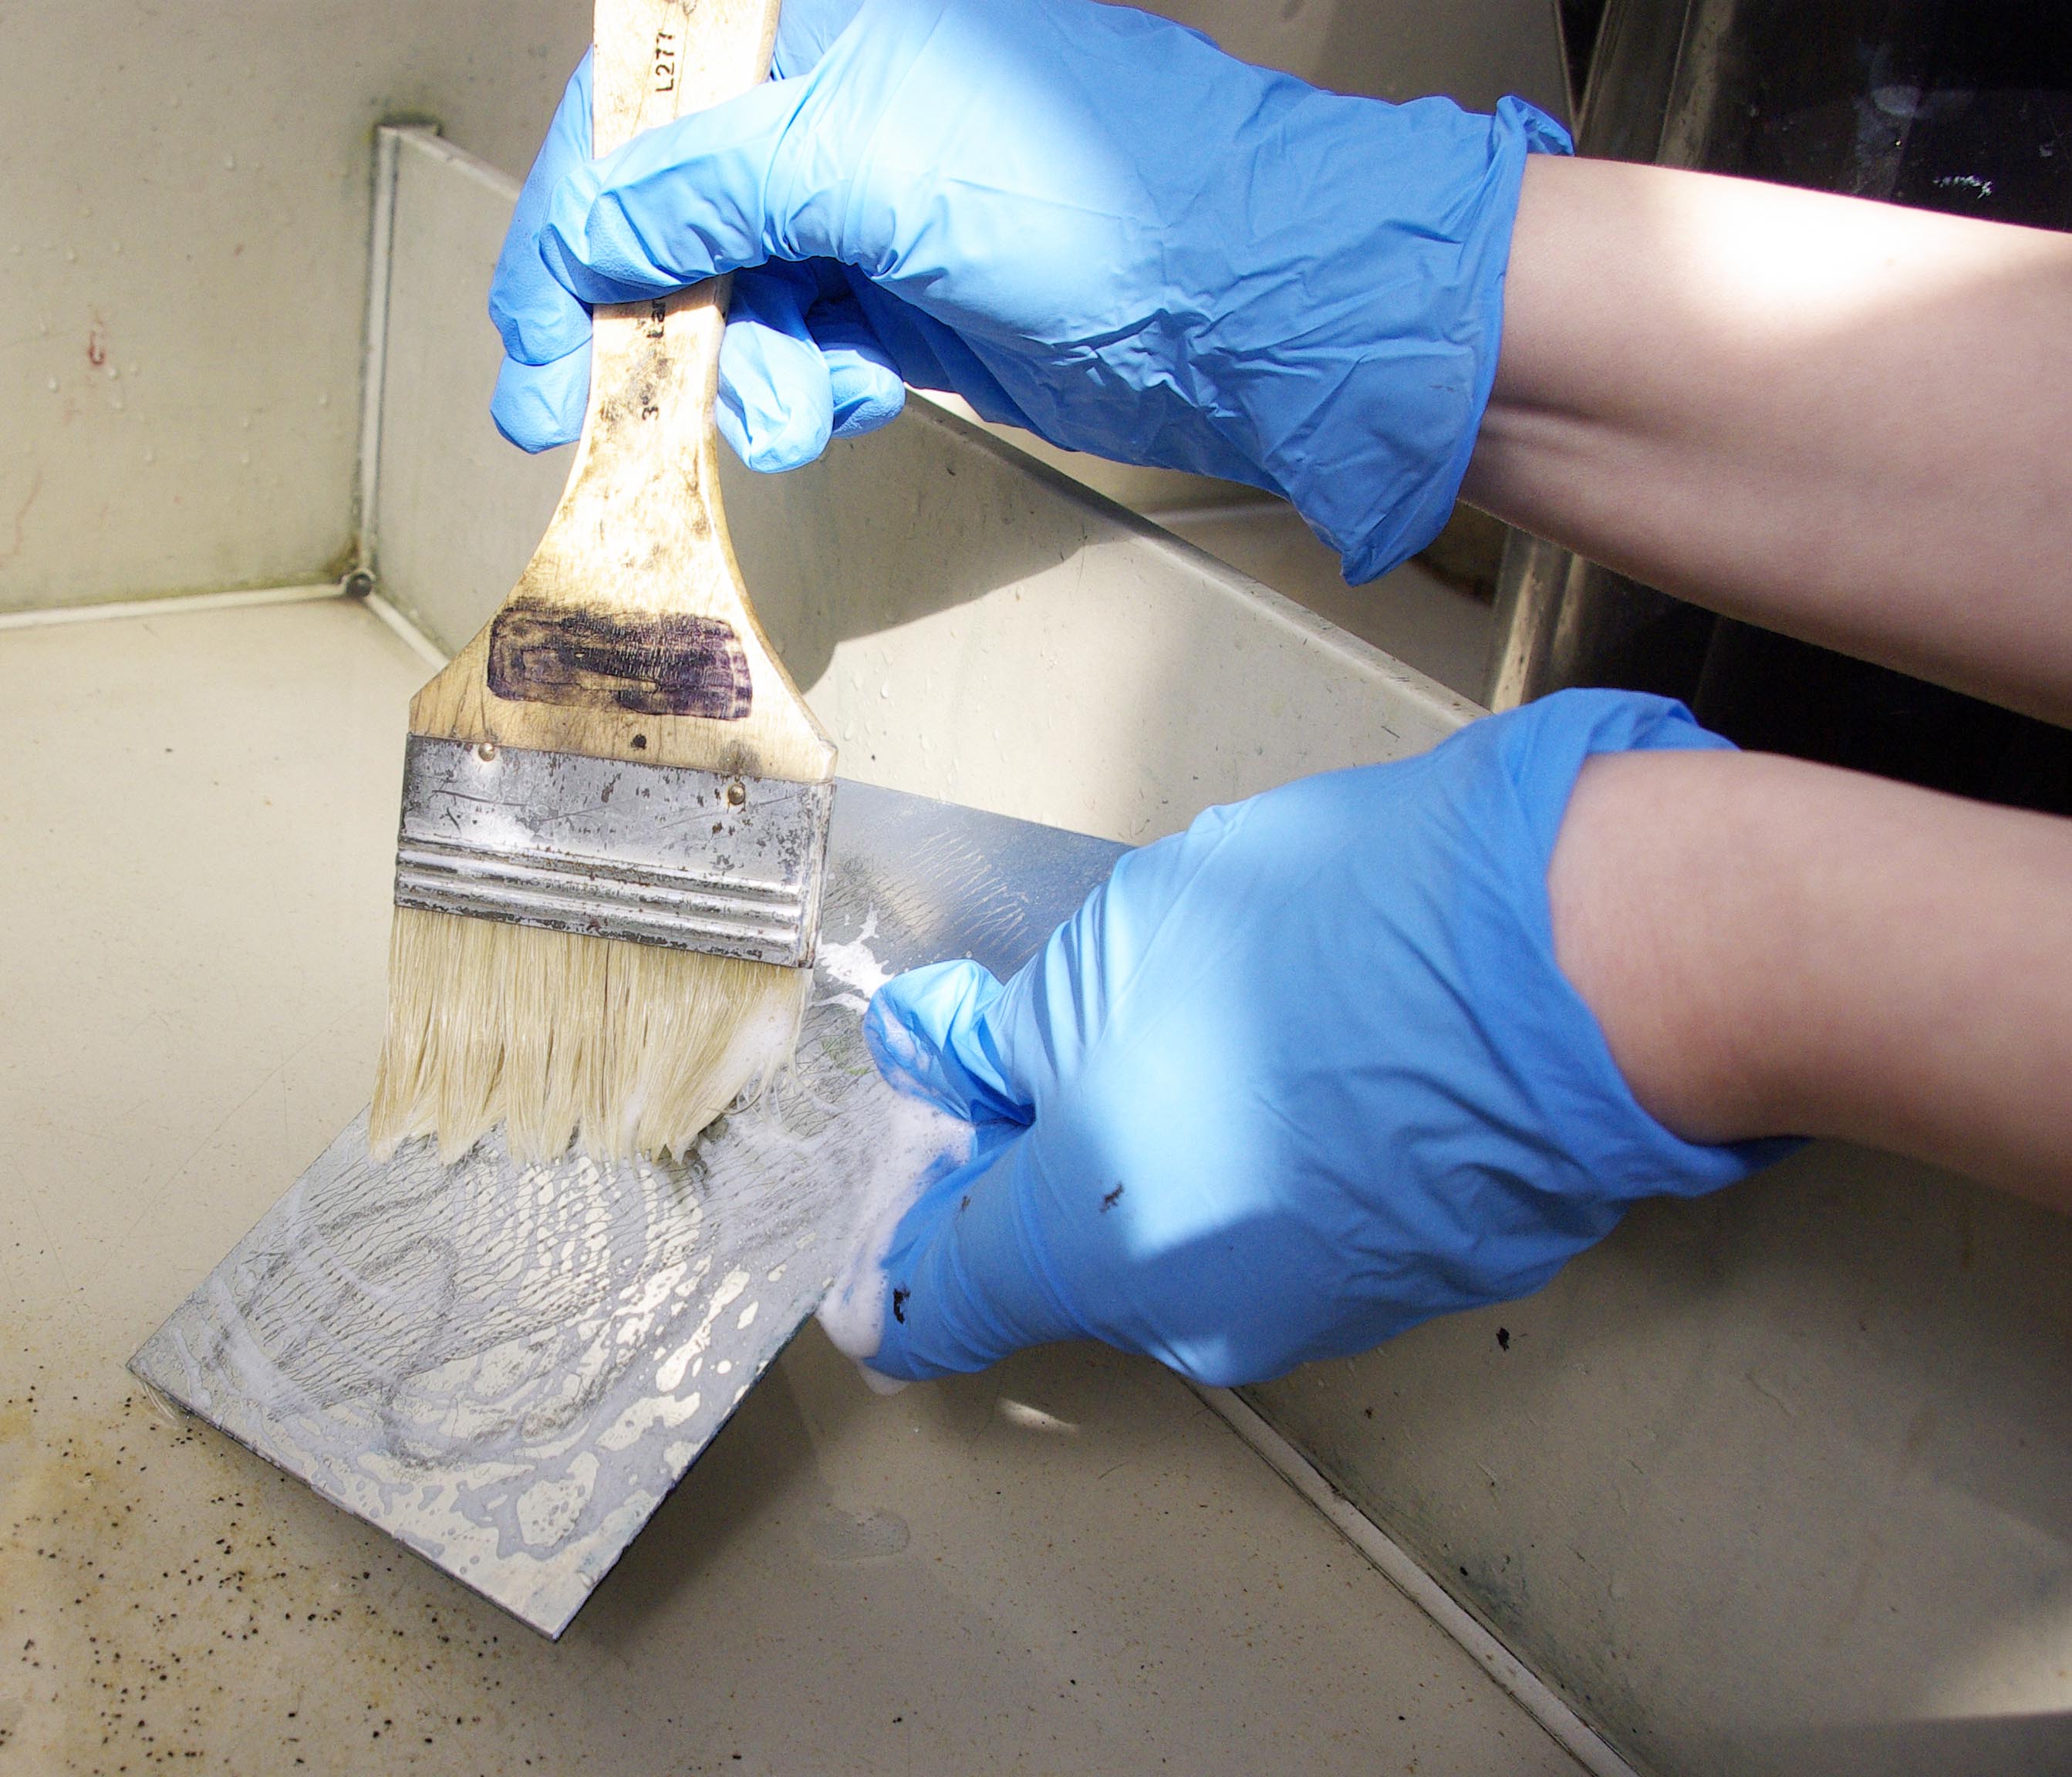
Next degrease the plate. Time to put your latex gloves on!
One way of doing this is to create your own degreasing solution with whiting powder and vinegar mix (4tbsp vinegar to 1 litre water). You want your solution to be thin but not watery. You can use a sponge or a brush (a large varnish brush works well) to put the solution onto your plate. Cover the whole plate, brushing in a small circular motion, the solution should become soapy. Spend around 5 minutes brushing the plate with the degreasing solution.
Small scraper with 3 edges[/caption]
You will know when the plate is ready because if you gently run your finger along the edge it will be smooth.
Next degrease the plate. Time to put your latex gloves on!
One way of doing this is to create your own degreasing solution with whiting powder and vinegar mix (4tbsp vinegar to 1 litre water). You want your solution to be thin but not watery. You can use a sponge or a brush (a large varnish brush works well) to put the solution onto your plate. Cover the whole plate, brushing in a small circular motion, the solution should become soapy. Spend around 5 minutes brushing the plate with the degreasing solution.
 Rinse the plate with water and then dry. We used a hairdryer but paper towels work fine. It's important to dry your plate straight away as they can rust.
Applying ground
There are a few different grounds and techniques you can use here. In my first few attempts I used hard etching ground. We apply ground so that we can see our drawn lines easily and protect everything but the lines from being etched.
Place your metal plate onto a hot plate and rub the hard ground onto it. You don't need a lot here. Use a roller to roll the ground onto your plate evenly. In the end you don't want any metal showing through the ground.
Rinse the plate with water and then dry. We used a hairdryer but paper towels work fine. It's important to dry your plate straight away as they can rust.
Applying ground
There are a few different grounds and techniques you can use here. In my first few attempts I used hard etching ground. We apply ground so that we can see our drawn lines easily and protect everything but the lines from being etched.
Place your metal plate onto a hot plate and rub the hard ground onto it. You don't need a lot here. Use a roller to roll the ground onto your plate evenly. In the end you don't want any metal showing through the ground.
 In your imagination, the ground would begin to melt as you rub it onto the plate.
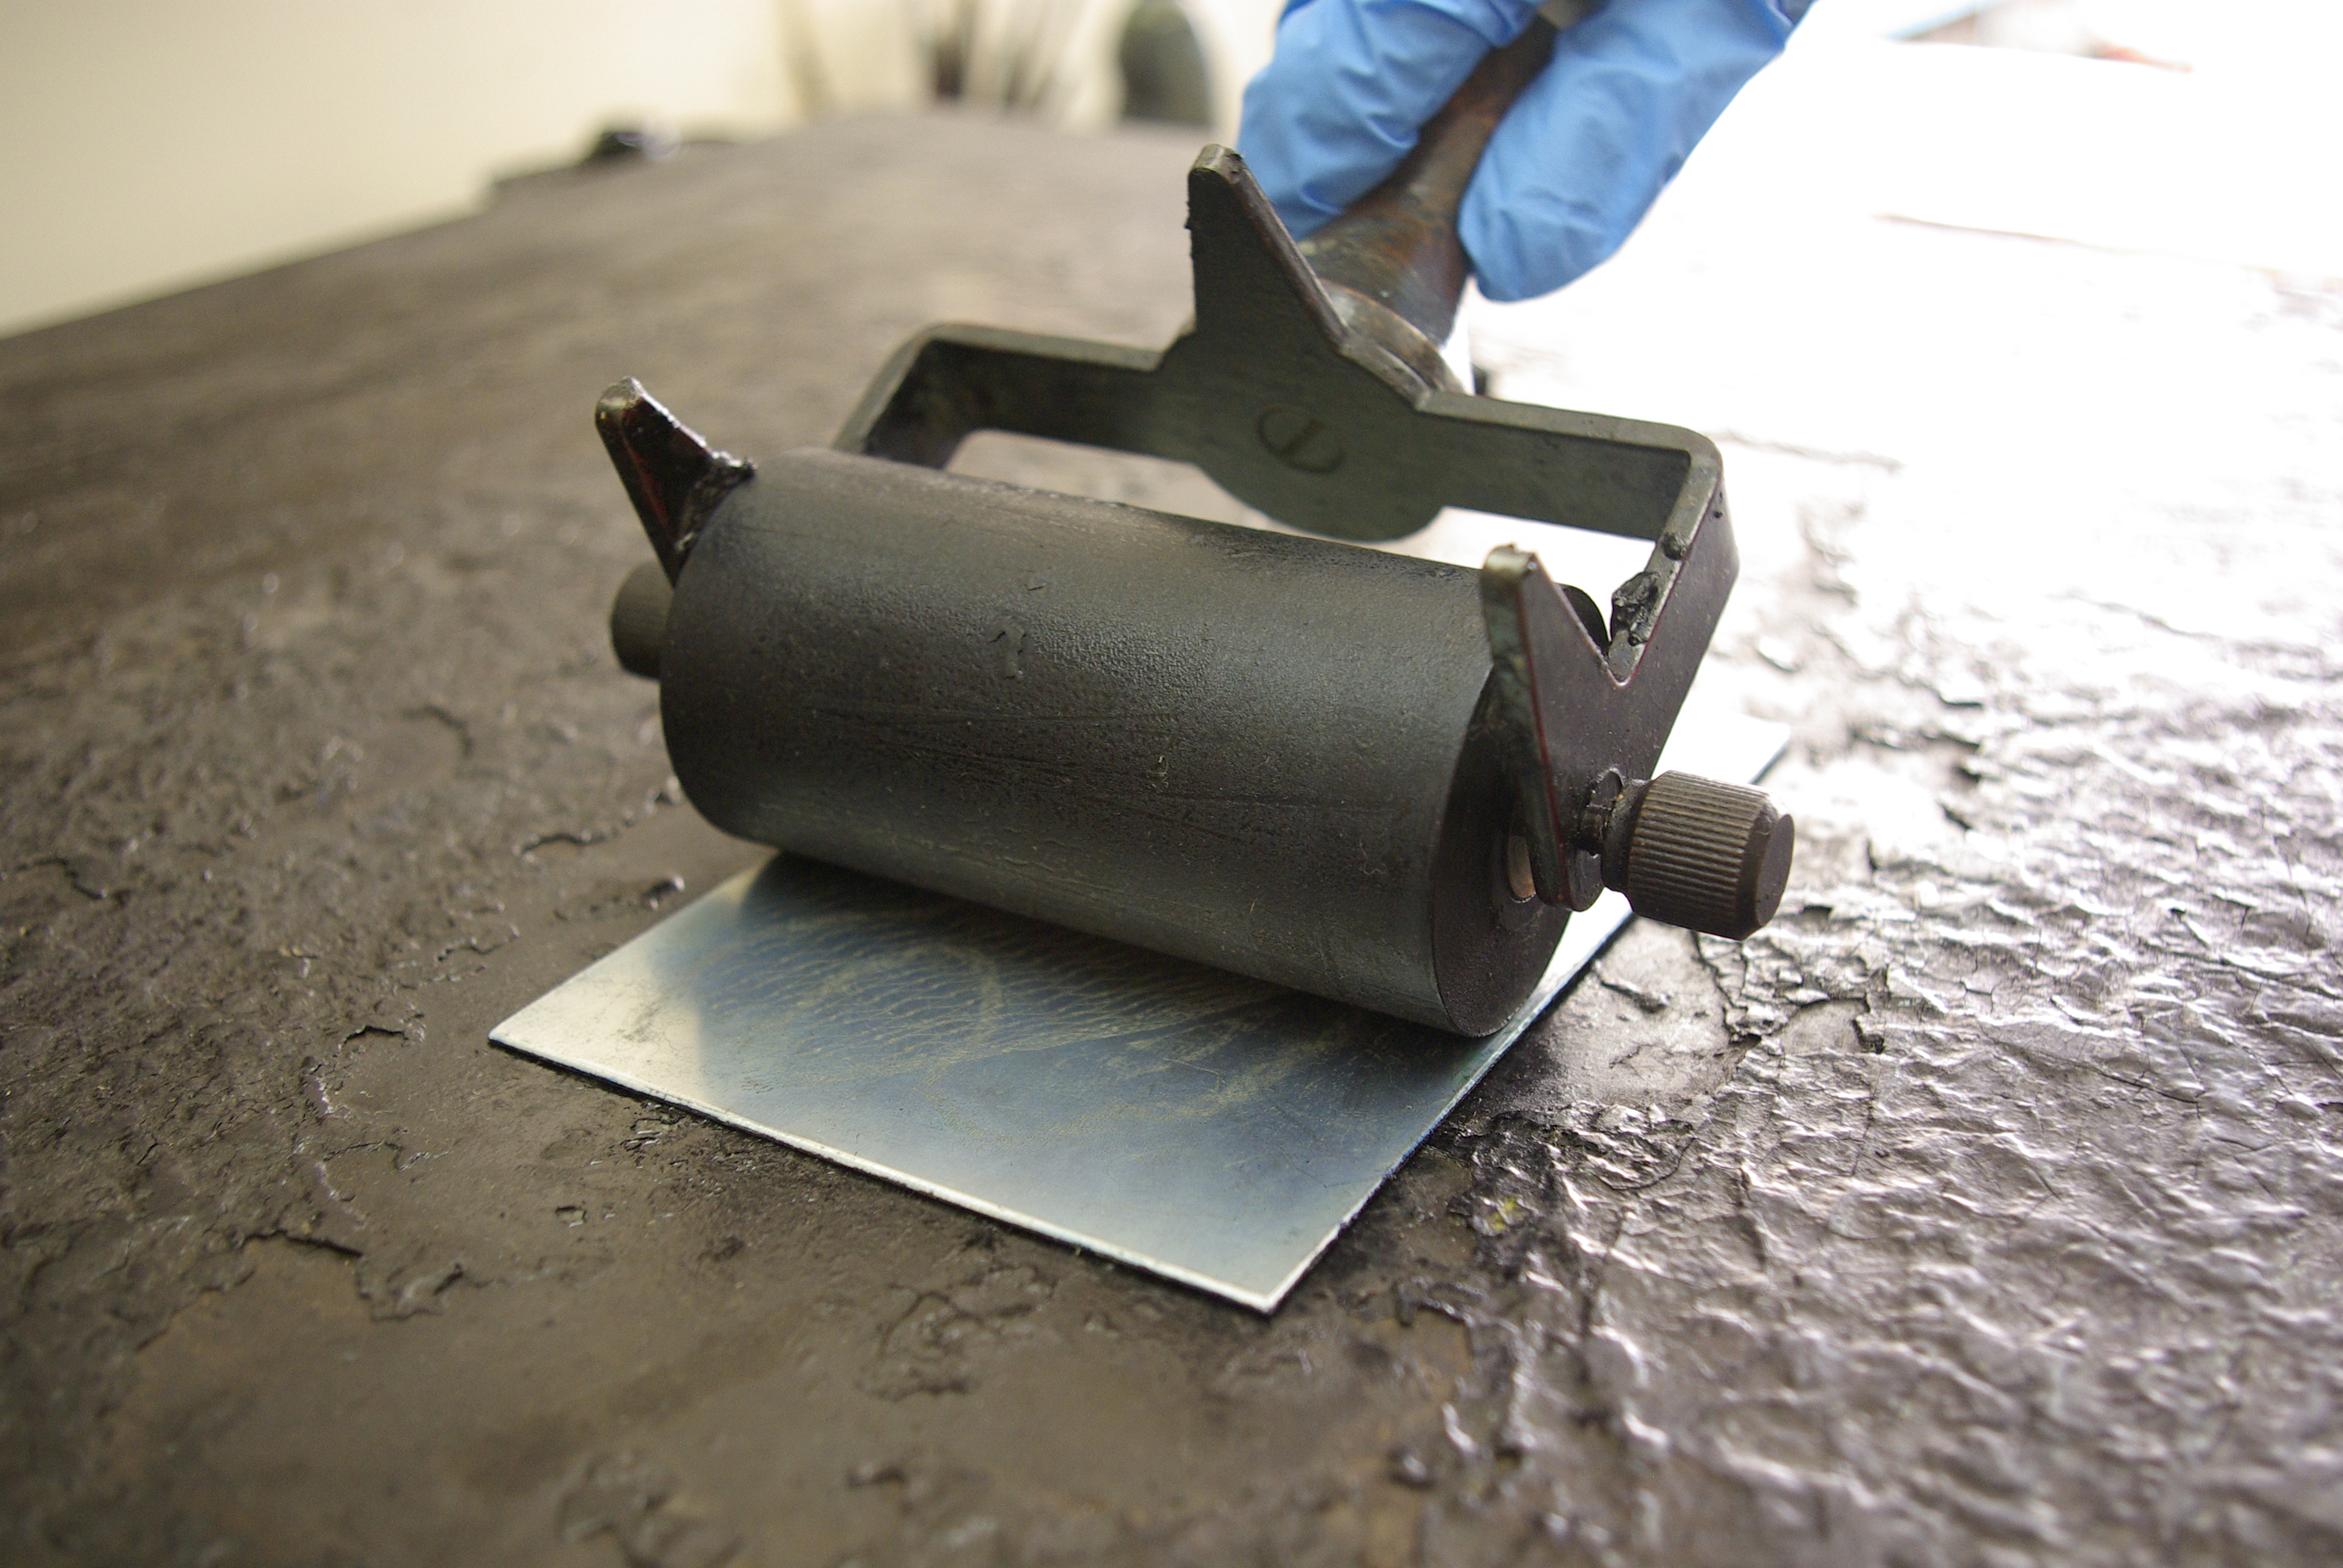 Here we imagine the plate is covered in black ground and smooth it all over the plate with the roller.
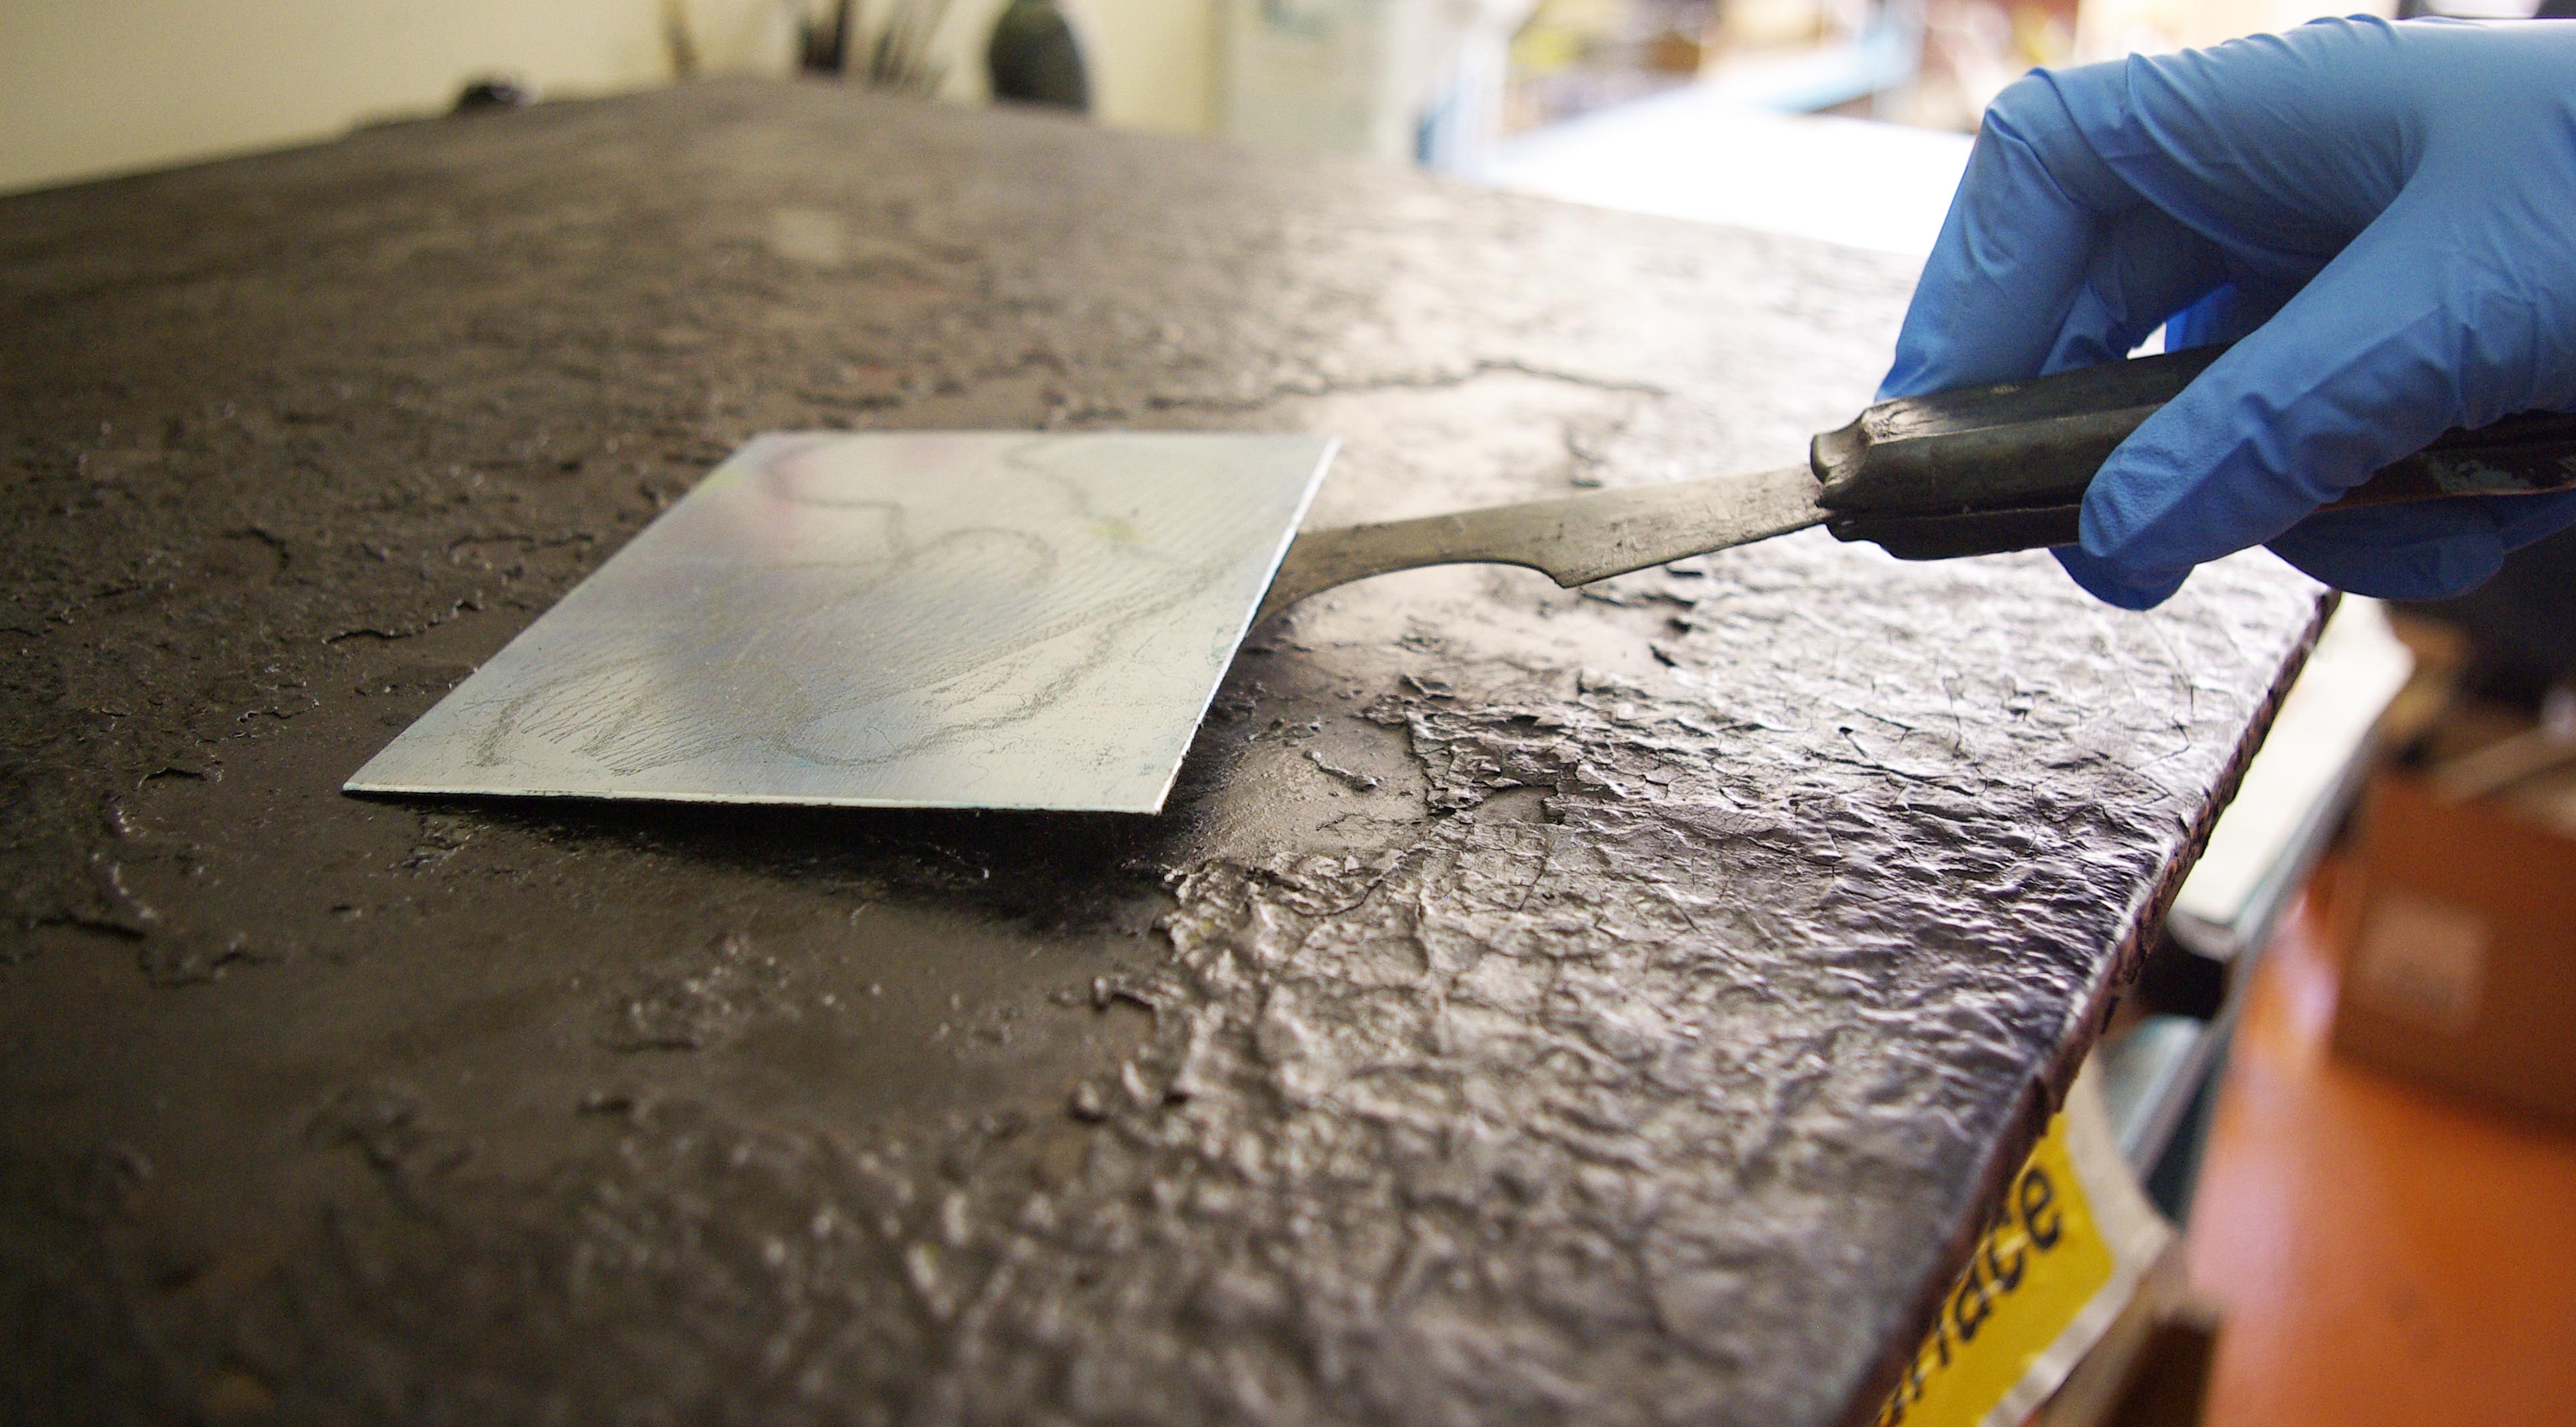 The plate will be hot so don't pick it up with your hands! Ouch!
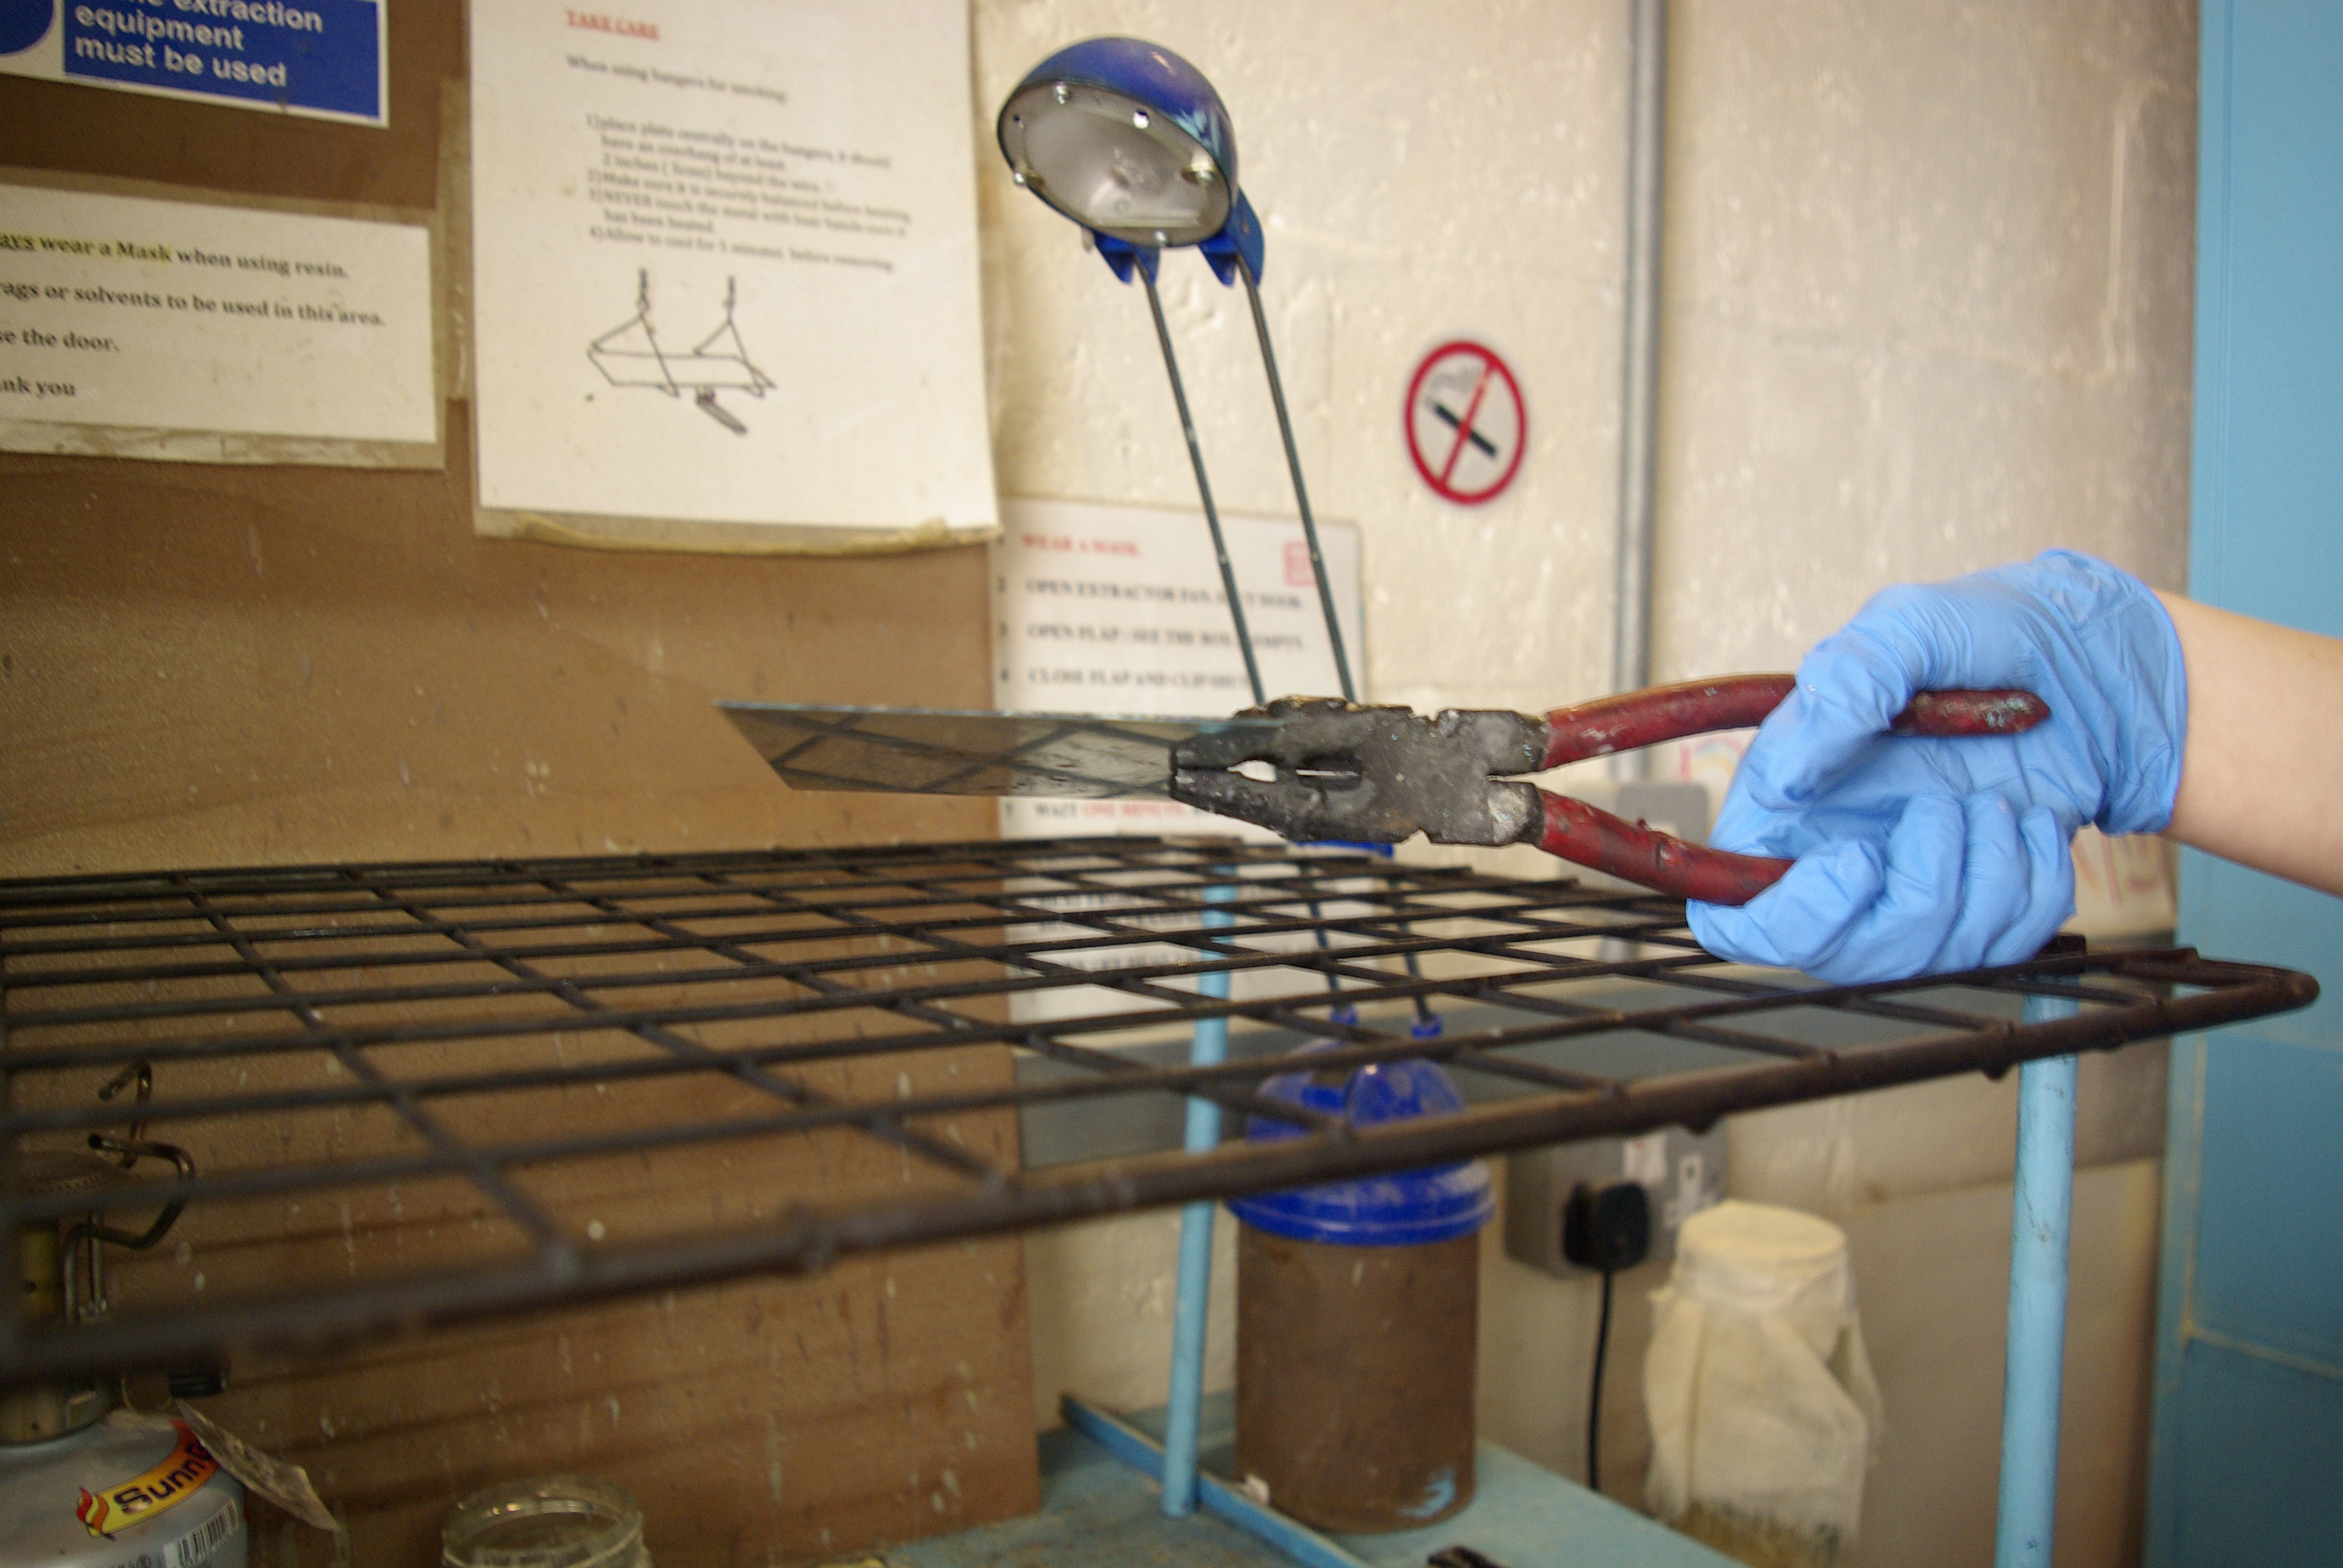
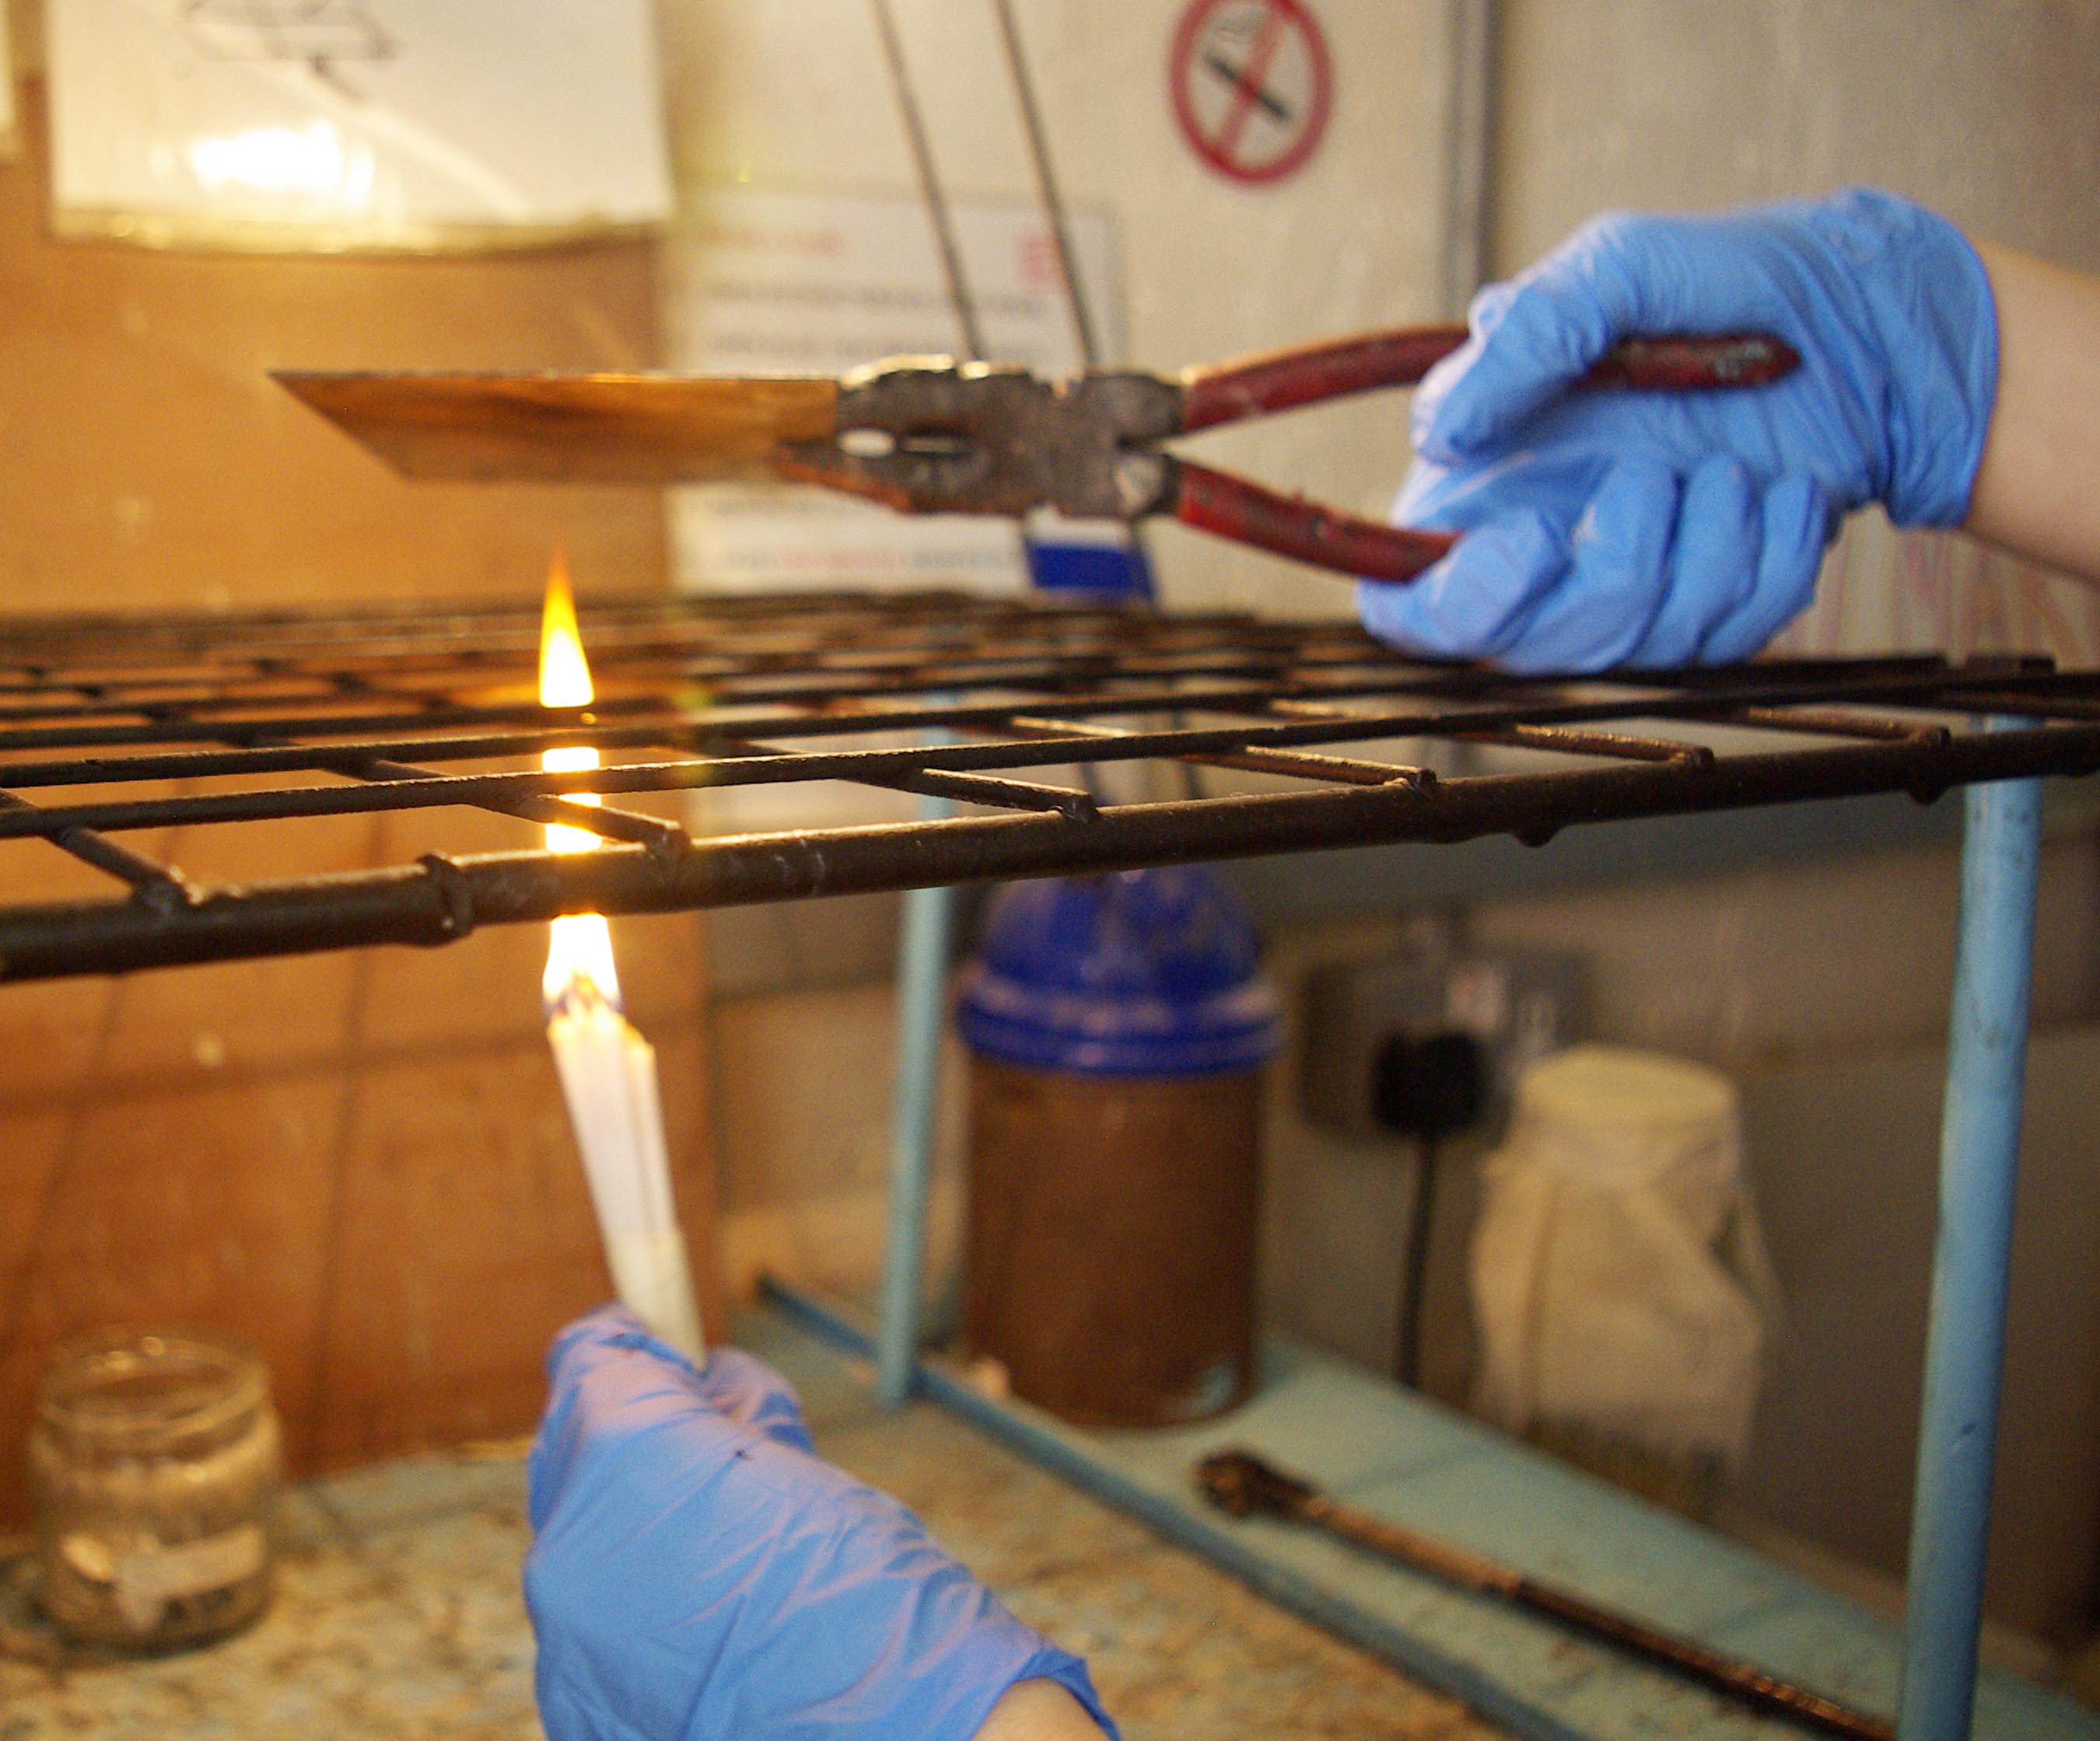
Next we can smoke the plate. Smoking it is not compulsory but it darkens the plate which enables you see lines you have drawn more easily and it can cover any bits that you missed when rolling the ground on.
Hold the plate upside down using a hand vice or pliers (ground side facing down). Bring a flame (using tapers gives you lots of space to keep the flame away from your hands) to just under the plate, move it around fluidly until you can see the ground changing colour then quickly move to the next part of the plate. Try to work logically from one edge to the next, do not stay in one spot too long.
The plate will be hot so don't pick it up with your hands! Ouch!
Next we can smoke the plate. Smoking it is not compulsory but it darkens the plate which enables you see lines you have drawn more easily and it can cover any bits that you missed when rolling the ground on.
Hold the plate upside down using a hand vice or pliers (ground side facing down). Bring a flame (using tapers gives you lots of space to keep the flame away from your hands) to just under the plate, move it around fluidly until you can see the ground changing colour then quickly move to the next part of the plate. Try to work logically from one edge to the next, do not stay in one spot too long.

 Once complete check your plate for any blemishes or areas that have been missed. Use stopping out varnish to paint over any marks. Stop out varnish does exactly as it says- it stops areas of the plate from being etched.
The final step of preparing the plate (phew!) is to protect the back of the plate. Use car spray (usually called etch primer) and spray the back of the plate. Leave to dry!
Drawing on the plate
There are many, many tools that you can use to create lines and textures in your plate. From drypoints (to create linear burr) to roulettes (creates areas of tone using dots) to scraper burnishers (scraping end and a burnishing end for polishing) to burnishers (making corrections to a bitten plate).
[caption id="attachment_1126" align="alignnone" width="584"]
Once complete check your plate for any blemishes or areas that have been missed. Use stopping out varnish to paint over any marks. Stop out varnish does exactly as it says- it stops areas of the plate from being etched.
The final step of preparing the plate (phew!) is to protect the back of the plate. Use car spray (usually called etch primer) and spray the back of the plate. Leave to dry!
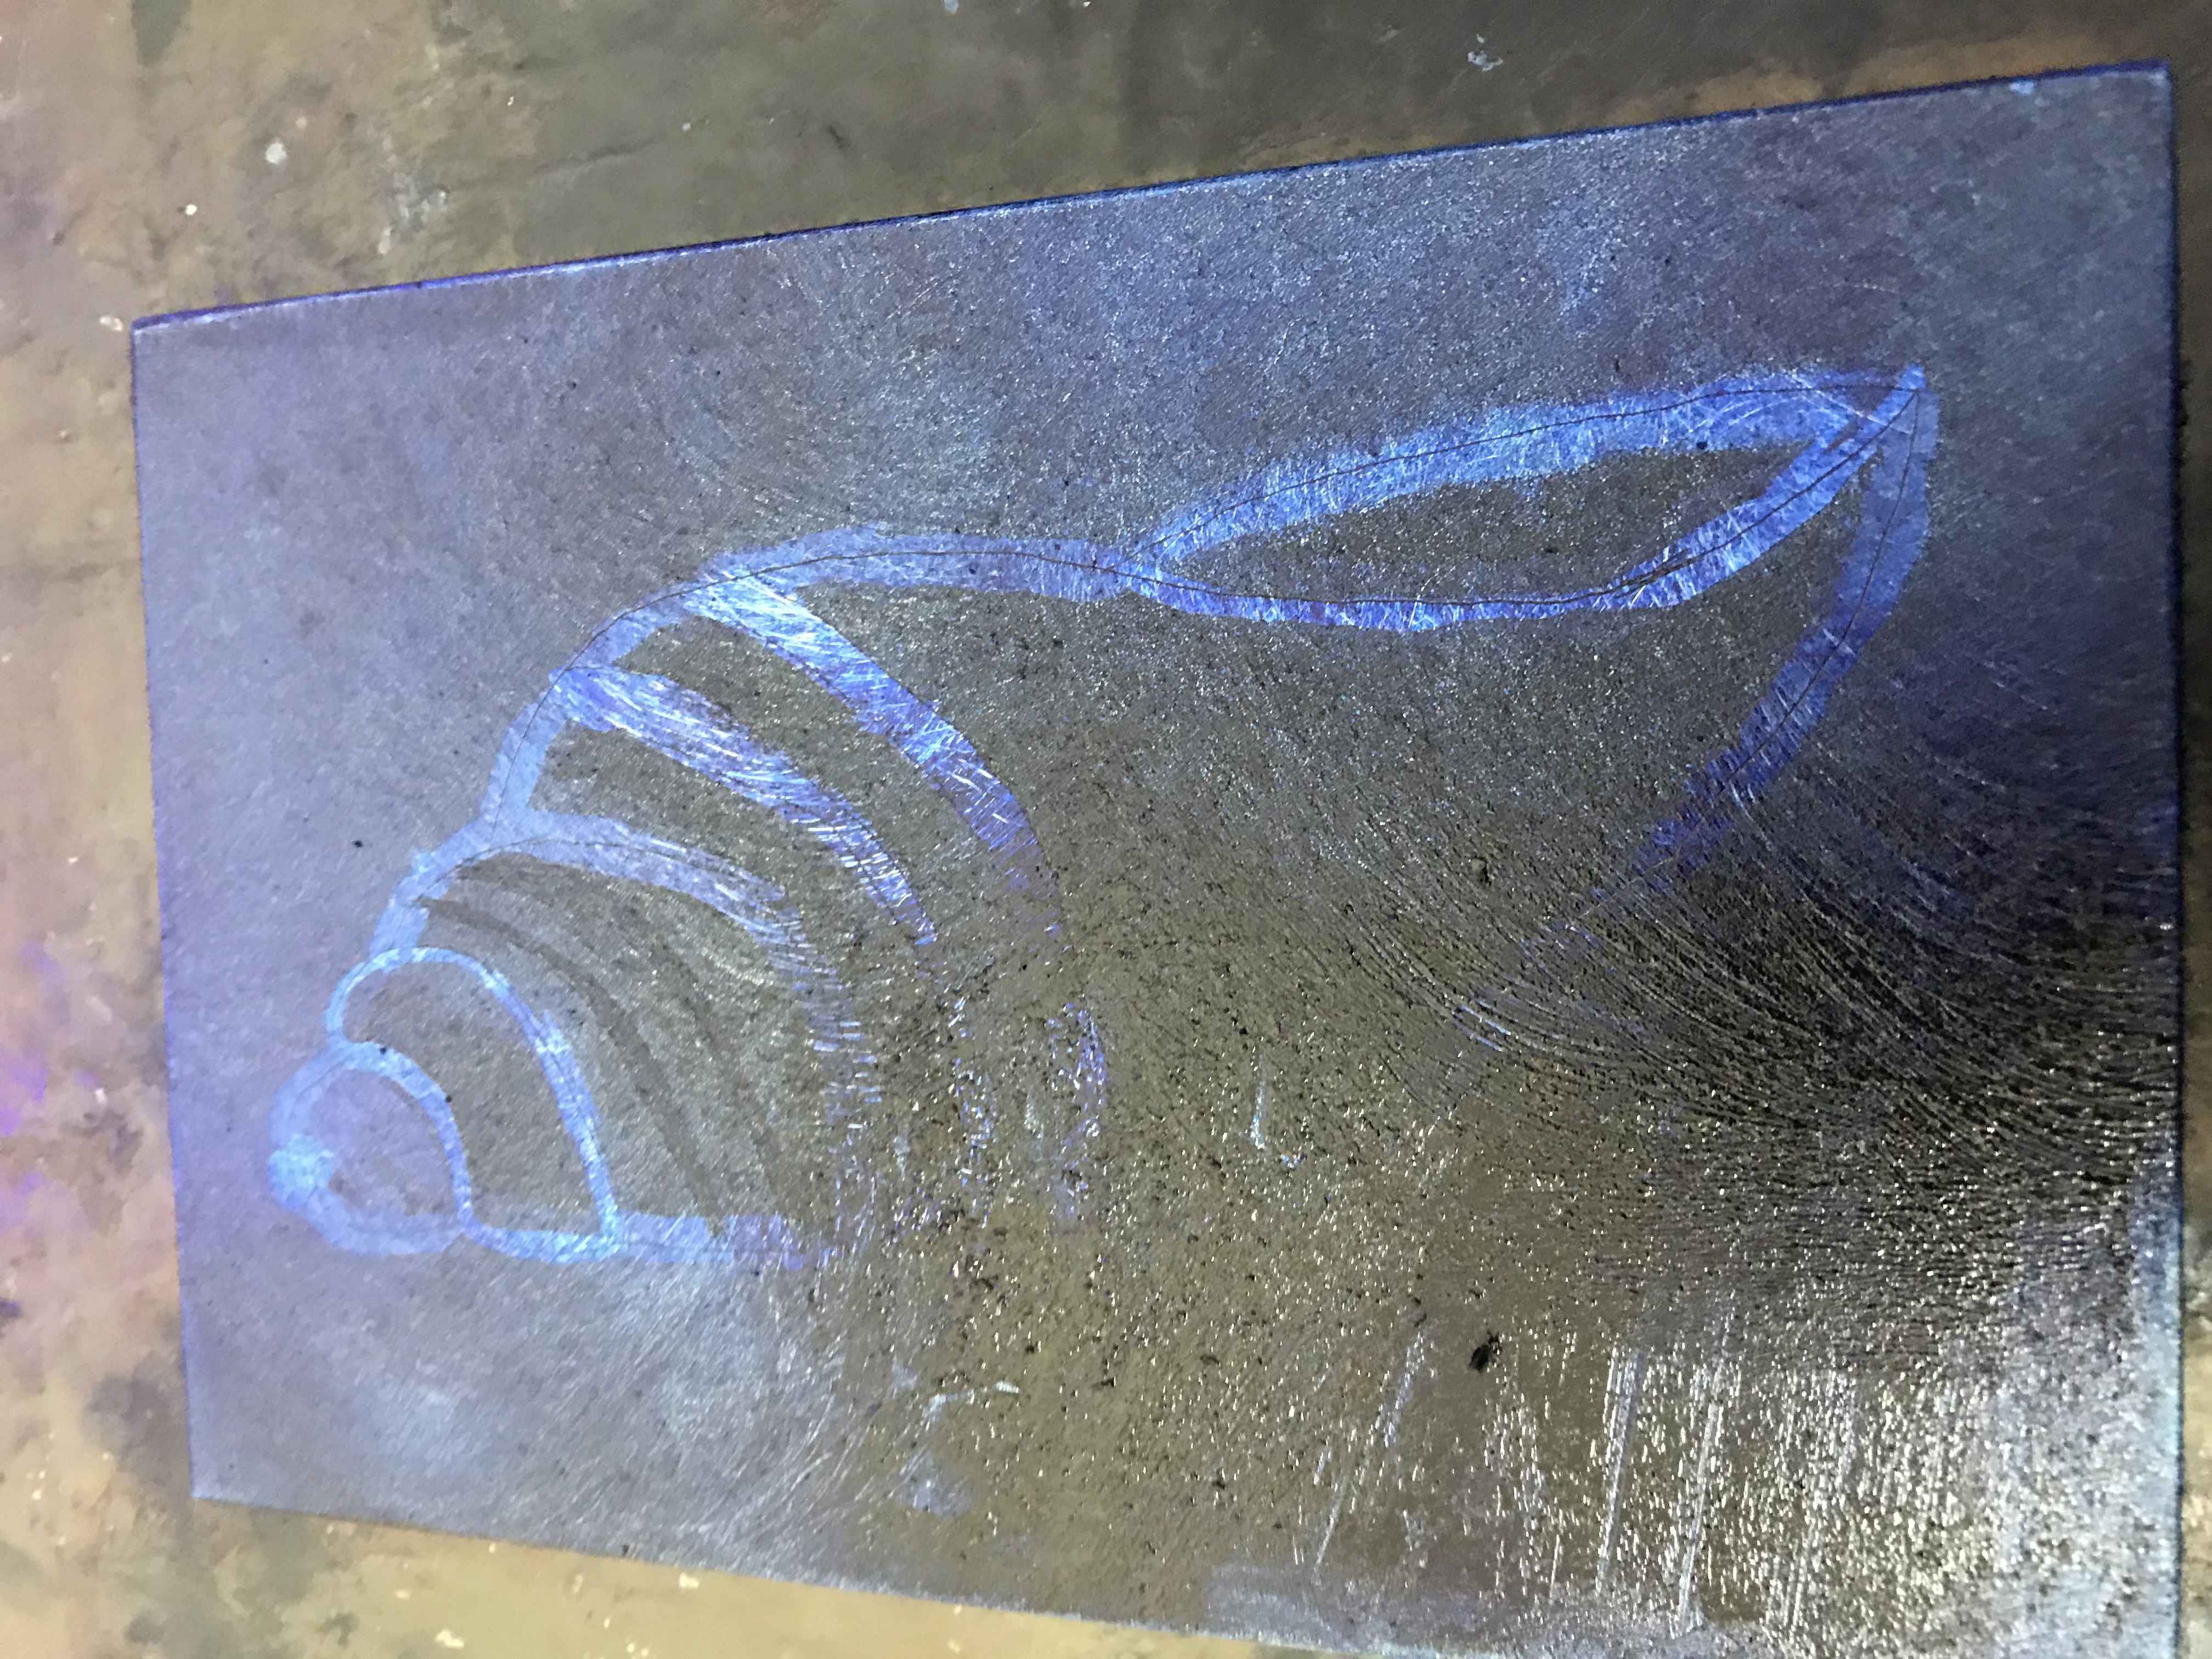
Drawing on the plate
There are many, many tools that you can use to create lines and textures in your plate. From drypoints (to create linear burr) to roulettes (creates areas of tone using dots) to scraper burnishers (scraping end and a burnishing end for polishing) to burnishers (making corrections to a bitten plate).
[caption id="attachment_1126" align="alignnone" width="584"] My drawn plate with some stop out varnish on it![/caption]
I used the knurled drypoint and a 5mm junior drypoint to create my lines. You don't need to press very hard. Remember, the lines are the bits that will print (it's the opposite to relief printing!).
[caption id="attachment_1145" align="aligncenter" width="584"]
My drawn plate with some stop out varnish on it![/caption]
I used the knurled drypoint and a 5mm junior drypoint to create my lines. You don't need to press very hard. Remember, the lines are the bits that will print (it's the opposite to relief printing!).
[caption id="attachment_1145" align="aligncenter" width="584"]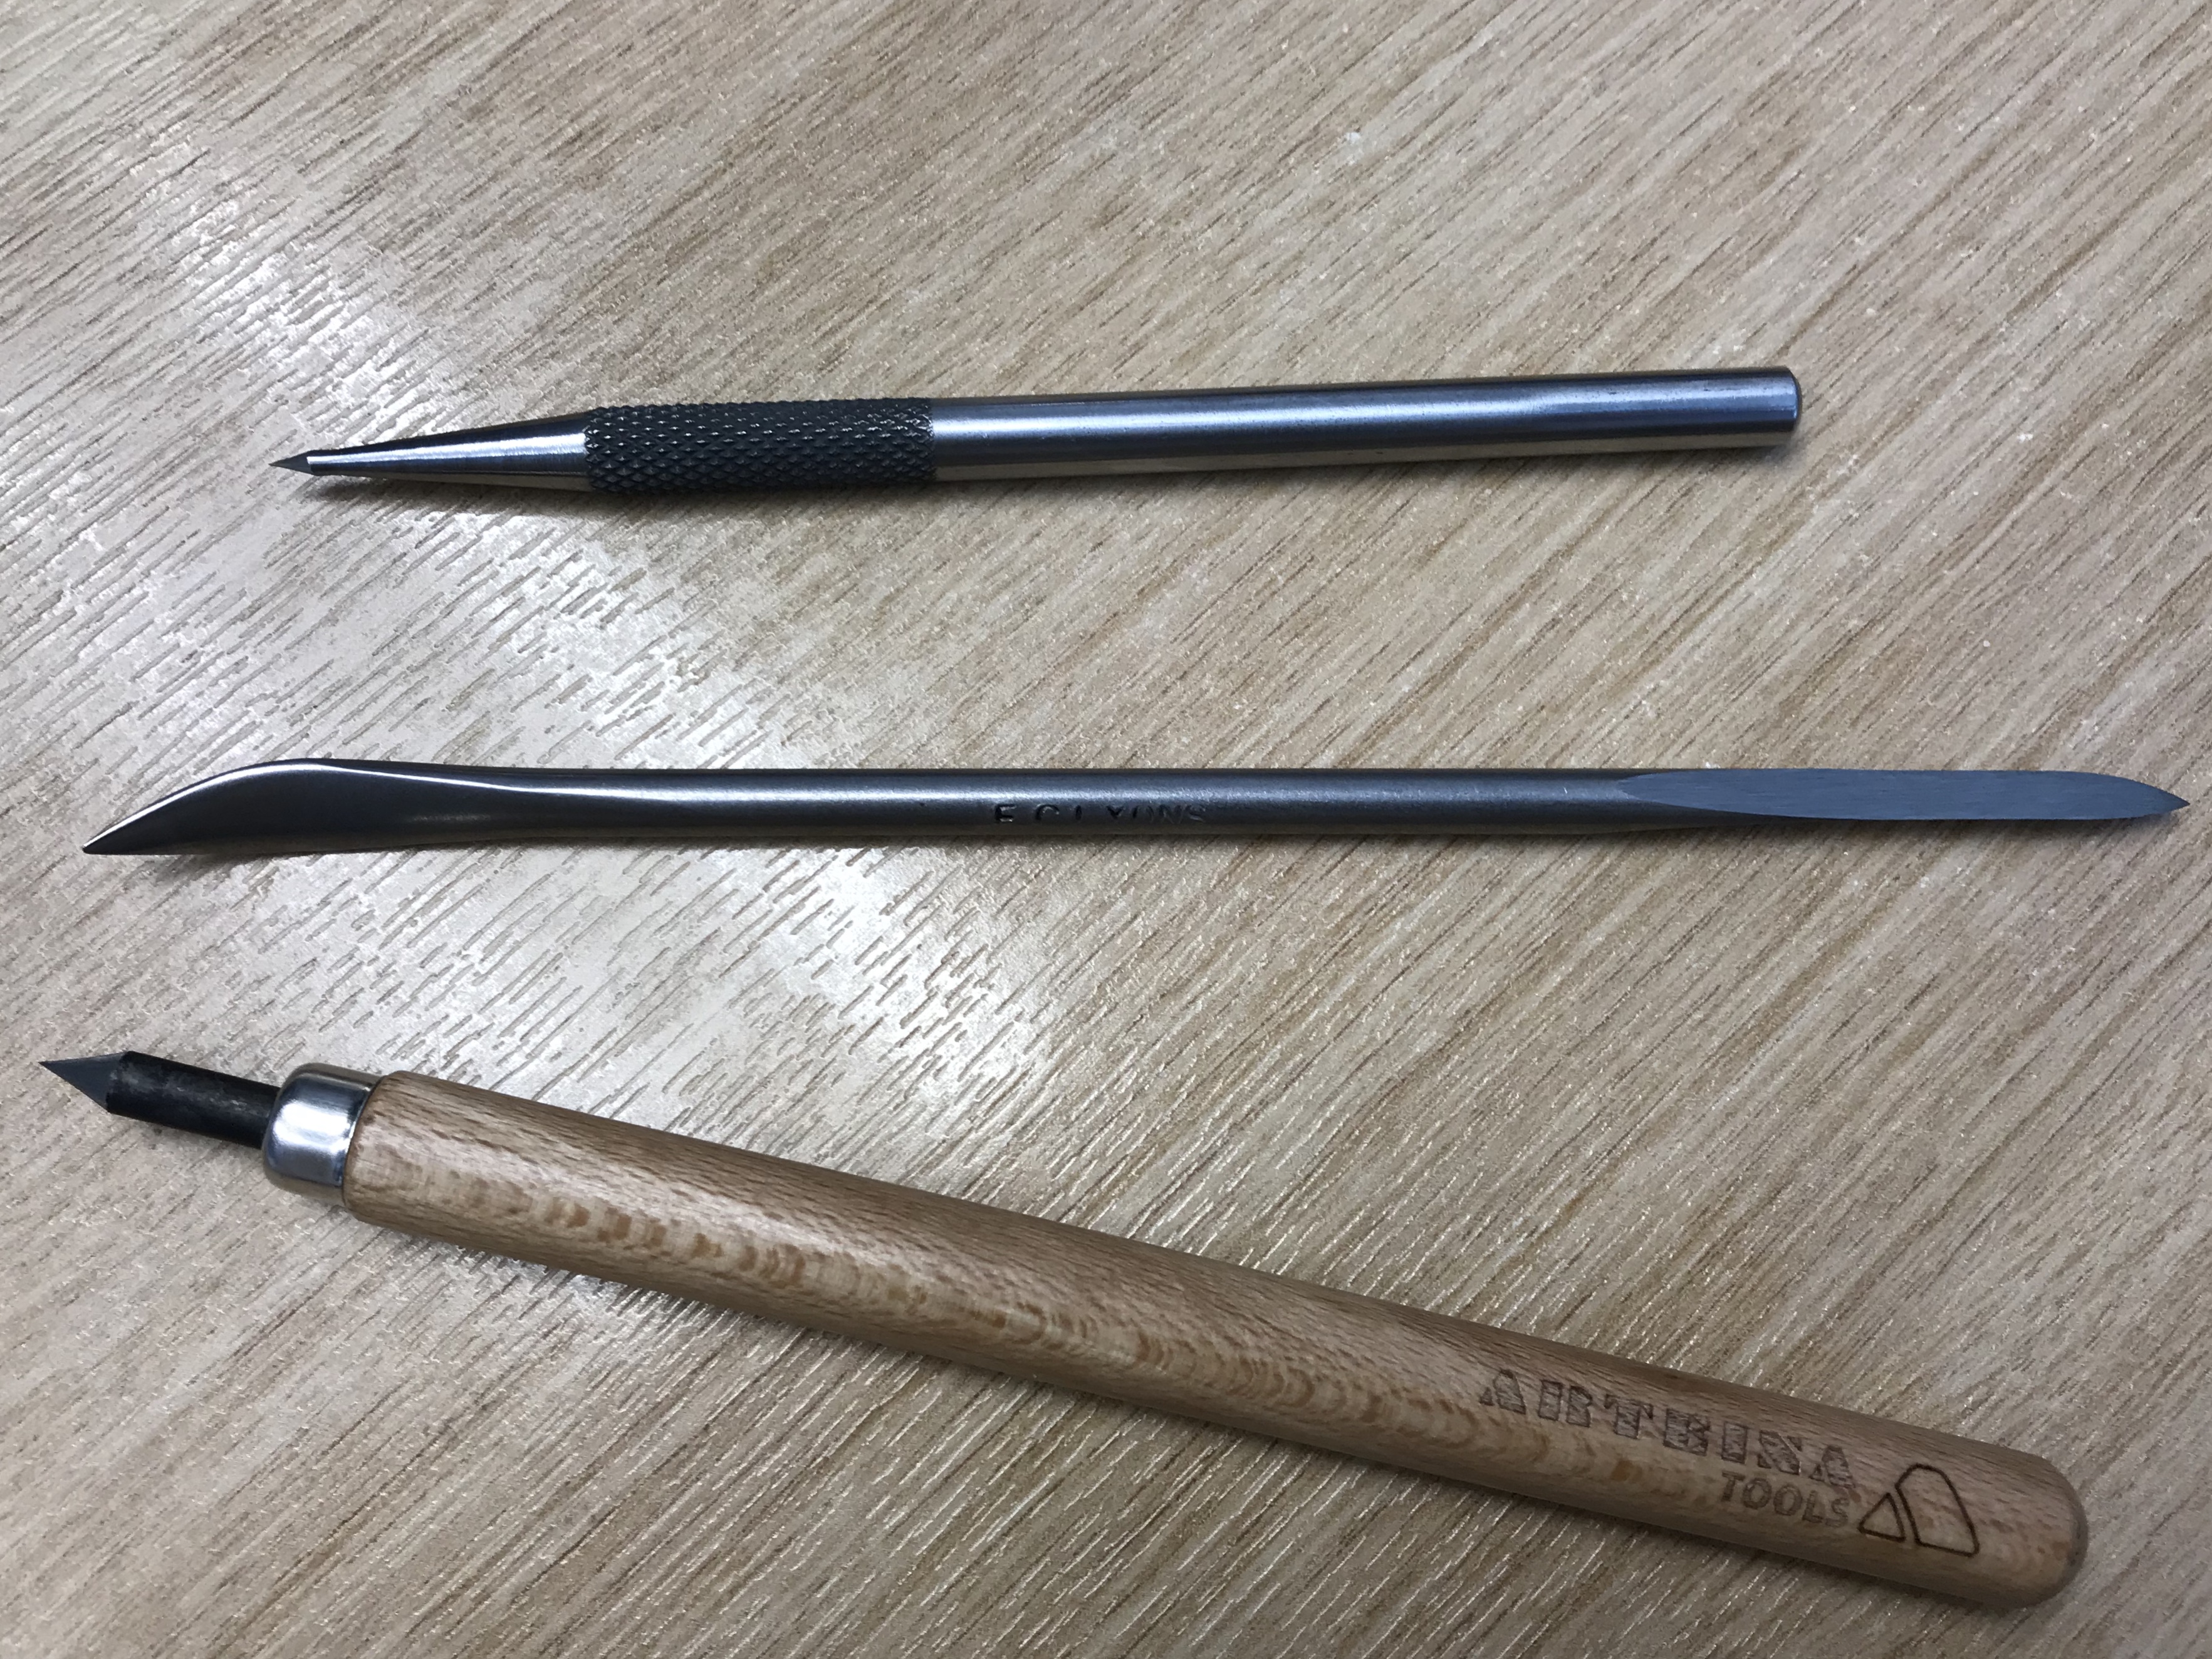 From top to bottom; Arteina knurled drypoint, Scraper burnisher USA, 5mm Arteina Junior Drypoint[/caption]
Biting and stopping out
Once you've completed your masterpiece (or in my case, simplistic shapes!) we move onto biting the plate (otherwise known as etching). Biting is where the acid eats away at the plate and incises your image.
Any areas of the plate that you want to appear lighter (white) you paint with stopping out varnish.
From top to bottom; Arteina knurled drypoint, Scraper burnisher USA, 5mm Arteina Junior Drypoint[/caption]
Biting and stopping out
Once you've completed your masterpiece (or in my case, simplistic shapes!) we move onto biting the plate (otherwise known as etching). Biting is where the acid eats away at the plate and incises your image.
Any areas of the plate that you want to appear lighter (white) you paint with stopping out varnish.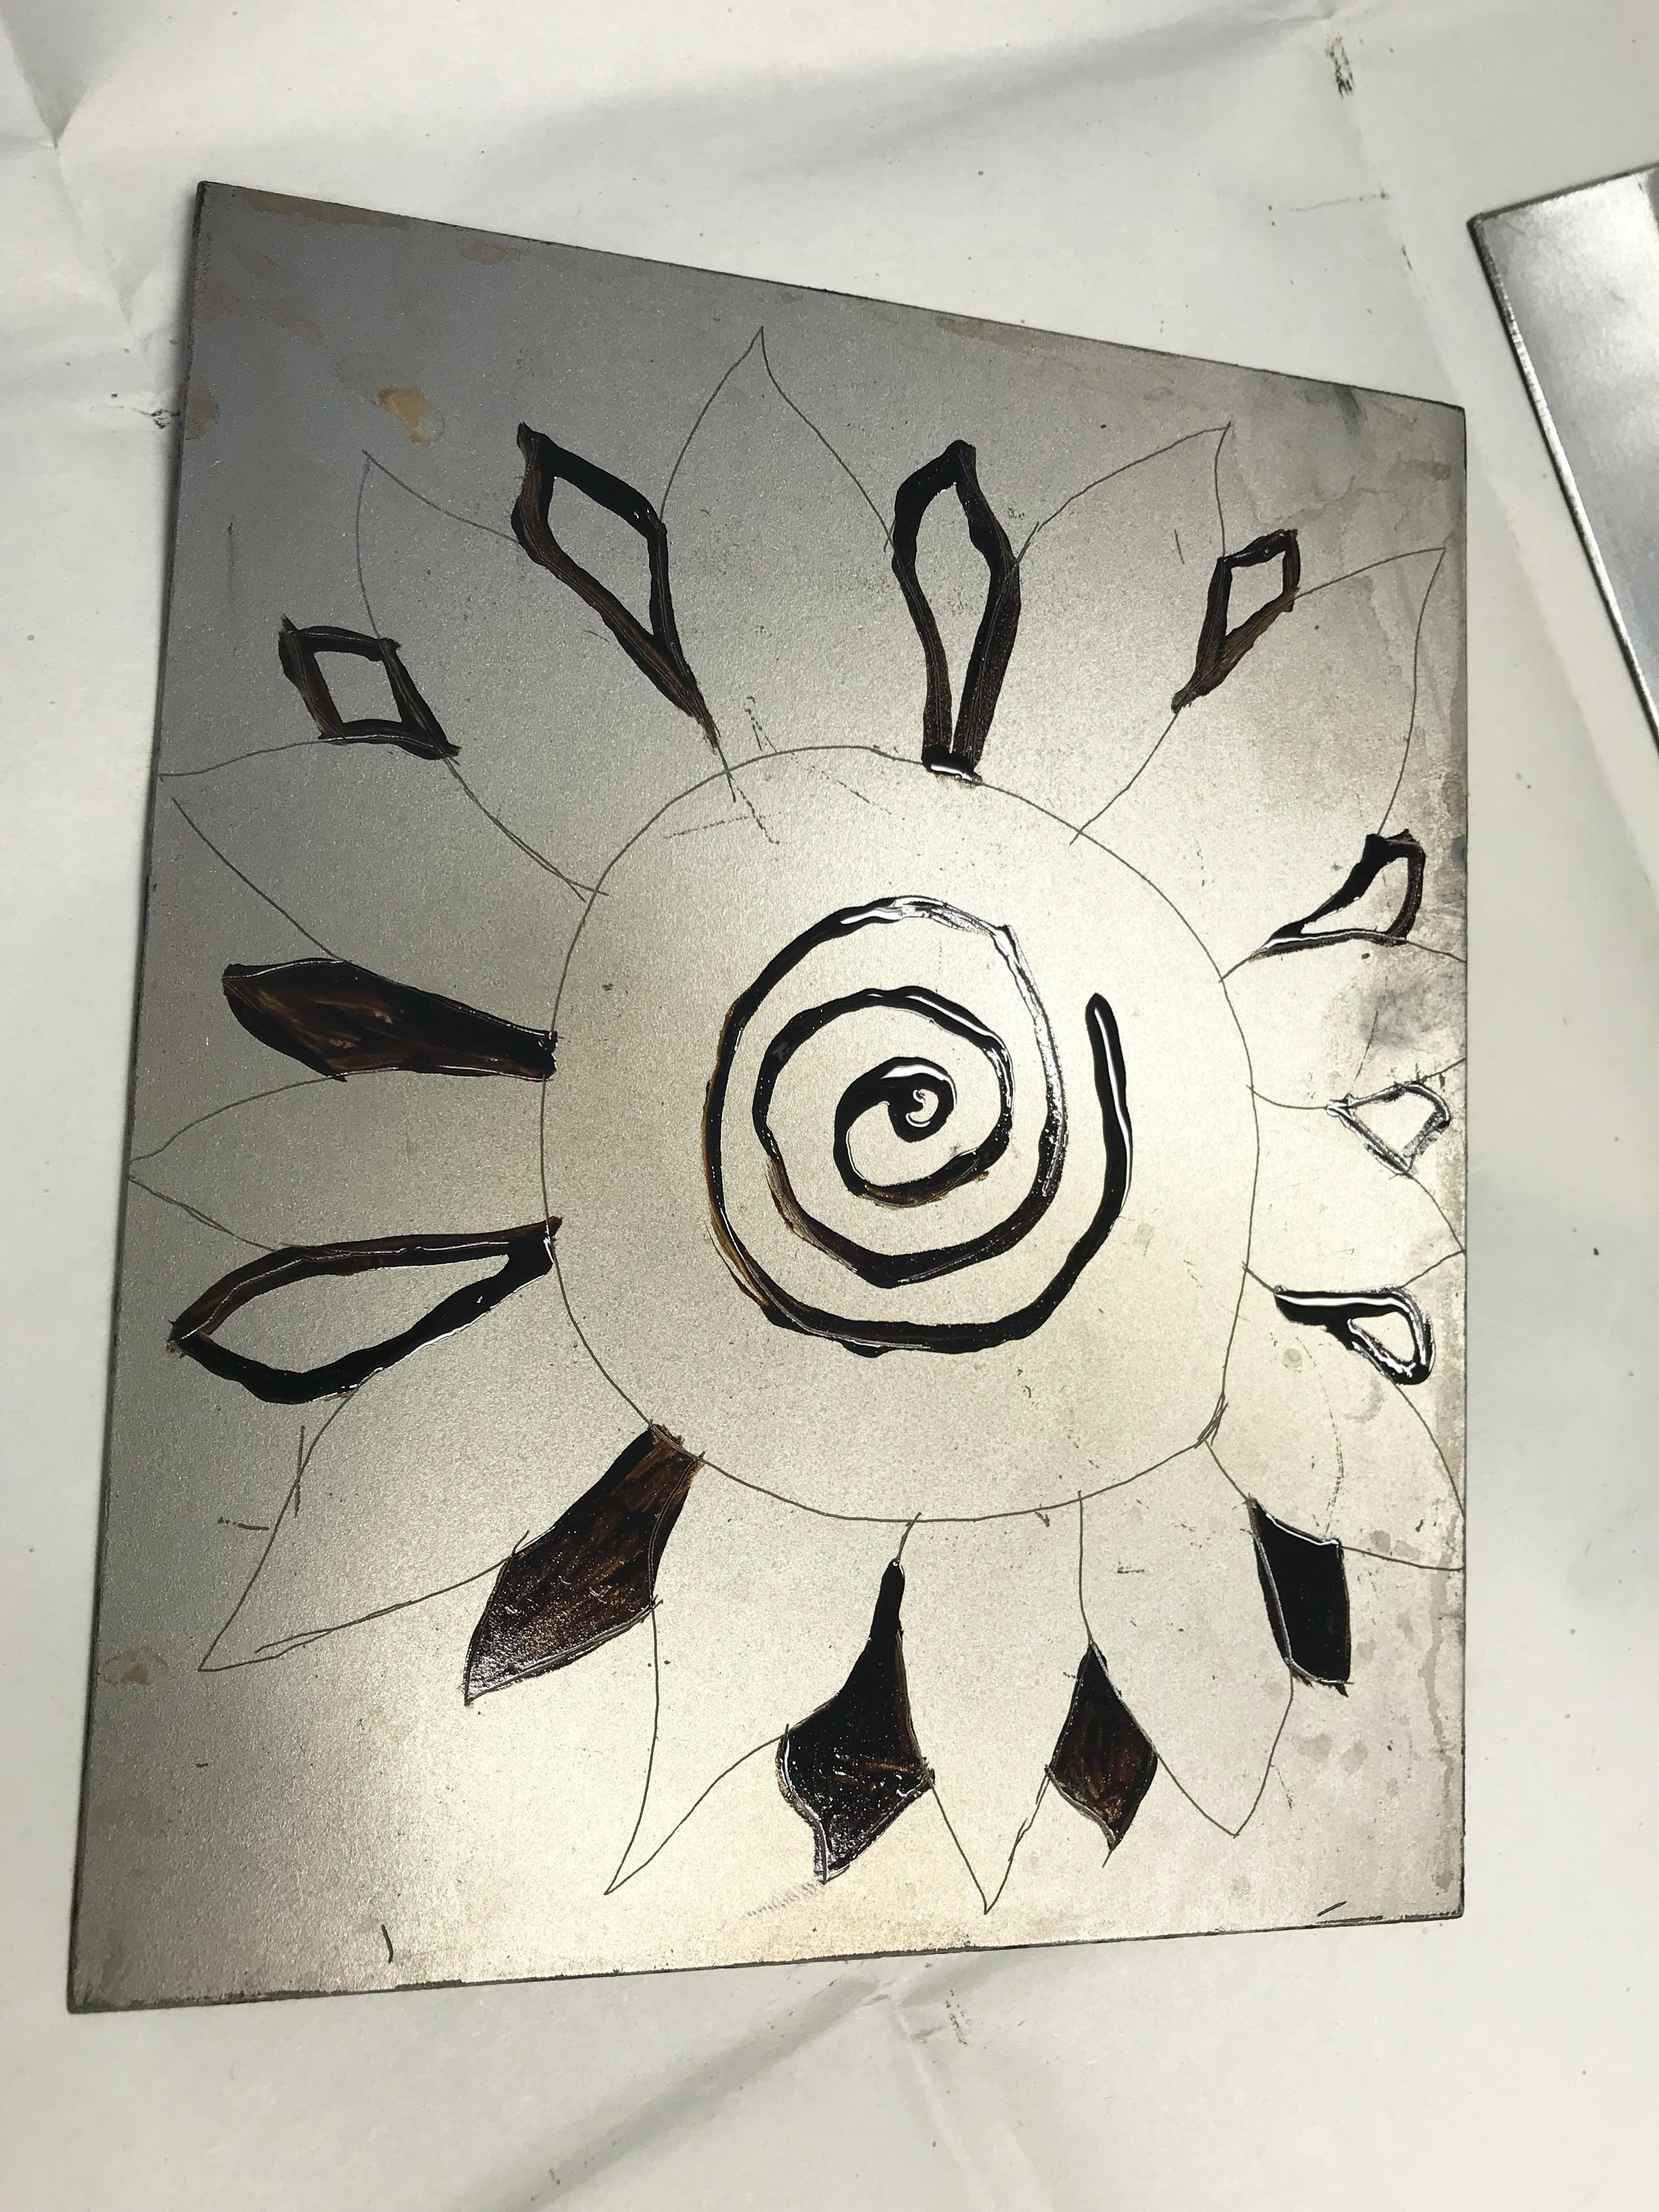 Etching times in the acid can vary immensely depending on the effect you want to create so I won't go into detail too much about time.
You can use ferric chloride as your etching solution if you are using copper plates and copper sulphate for zinc and steel plates as alternatives to acid. The advantage of using copper sulphate is that it doesn't produce harmful vapours (you still need to use gloves when handling any of these substances!). Please ensure you have read up on the health and safety of using these substances.
You can measure the saturation of your solution using a hydrometer.
Once the solution is created pour into an etching dish/bath. You need to use different baths for different metals as they will etch at different speeds. Lay your plate into the bath and gently rock the solution over so the whole plate is covered. If bubbles appear you can gently wipe them off with a feather. Etch to the desired depth (time varies), this will probably be an experimental process if you don't have access to a wizened printmaker. You can always bite the plate again so less is more!
Etching times in the acid can vary immensely depending on the effect you want to create so I won't go into detail too much about time.
You can use ferric chloride as your etching solution if you are using copper plates and copper sulphate for zinc and steel plates as alternatives to acid. The advantage of using copper sulphate is that it doesn't produce harmful vapours (you still need to use gloves when handling any of these substances!). Please ensure you have read up on the health and safety of using these substances.
You can measure the saturation of your solution using a hydrometer.
Once the solution is created pour into an etching dish/bath. You need to use different baths for different metals as they will etch at different speeds. Lay your plate into the bath and gently rock the solution over so the whole plate is covered. If bubbles appear you can gently wipe them off with a feather. Etch to the desired depth (time varies), this will probably be an experimental process if you don't have access to a wizened printmaker. You can always bite the plate again so less is more!

 Rinse with water once the plate is etched to the desired state to prevent the biting continuing. Pat dry with newspaper or rags, then clean the ground off the plate using white spirit.
 Printing
Now, after all that prep, we are ready to print a proof.
You can use pre-prepared etching inks or create your own using pigment and copper plate oil.
We also need to soak the paper we are printing on for about 10 minutes. For etching we would recommend Somerset, BFK Rives, Hahnemuhle, Fabriano Rosaspina or Arches printmaking papers. I used the Fabriano Unica pad as I was only printing very small and could get two prints from one A4 sheet of the pad.
Once your ink is rolled out and ready on an inking slab you can apply it to your plate.
Printing
Now, after all that prep, we are ready to print a proof.
You can use pre-prepared etching inks or create your own using pigment and copper plate oil.
We also need to soak the paper we are printing on for about 10 minutes. For etching we would recommend Somerset, BFK Rives, Hahnemuhle, Fabriano Rosaspina or Arches printmaking papers. I used the Fabriano Unica pad as I was only printing very small and could get two prints from one A4 sheet of the pad.
Once your ink is rolled out and ready on an inking slab you can apply it to your plate. Rest your plate back on a hot plate (a hot plate isn't required but it makes it a lot easier as the ink is easier to wipe!) and use thin paper or cardboard (a small square) to apply the ink to the plate and drag over the surface. You want to get an even level of ink all over the plate. Rub it into the lines using your fingers.
Next we wipe off the ink (and it should hold over the bitten lines).
Rest your plate back on a hot plate (a hot plate isn't required but it makes it a lot easier as the ink is easier to wipe!) and use thin paper or cardboard (a small square) to apply the ink to the plate and drag over the surface. You want to get an even level of ink all over the plate. Rub it into the lines using your fingers.
Next we wipe off the ink (and it should hold over the bitten lines).  Use stiff coarse wiping scrim to wipe the ink gently from the plate. Use very little pressure because we don't want to remove the ink from the lines. Wipe vertically then horizontally starting with one corner first. Once you have done that move in circular motions and you will begin to see the ink coming off.
 Once you have gently taken off as much ink as you like you then use tissue paper to get the stubborn bits (you can use a bit more pressure here).
Your plate should begin looking like my one below.
Once you have gently taken off as much ink as you like you then use tissue paper to get the stubborn bits (you can use a bit more pressure here).
Your plate should begin looking like my one below.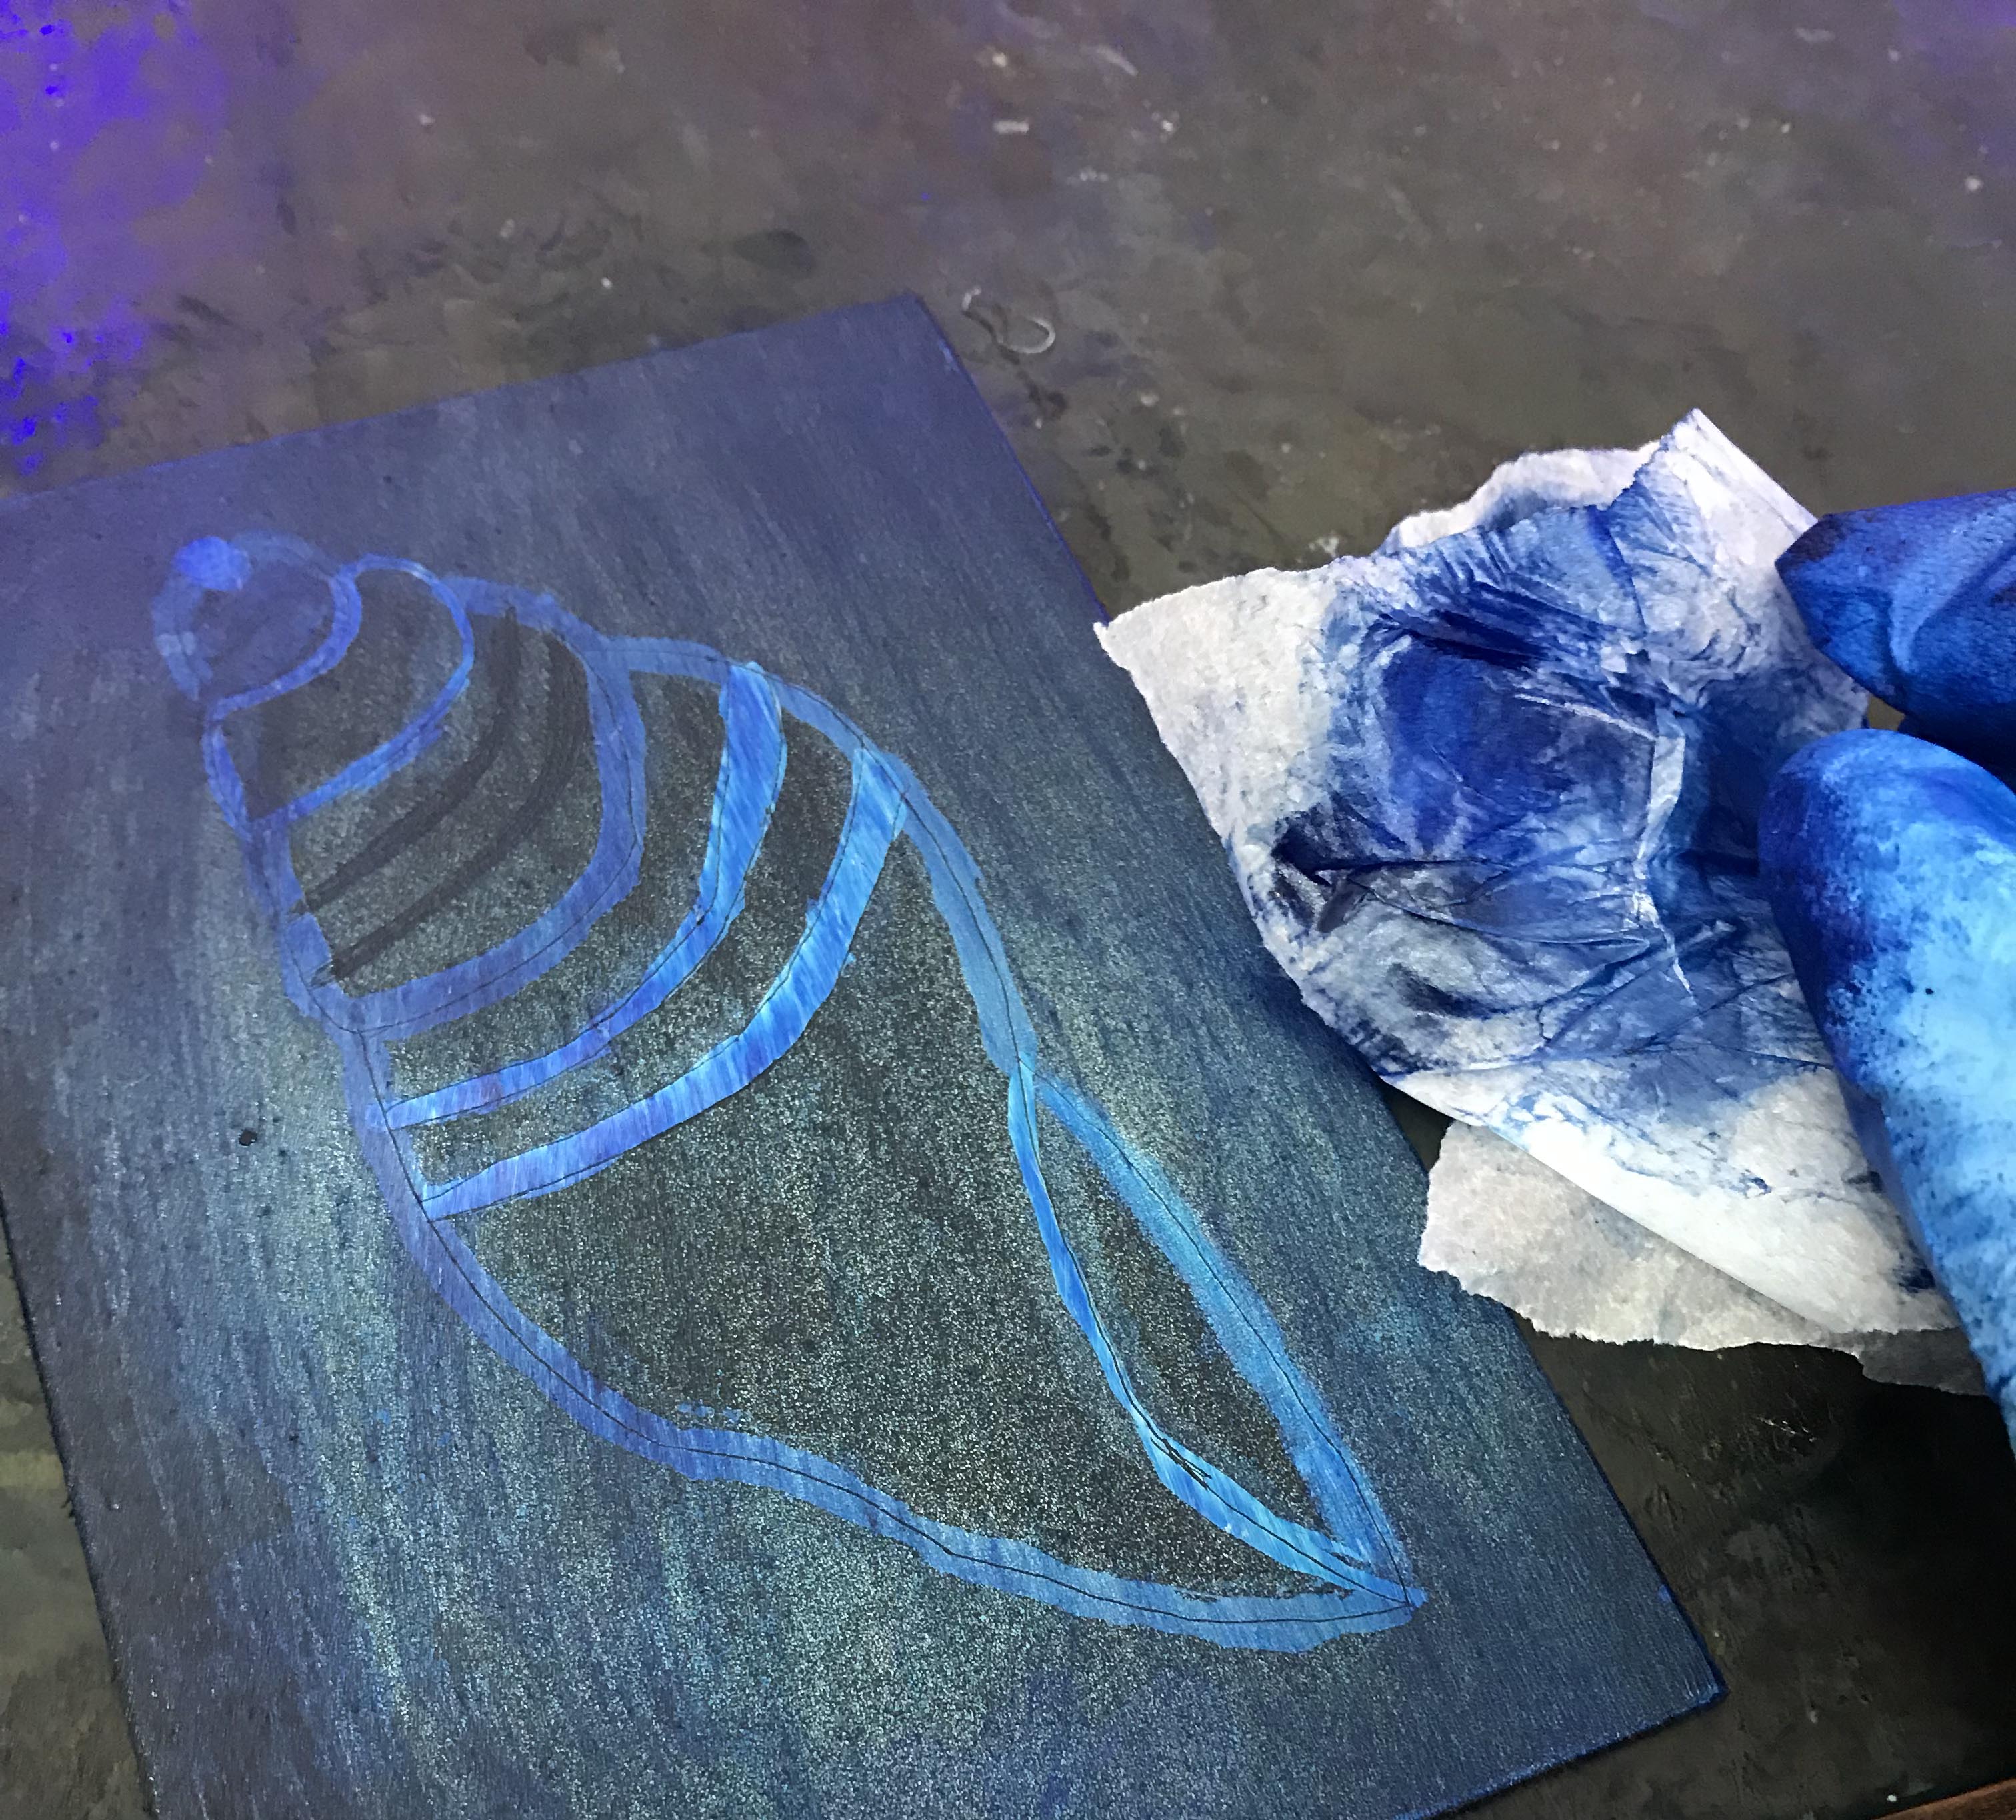 Now is probably a good time to change or remove your gloves so you don't ruin your paper.
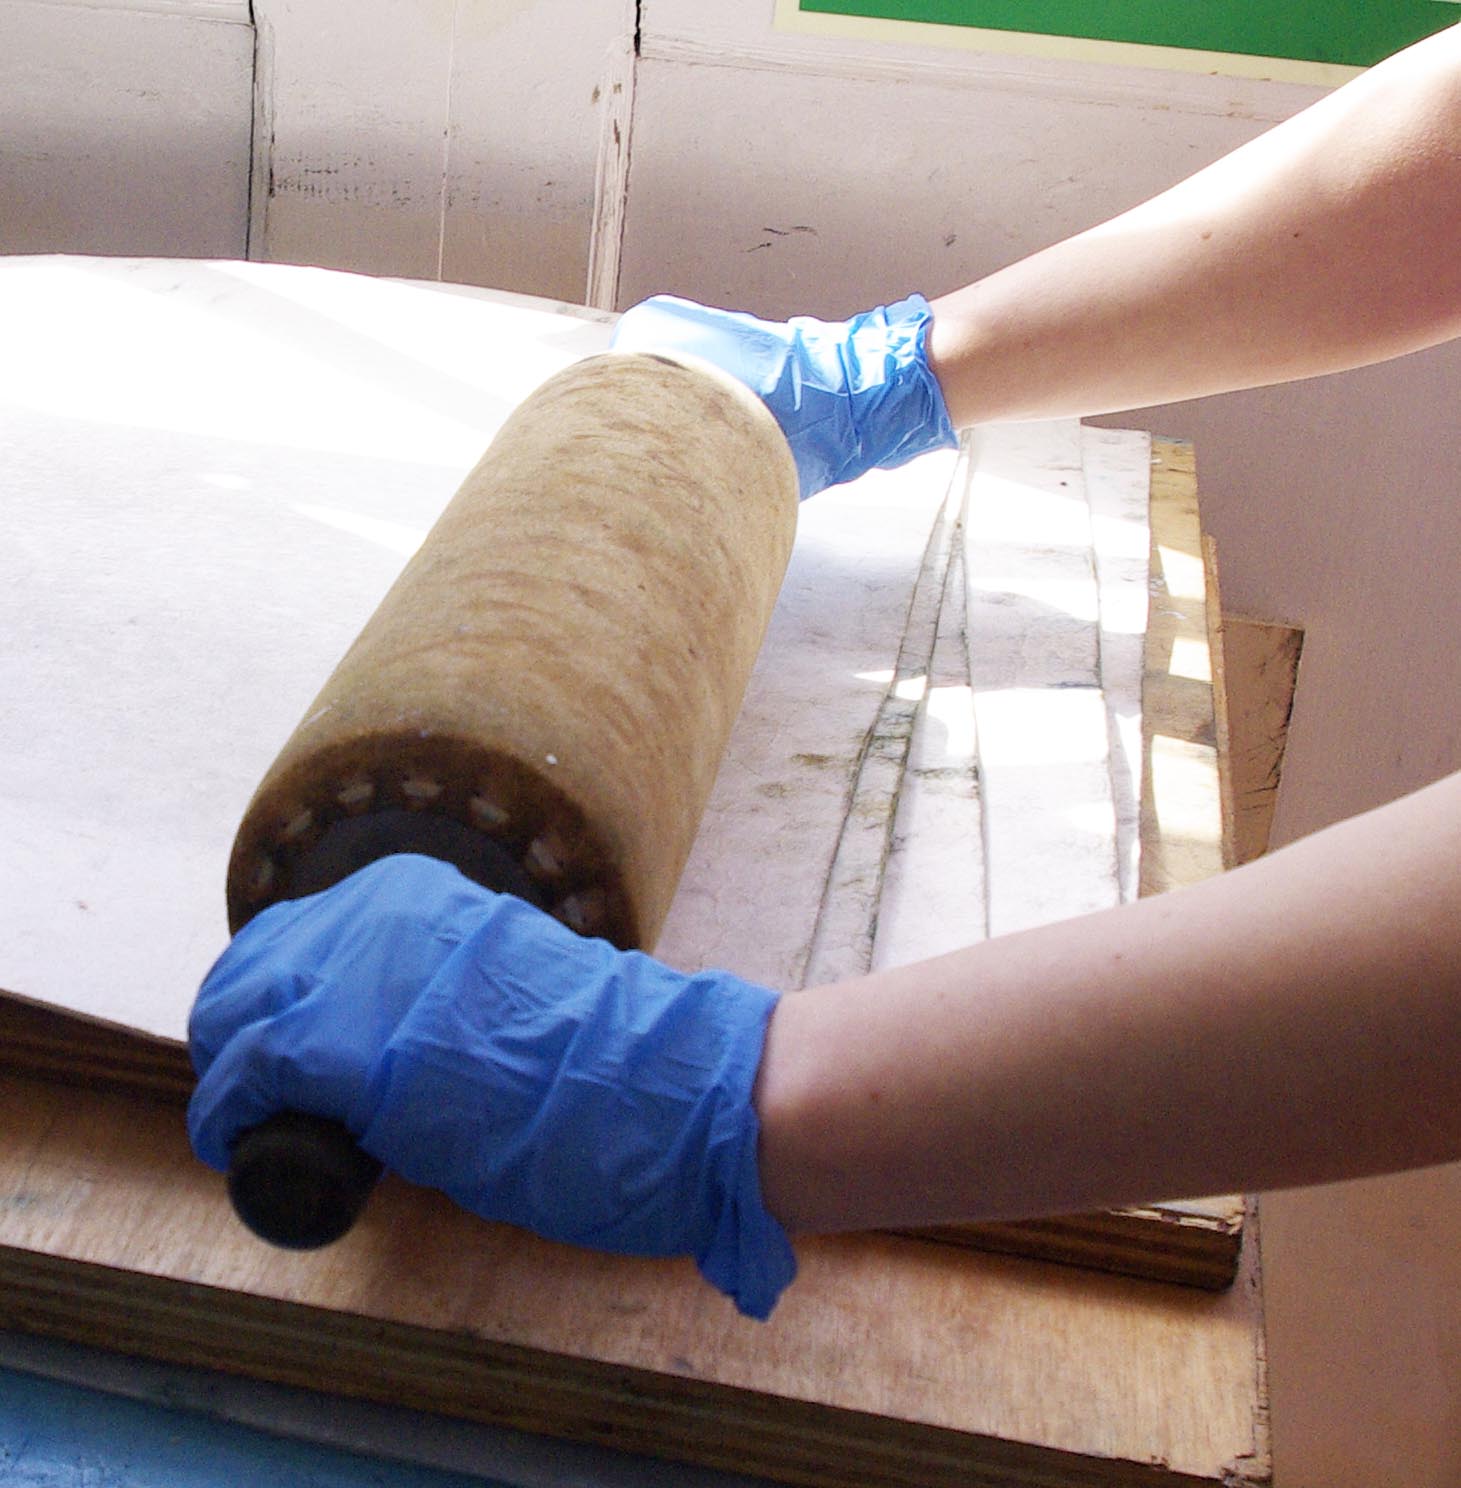
Once the plate is ready dry your paper between some felts (you can use a leather roller) to roll when the paper is between these sheets.
Now is probably a good time to change or remove your gloves so you don't ruin your paper.
Once the plate is ready dry your paper between some felts (you can use a leather roller) to roll when the paper is between these sheets.
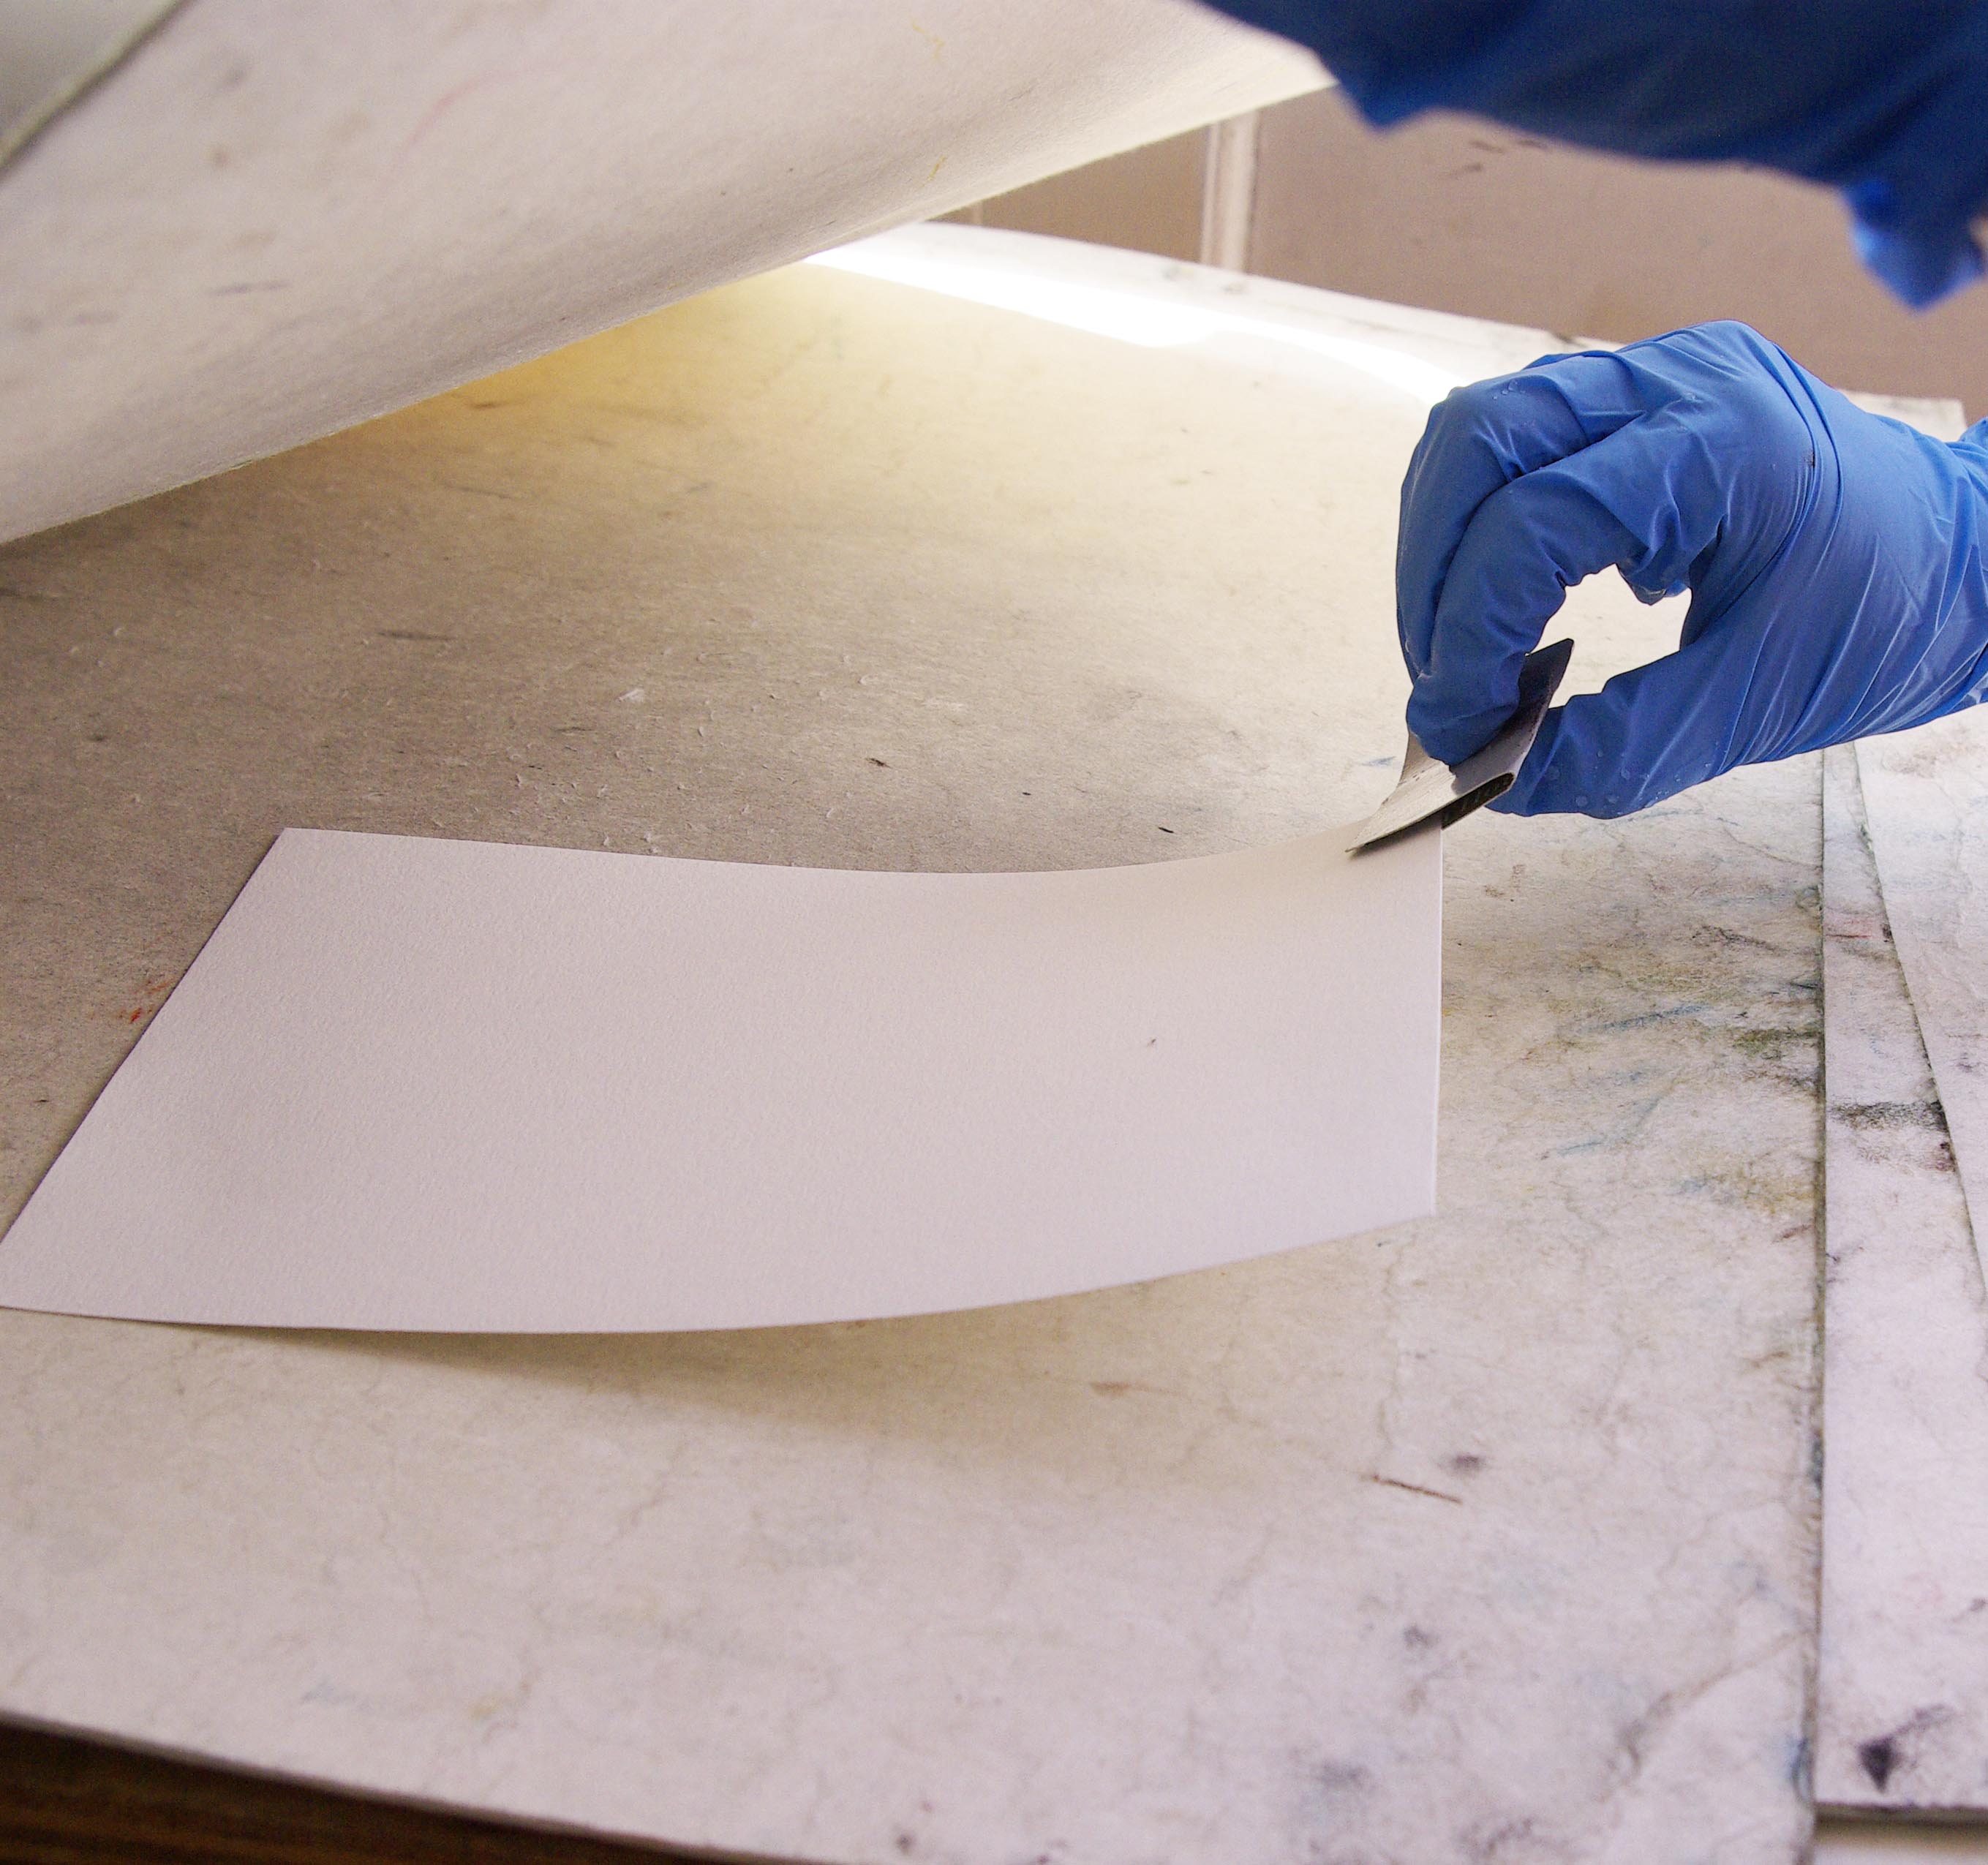 You can use small bits of folded card to handle your paper so that no ink or other substance spoils it.
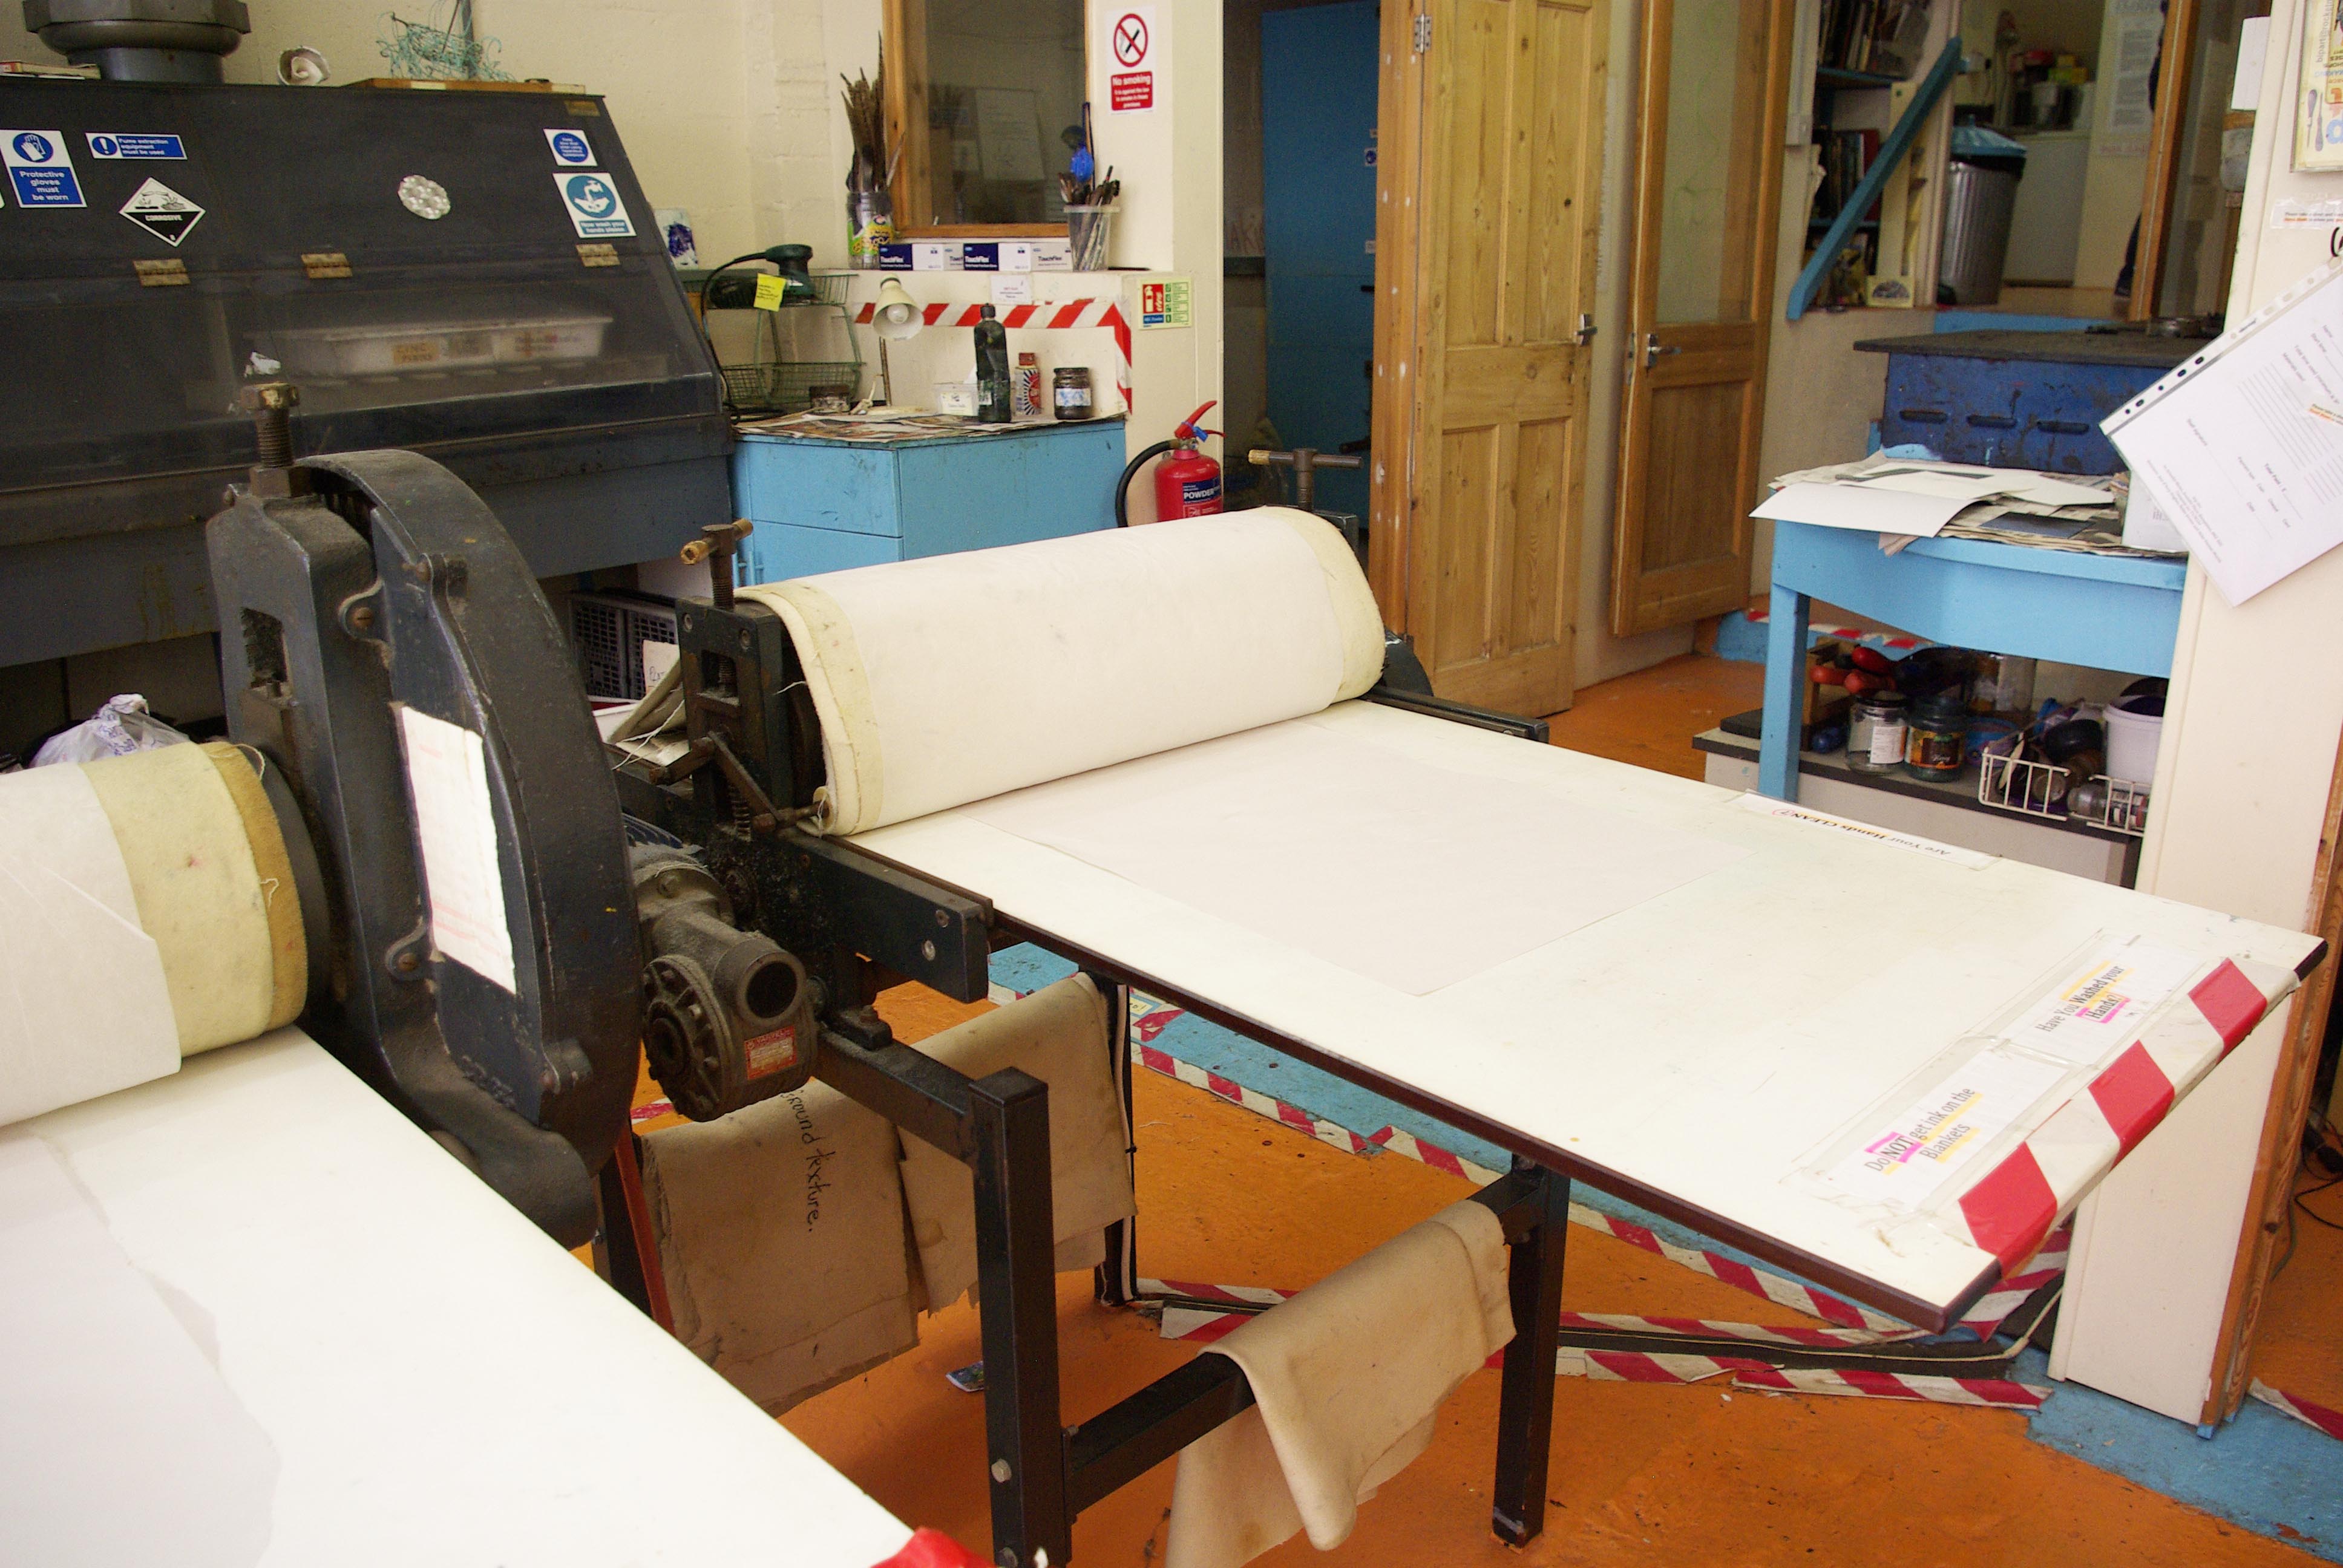
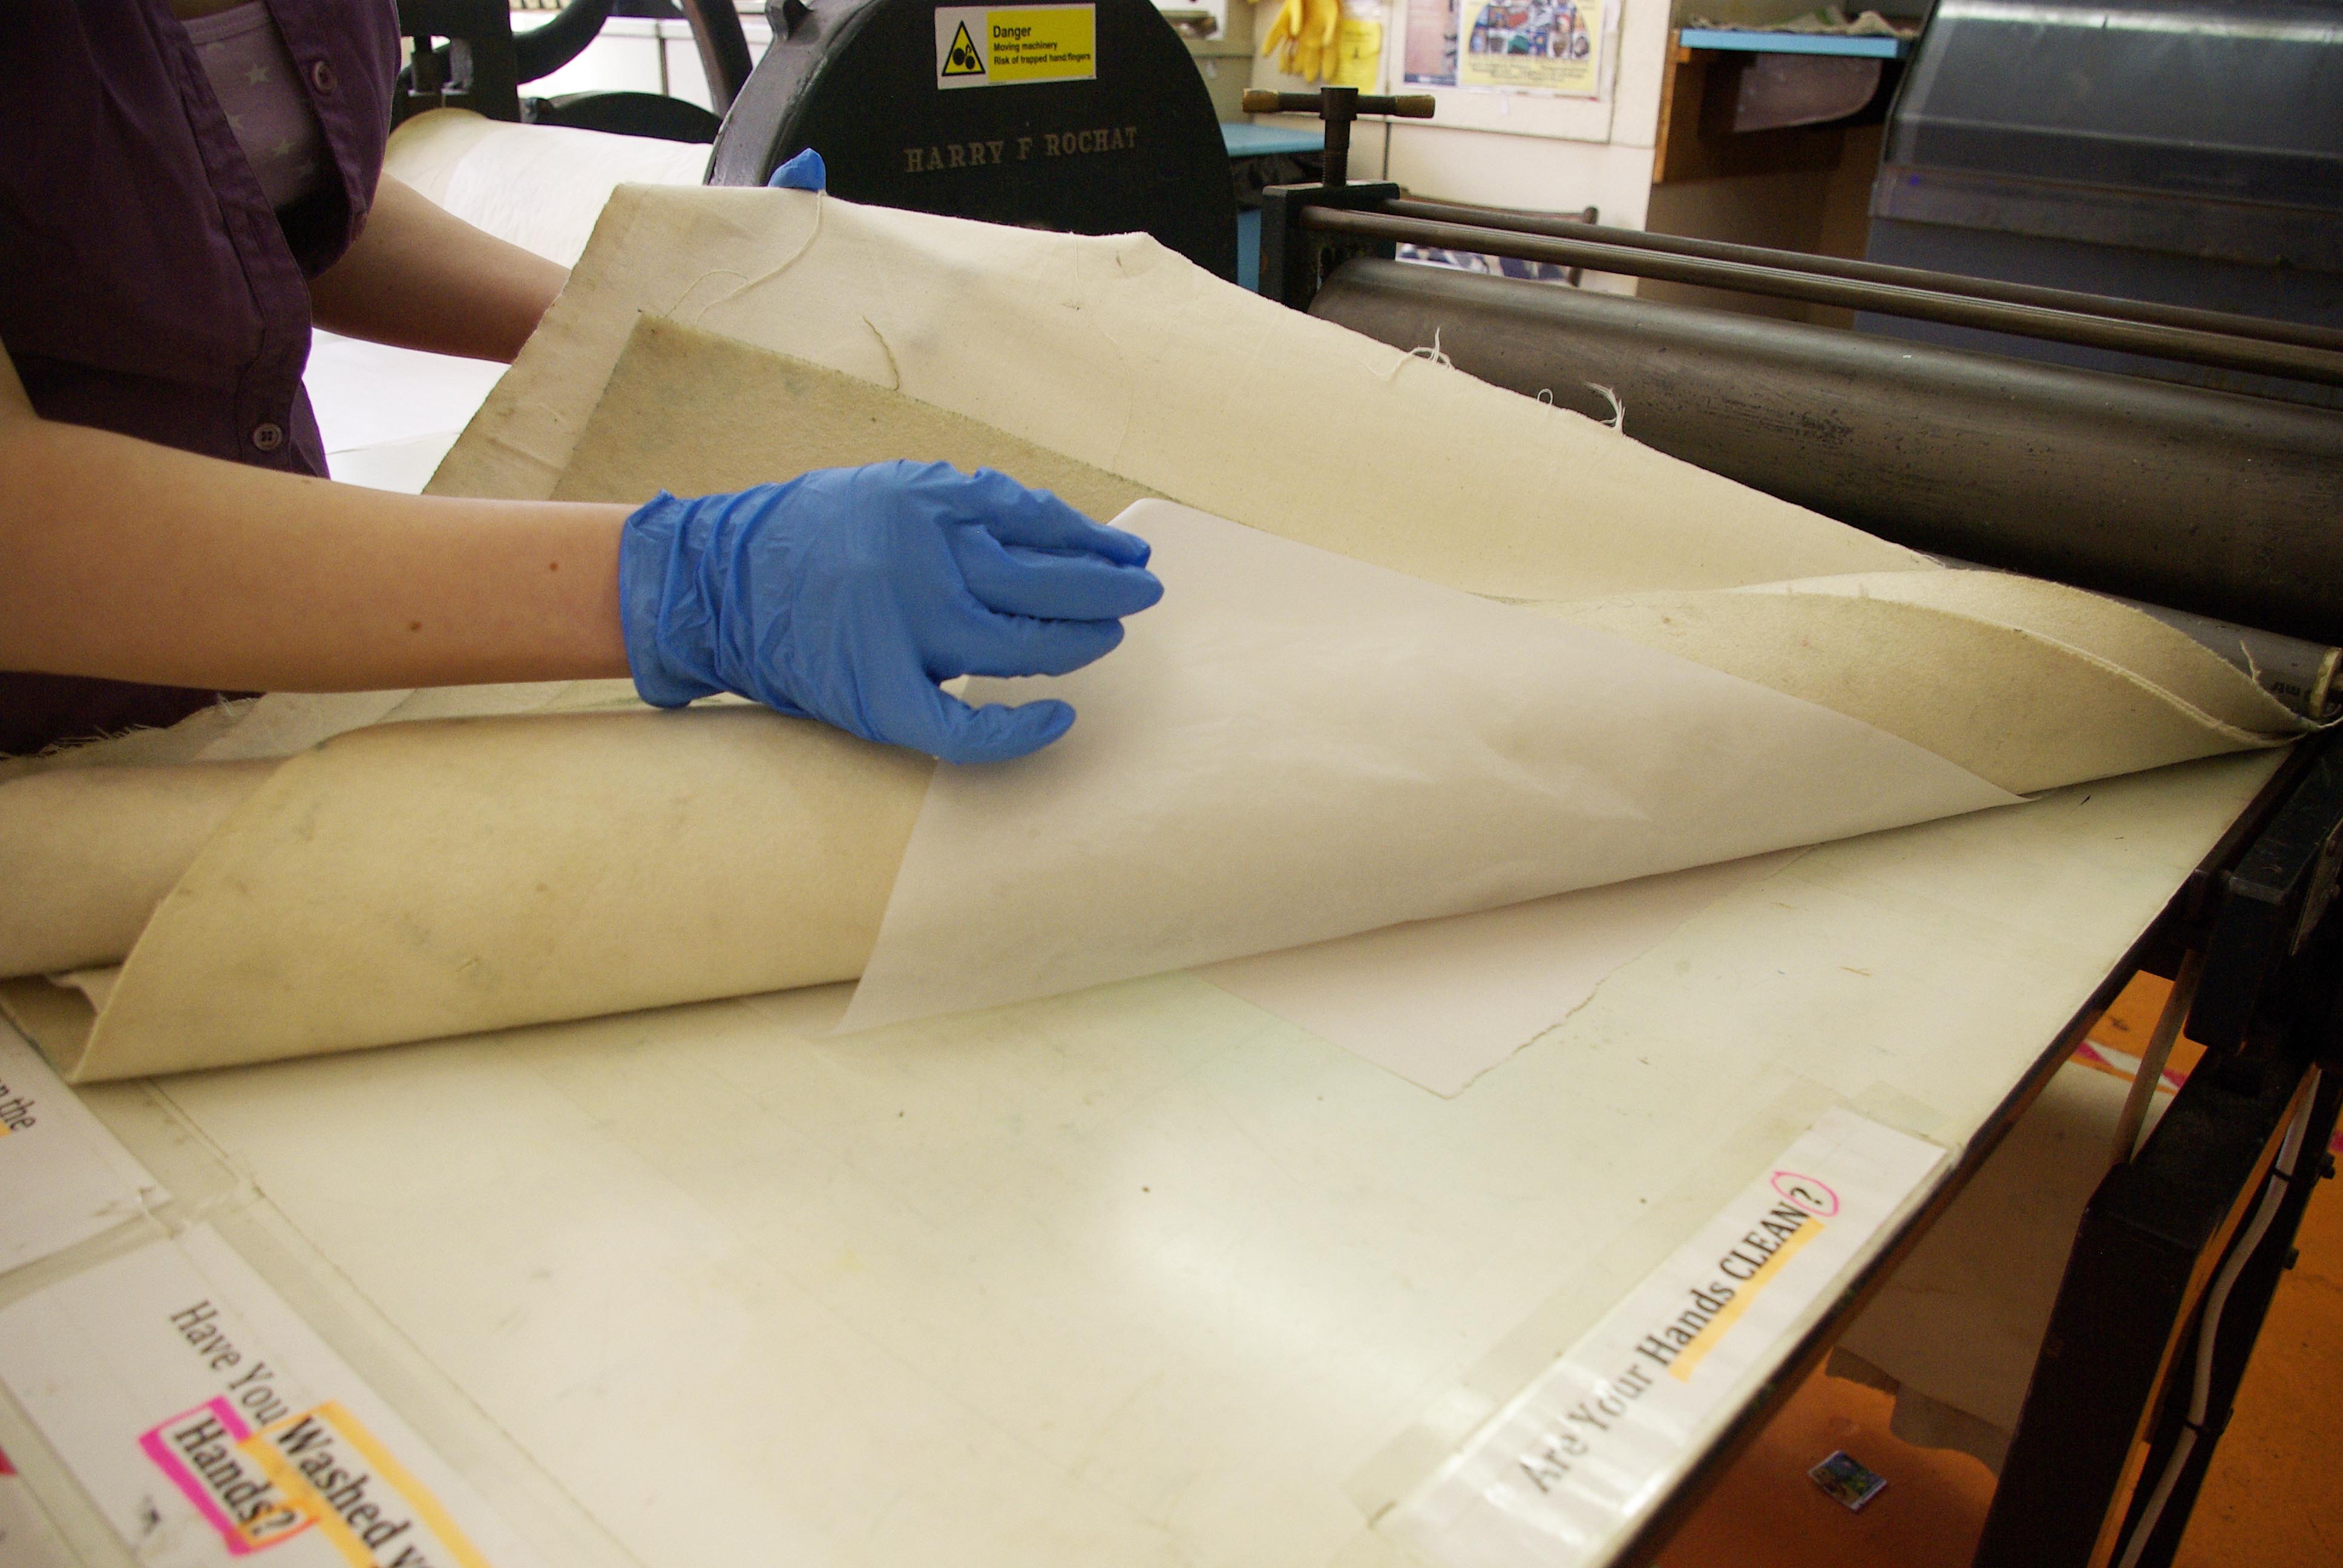
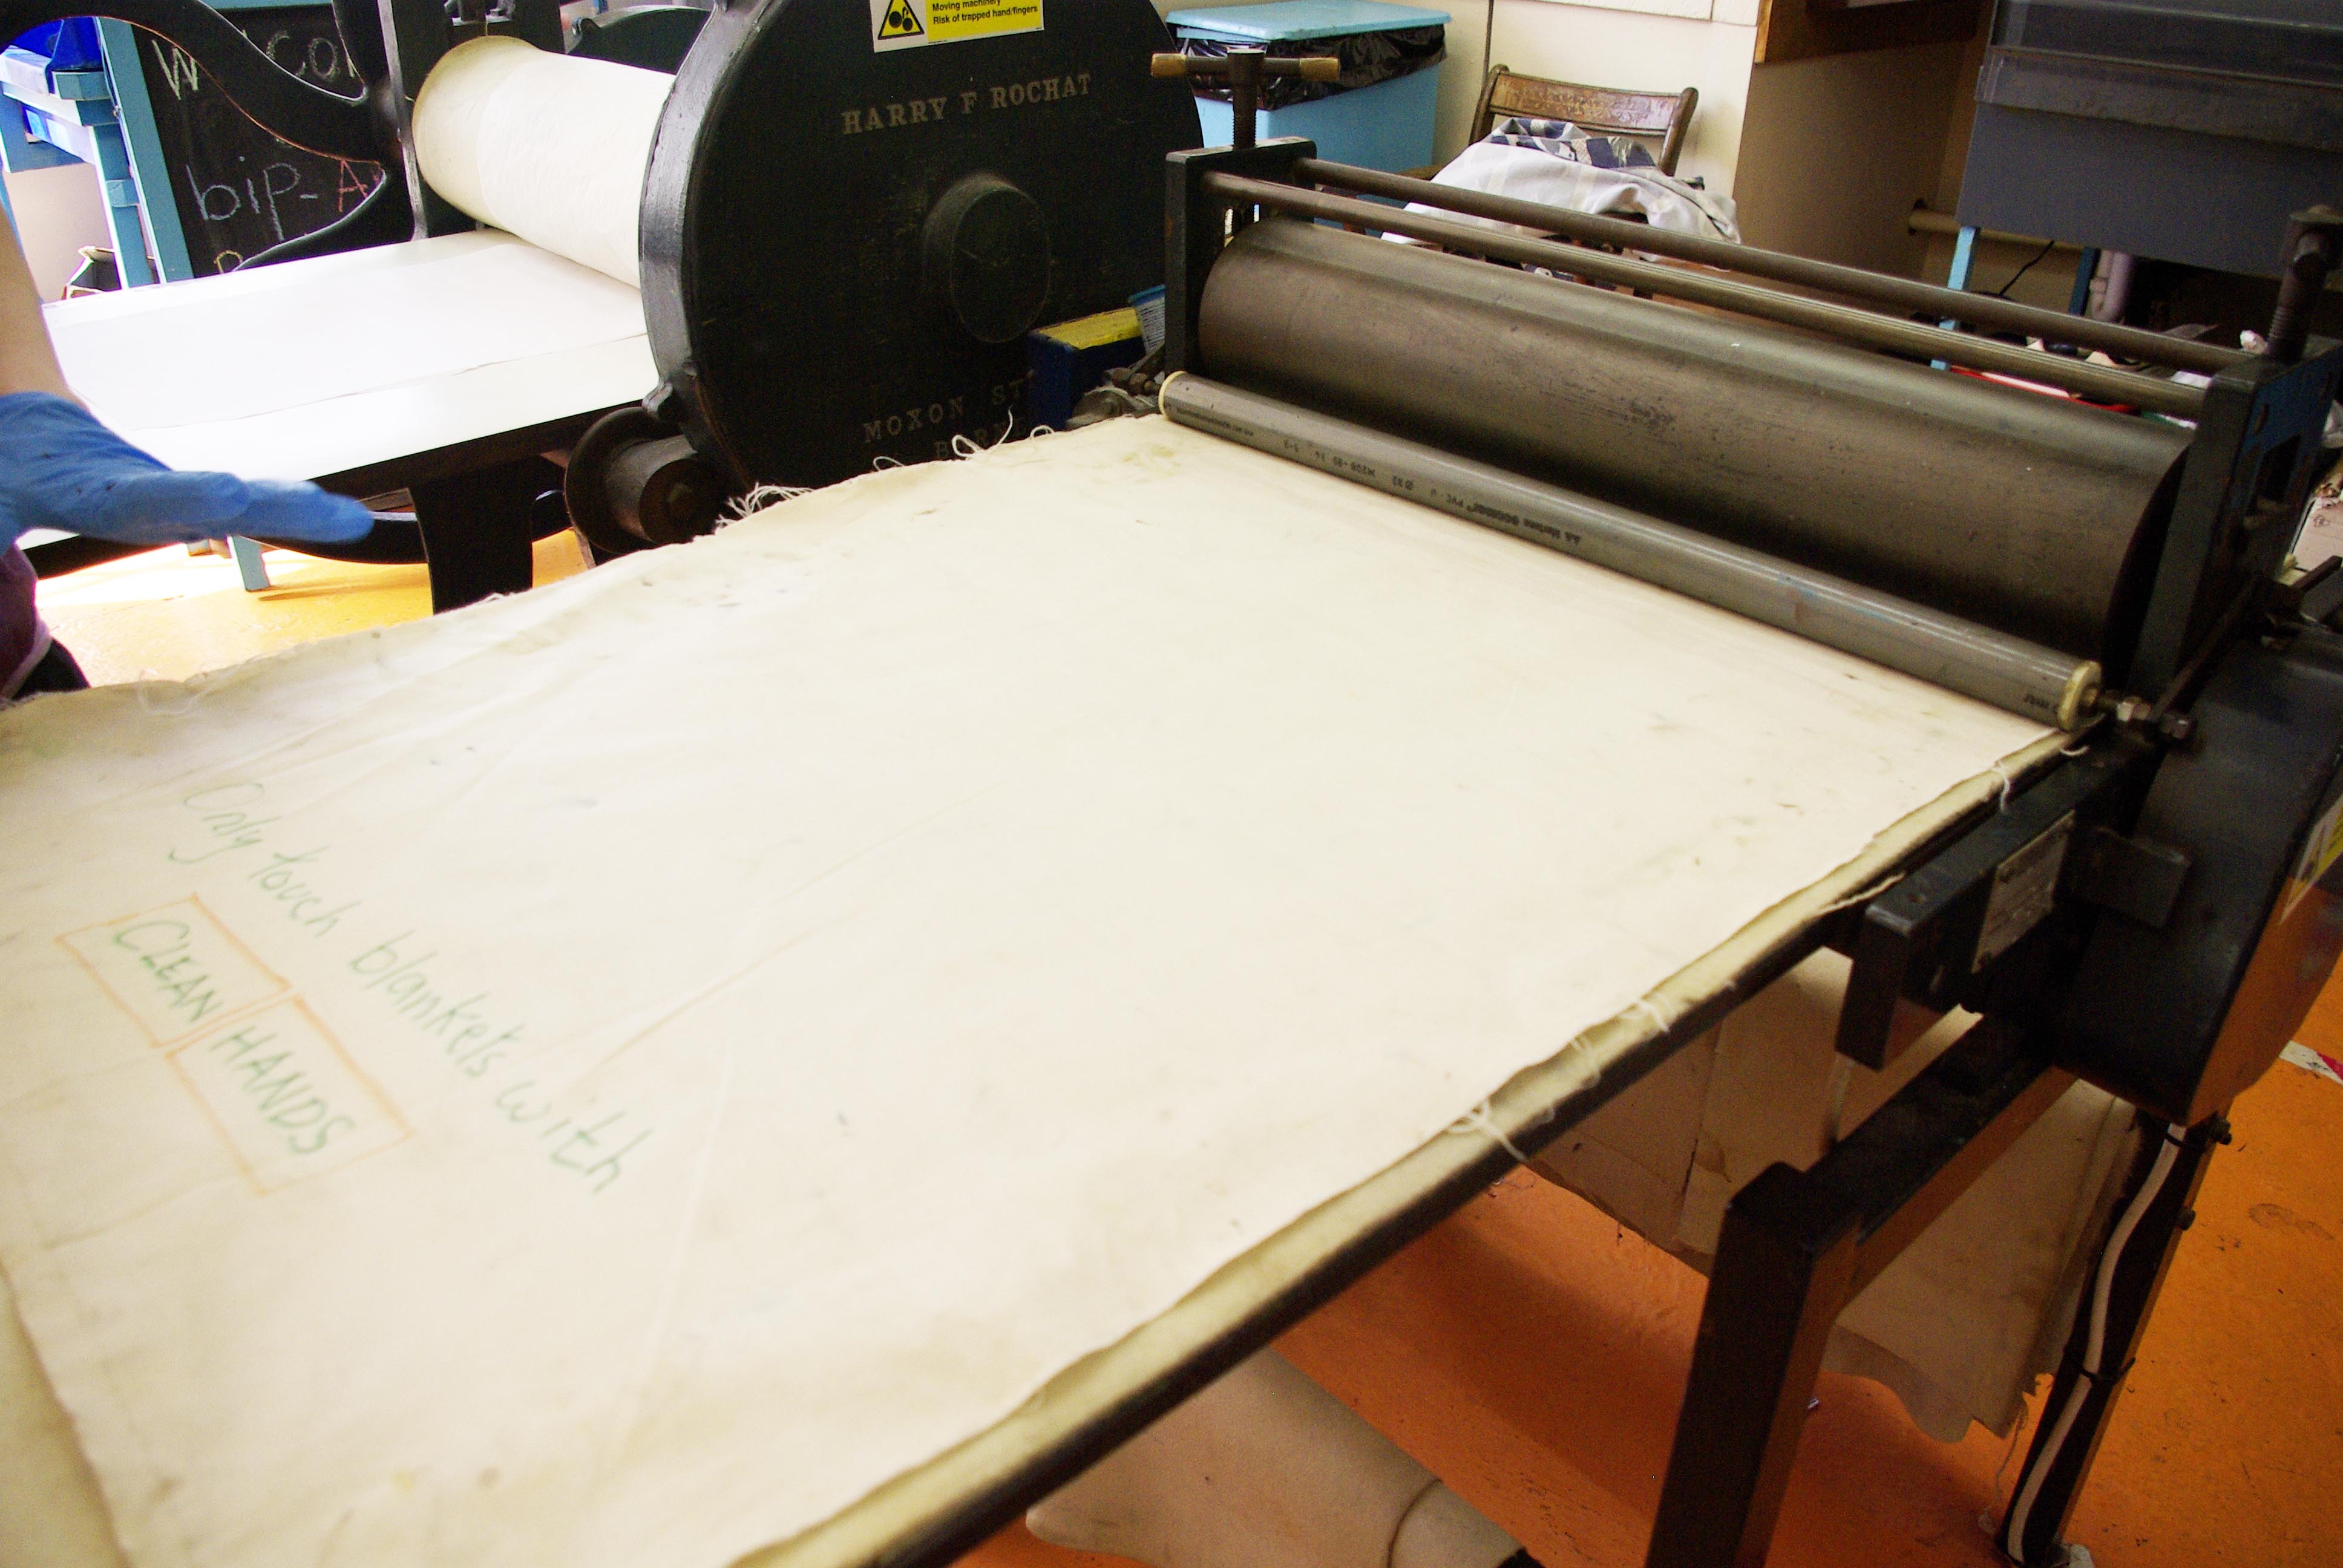
Over to the press. Make sure that your hands are clean so you don't spoil that lovely set of blankets! I used an electric press at BiP, here are some modern manual presses suitable for etching.
You can use small bits of folded card to handle your paper so that no ink or other substance spoils it.
Over to the press. Make sure that your hands are clean so you don't spoil that lovely set of blankets! I used an electric press at BiP, here are some modern manual presses suitable for etching.
 Lovely Harry Rochat manual press!
 The electric press.
Newsprint is the first thing that goes down, followed by your plate, followed by the paper you're printing on, followed by your blankets (usually a combination of 3). Smooth it all down so there are no raised areas. Then let her go!
The electric press.
Newsprint is the first thing that goes down, followed by your plate, followed by the paper you're printing on, followed by your blankets (usually a combination of 3). Smooth it all down so there are no raised areas. Then let her go!

 You should see an indent of the plate in your paper once you've pressed and voila!
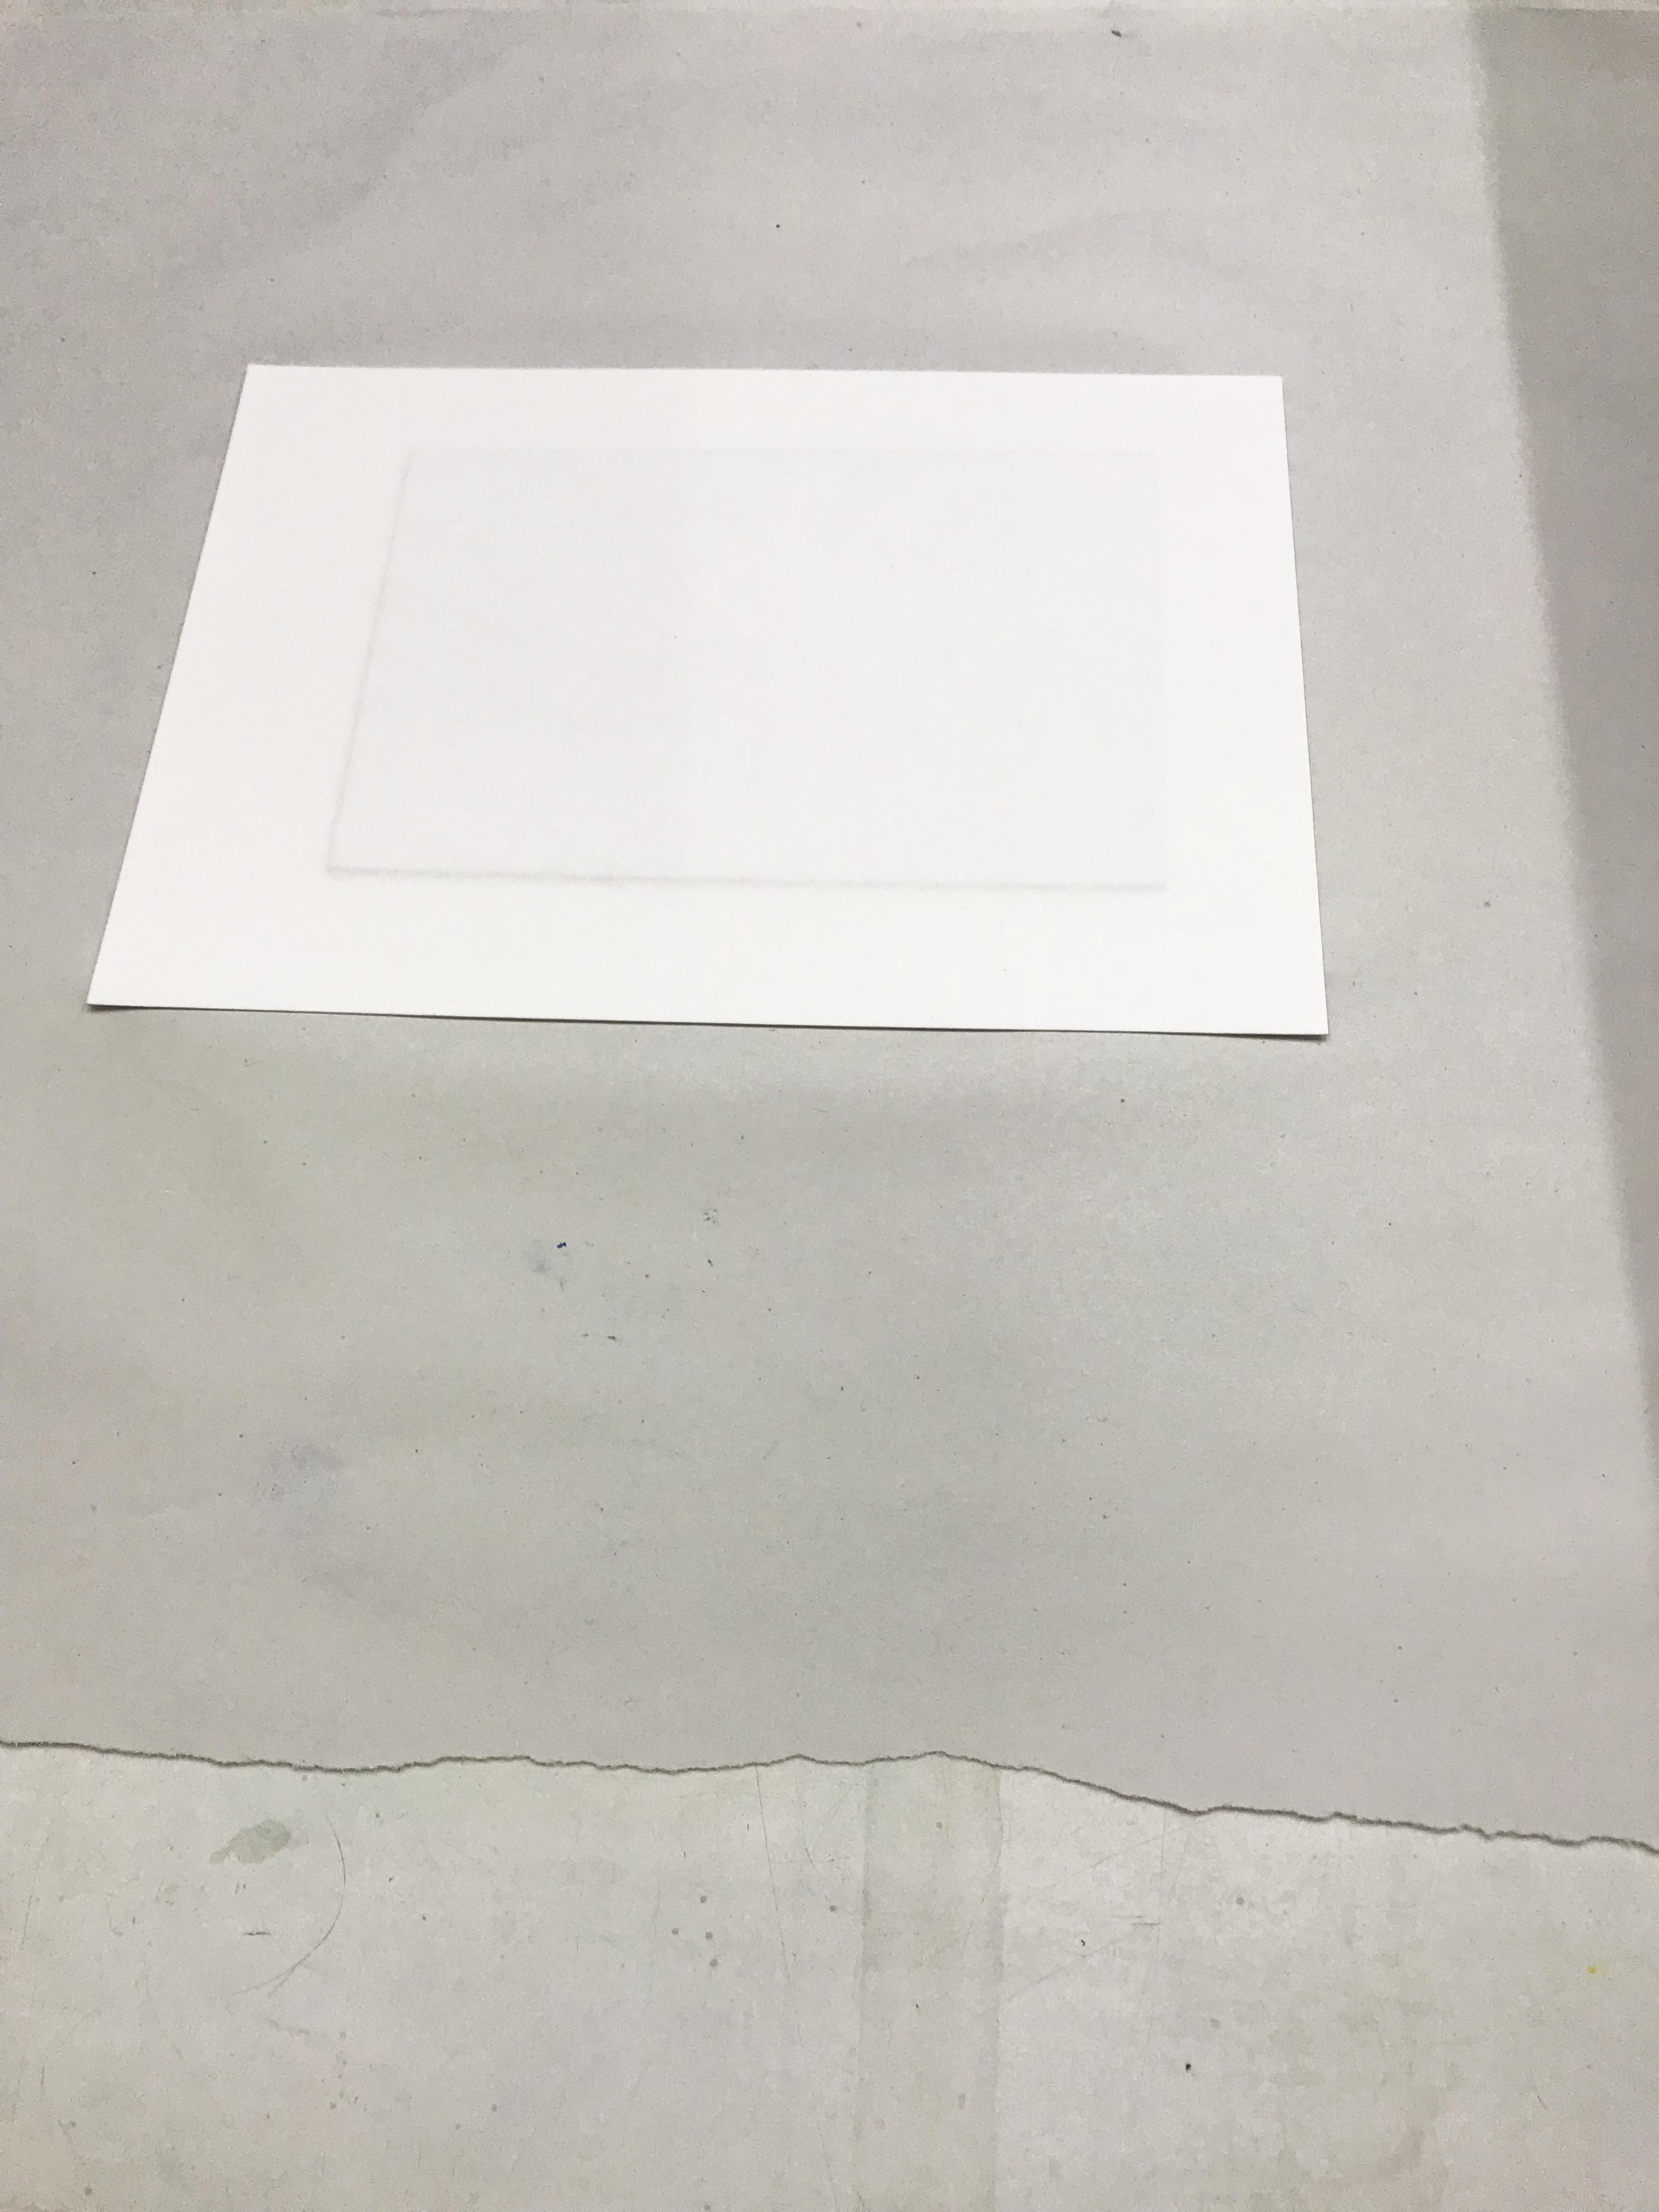 [caption id="attachment_1150" align="aligncenter" width="584"]
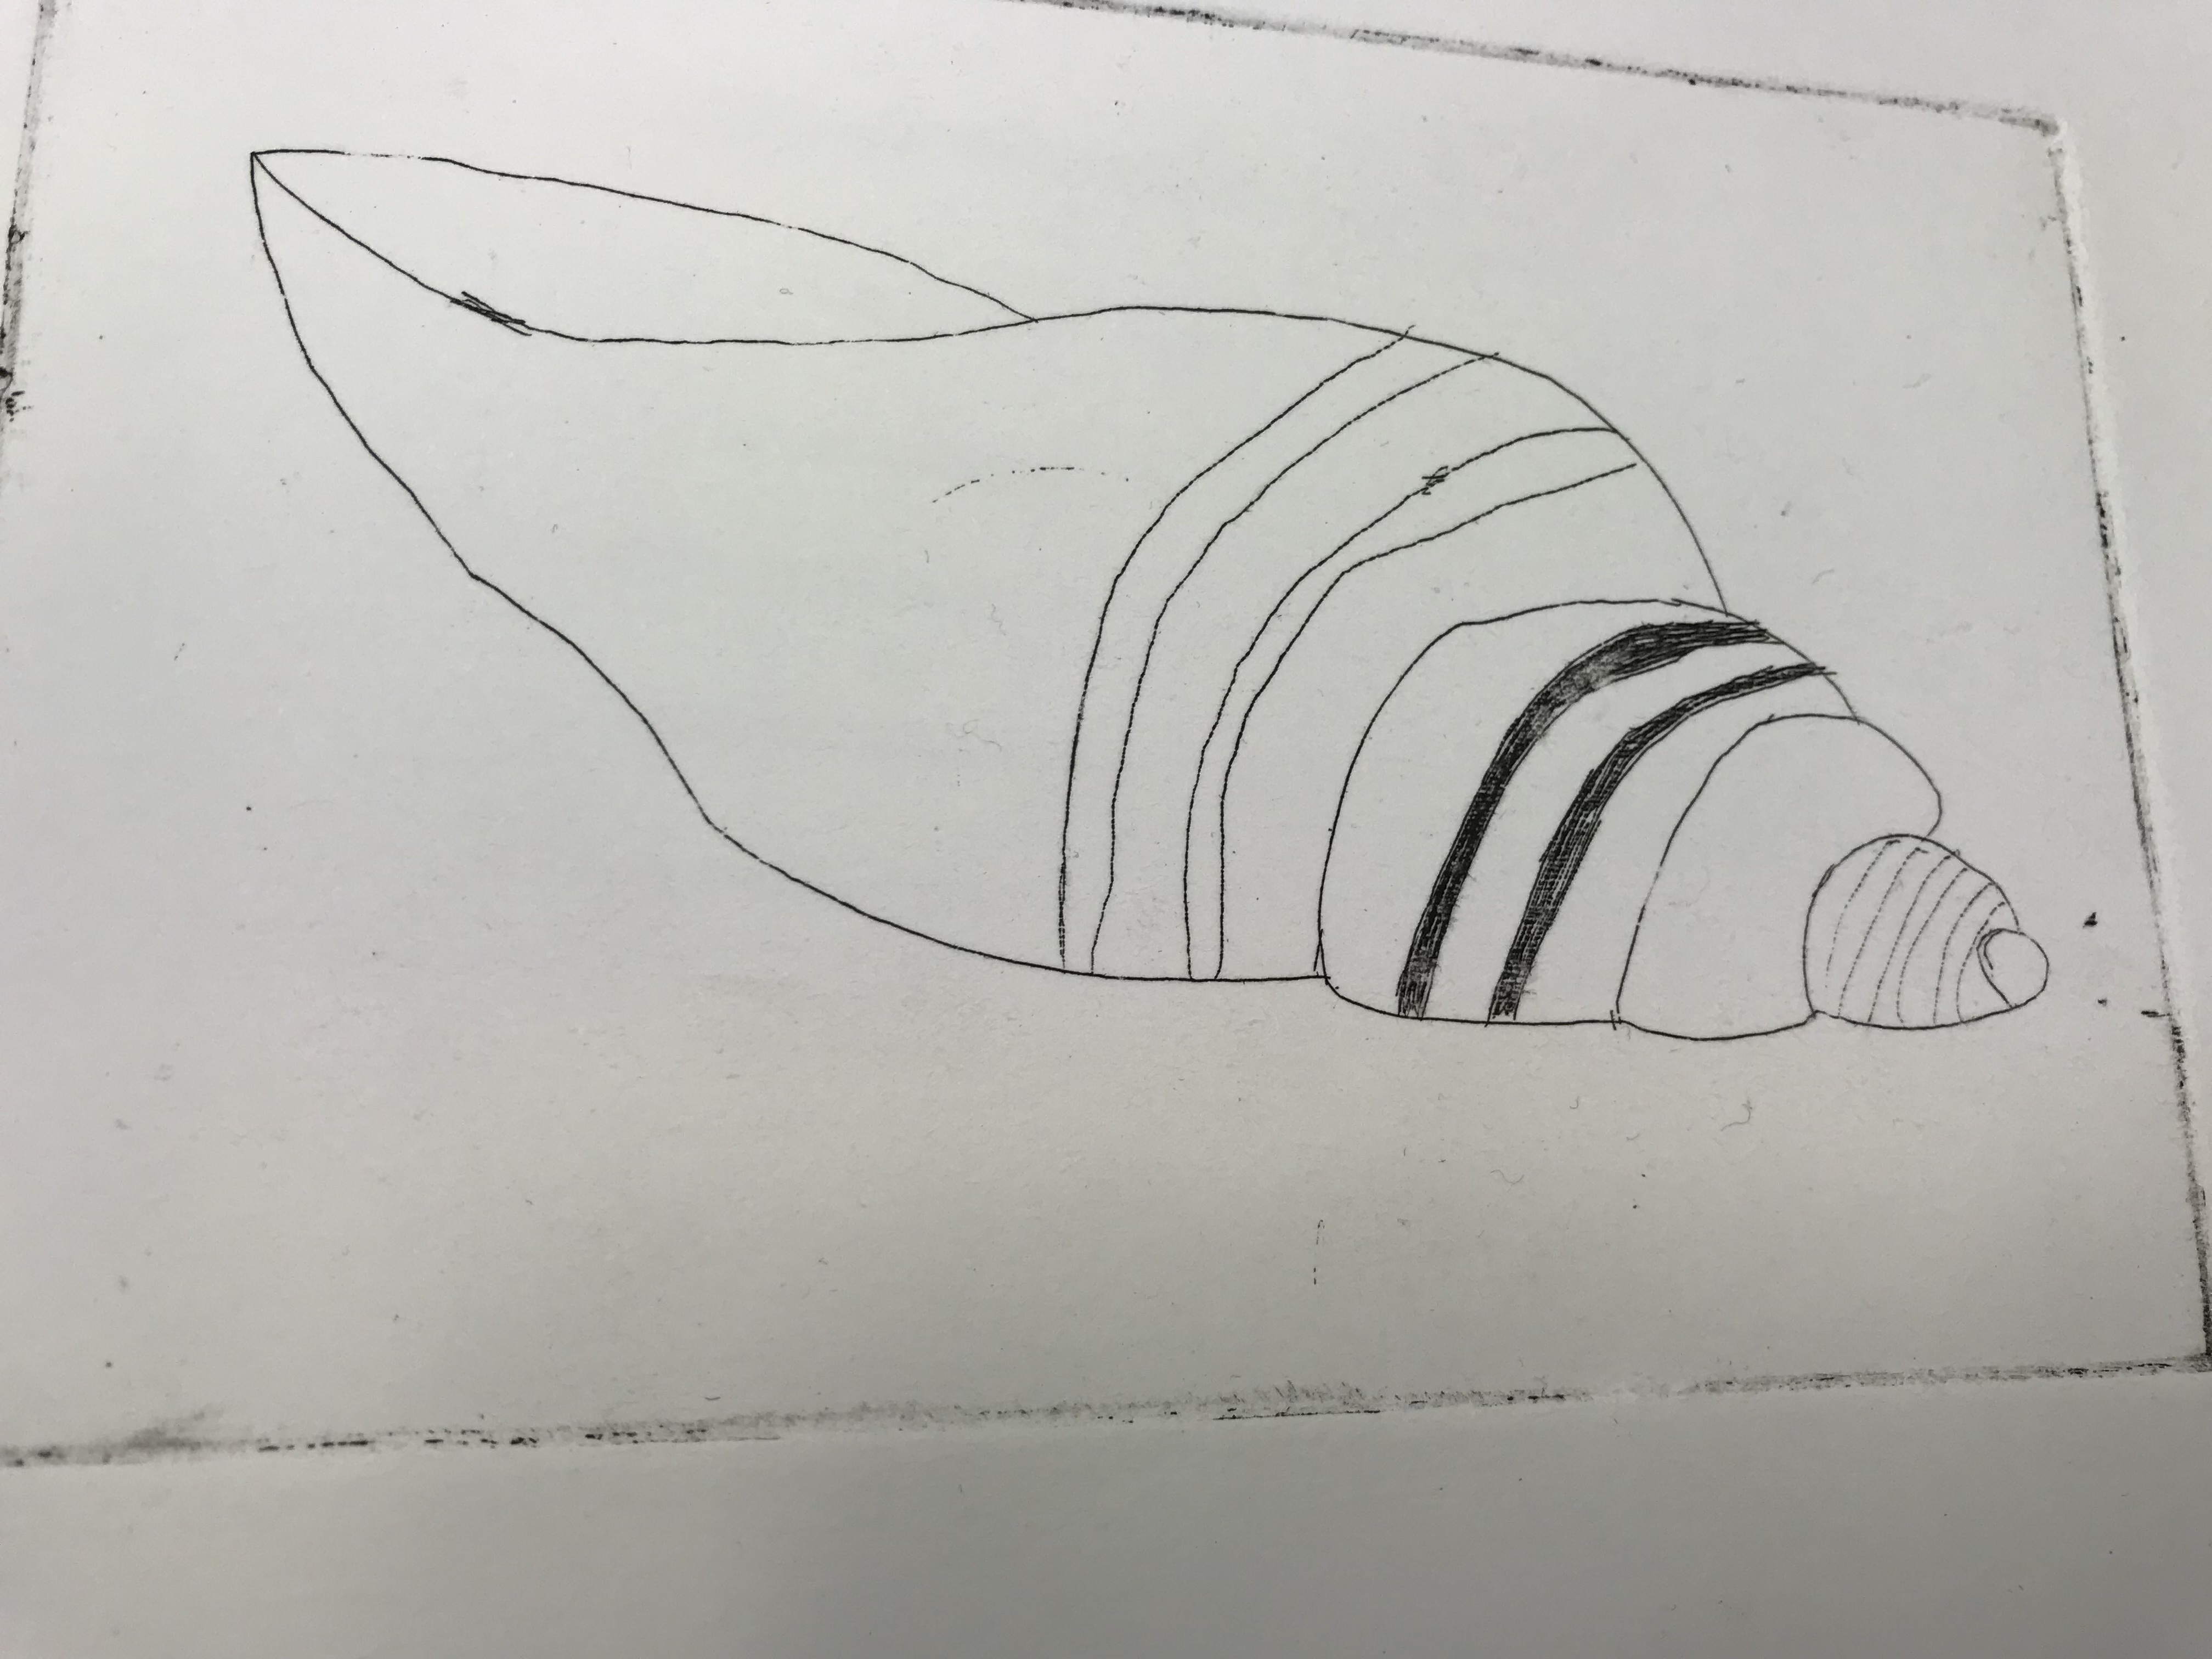 Zinc sheet proof[/caption]
My first proofs, you can quite clearly see the difference in tone between the zinc and steel sheets here.
[caption id="attachment_1116" align="aligncenter" width="584"]
Zinc sheet proof[/caption]
My first proofs, you can quite clearly see the difference in tone between the zinc and steel sheets here.
[caption id="attachment_1116" align="aligncenter" width="584"]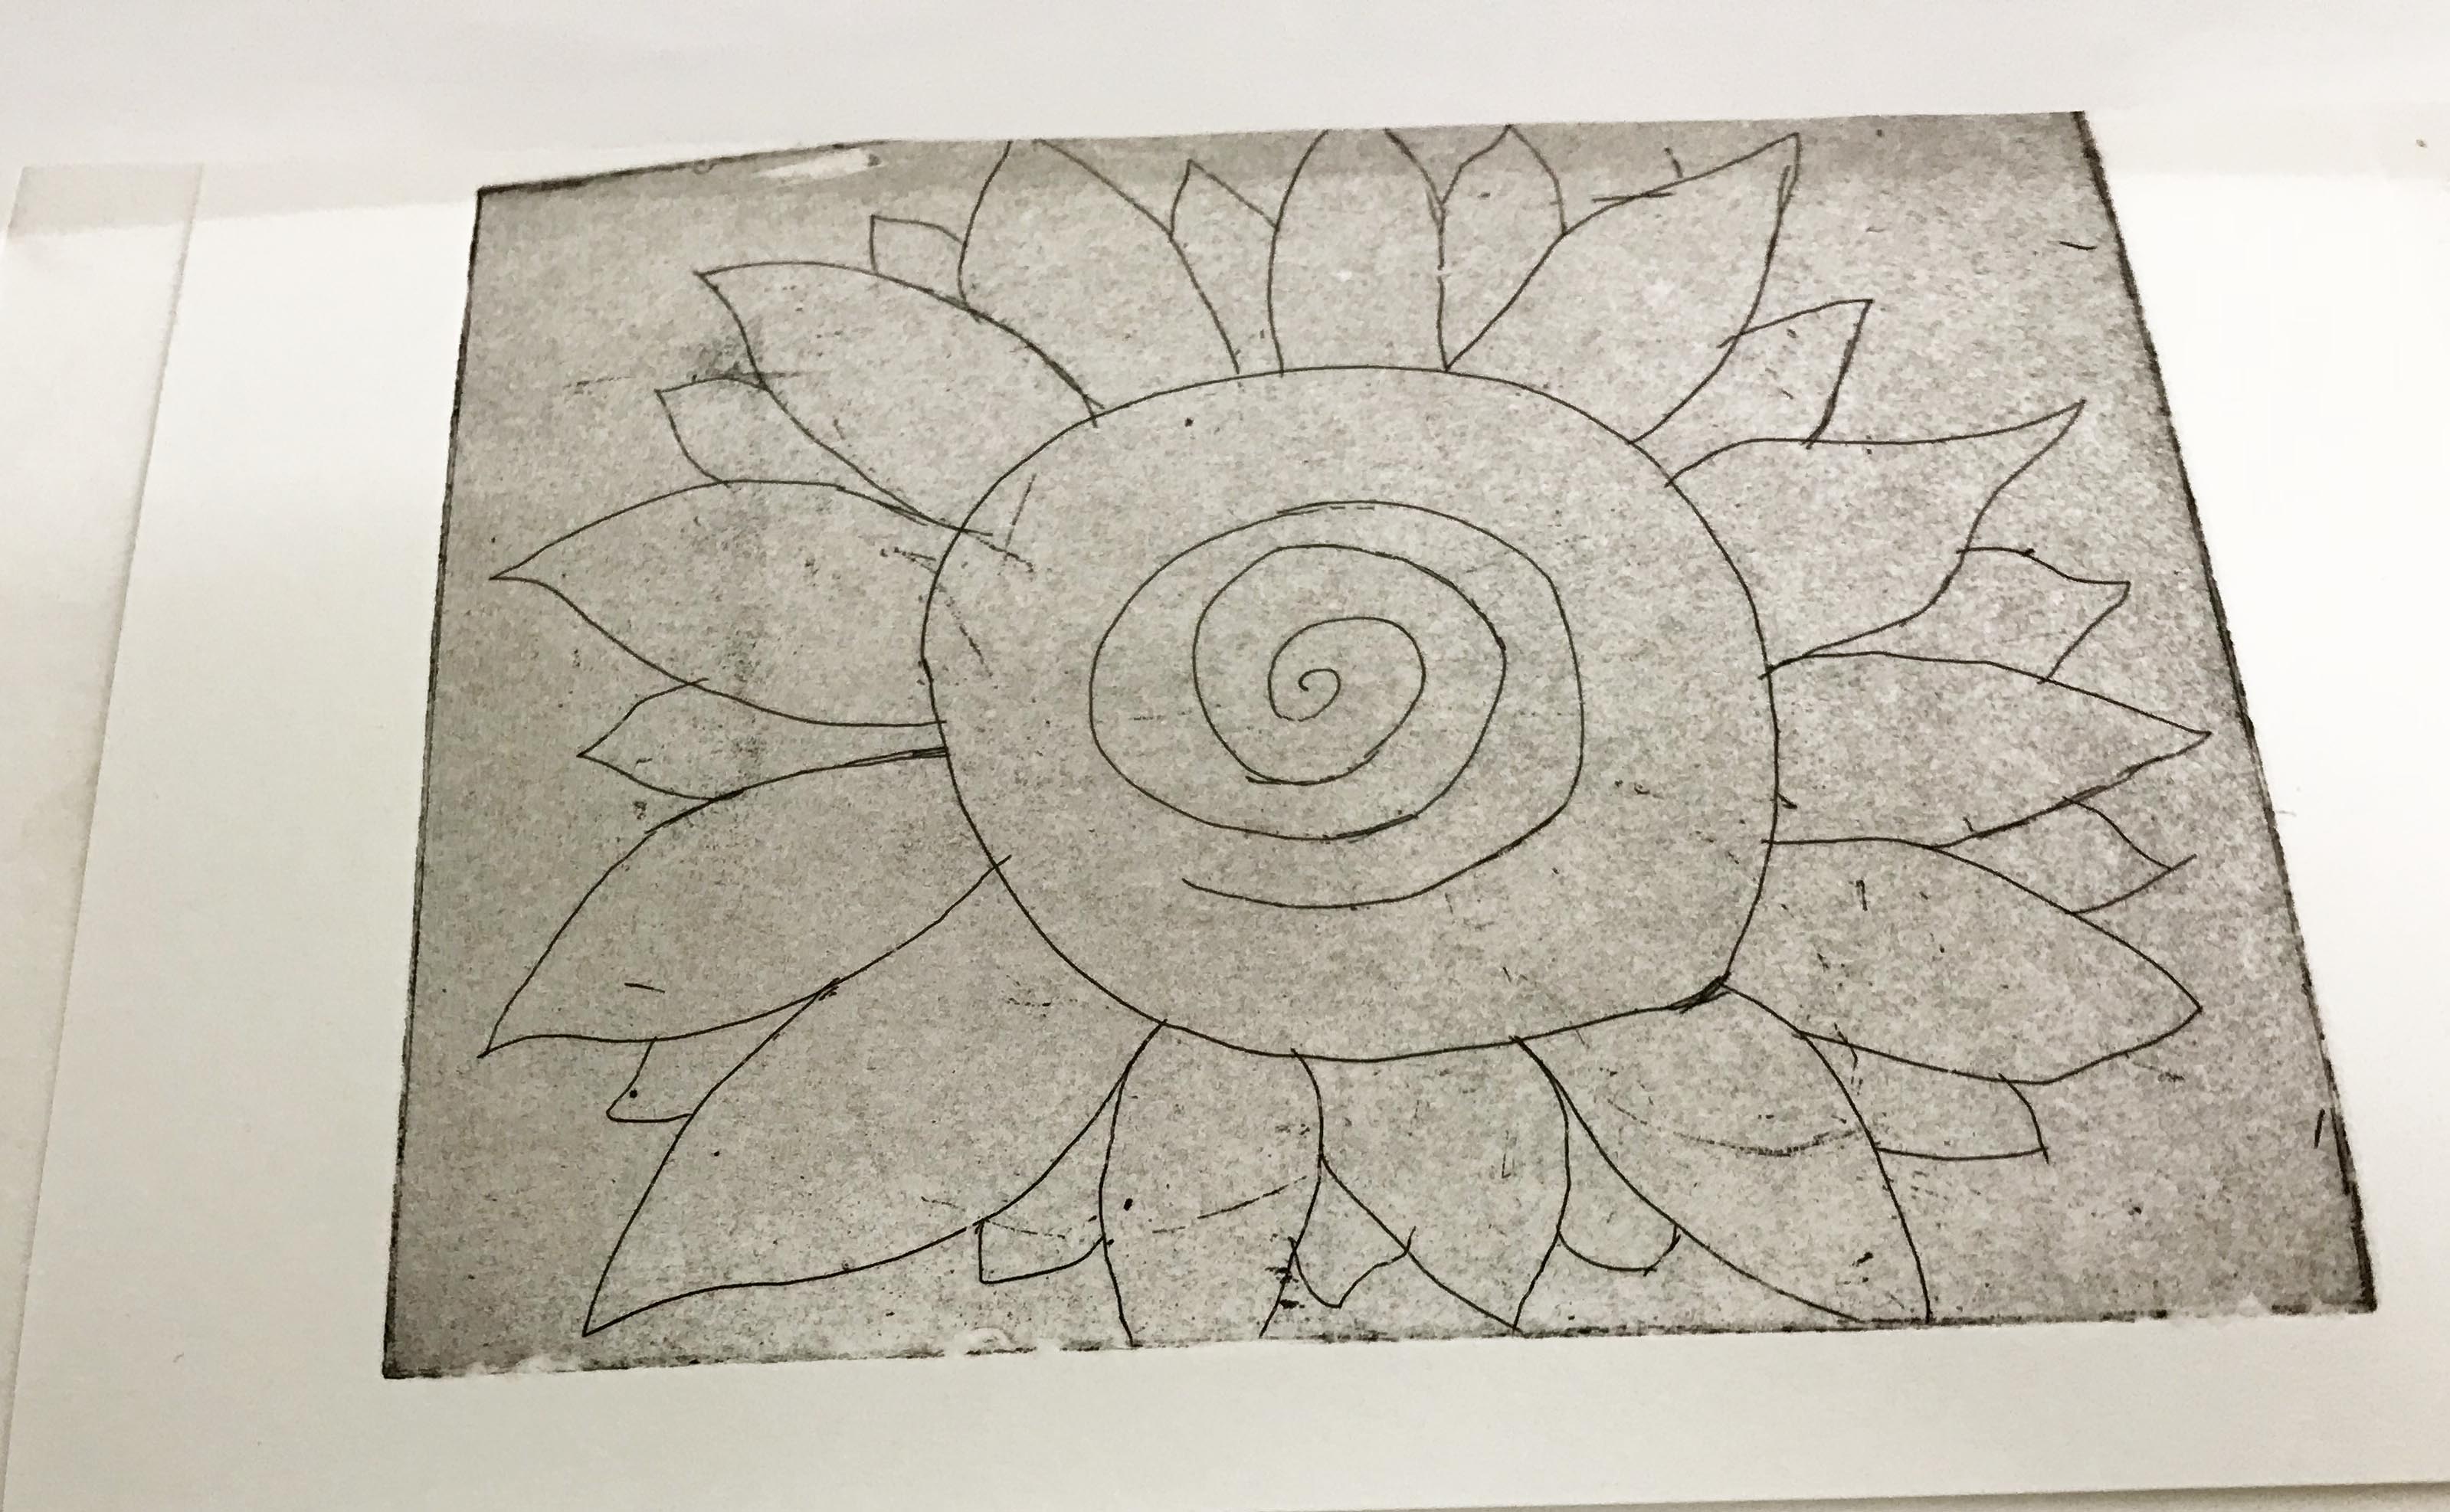 Steel sheet proof[/caption]
Congratulations, you've made a print! Make sure to clean your plate with white spirit and if you are not printing for a while use some oil (vegetable oil will do) and wrap in tissue to protect it (this will also prevent it from rusting quickly).
As you can see from the other images, this was only where my etching education began! But alas, this post is already a good dissertation length so I'll leave it at that.
In my next post we go on to: Aquatint, soft etching ground, more on stopping out and scraping/burnishing.
Steel sheet proof[/caption]
Congratulations, you've made a print! Make sure to clean your plate with white spirit and if you are not printing for a while use some oil (vegetable oil will do) and wrap in tissue to protect it (this will also prevent it from rusting quickly).
As you can see from the other images, this was only where my etching education began! But alas, this post is already a good dissertation length so I'll leave it at that.
In my next post we go on to: Aquatint, soft etching ground, more on stopping out and scraping/burnishing.
- Etching plate
- File
- Scraper/Scraper burnisher
- Drypoint/etching needle
- Varnish brush
- Stop out varnish
- Hard etching ground
- Gloves - nitrile or latex
- Etching ink
- Copper sulphate/ferric chloride
- Scrim
- Blankets
- Hand cleaner
- Paper
- Newsprint
- Taper
- Hand vice
- Roller/dabber for applying ground
- Rags
- Tissue paper
- White spirit
- Car spray
- Newspaper
- Hot plate (multiple)
- Etching dish
- Water tray for soaking paper
- Press
Zinc sheet[/caption]
The first step is to prepare your surface for etching. Copper, zinc or steel are most commonly used. Zinc and copper sheets are available on our website and come in several pre-cut sizes. Student zinc needs polishing before use. Copper takes more time to etch in the acid, in my examples I used zinc and steel plates. Steel has a tone and will create a grey background, zinc produces a white background. The edges of the plates are quite sharp, so we need to smooth them in order to handle the plate without damaging ourselves!
First use a file to smooth the edges down. Use the edge of a surface that you don't mind working on and overhang the plate slightly so you can work on it. Scrape the edges at a 45 degree angle so you create a small bevel along the edge of the plate. This is quite hard work and you'll need to put your back into it! Always scrape away from your body to avoid any unpleasant accidents.
You're going to need to use your imagination a little with our demo images, taking photos whilst doing the course proved difficult as I was too busy learning! Luckily the lovely people at BiP allowed myself and a colleague to go and take some mimed photos!
Then use a scraper or scraper burnisher to smooth the bevel you have created with the file. I found the scraper with 3 edges handy as a beginner as you're able to use the flat side to rest your finger on, almost like a vegetable peeler!
[caption id="attachment_1214" align="aligncenter" width="300"] Small scraper with 3 edges[/caption]
You will know when the plate is ready because if you gently run your finger along the edge it will be smooth.
Next degrease the plate. Time to put your latex gloves on!
One way of doing this is to create your own degreasing solution with whiting powder and vinegar mix (4tbsp vinegar to 1 litre water). You want your solution to be thin but not watery. You can use a sponge or a brush (a large varnish brush works well) to put the solution onto your plate. Cover the whole plate, brushing in a small circular motion, the solution should become soapy. Spend around 5 minutes brushing the plate with the degreasing solution.
Rinse the plate with water and then dry. We used a hairdryer but paper towels work fine. It's important to dry your plate straight away as they can rust.
Applying ground
There are a few different grounds and techniques you can use here. In my first few attempts I used hard etching ground. We apply ground so that we can see our drawn lines easily and protect everything but the lines from being etched.
Place your metal plate onto a hot plate and rub the hard ground onto it. You don't need a lot here. Use a roller to roll the ground onto your plate evenly. In the end you don't want any metal showing through the ground.
In your imagination, the ground would begin to melt as you rub it onto the plate. Here we imagine the plate is covered in black ground and smooth it all over the plate with the roller.
The plate will be hot so don't pick it up with your hands! Ouch!
Next we can smoke the plate. Smoking it is not compulsory but it darkens the plate which enables you see lines you have drawn more easily and it can cover any bits that you missed when rolling the ground on.
Hold the plate upside down using a hand vice or pliers (ground side facing down). Bring a flame (using tapers gives you lots of space to keep the flame away from your hands) to just under the plate, move it around fluidly until you can see the ground changing colour then quickly move to the next part of the plate. Try to work logically from one edge to the next, do not stay in one spot too long.
Once complete check your plate for any blemishes or areas that have been missed. Use stopping out varnish to paint over any marks. Stop out varnish does exactly as it says- it stops areas of the plate from being etched.
The final step of preparing the plate (phew!) is to protect the back of the plate. Use car spray (usually called etch primer) and spray the back of the plate. Leave to dry!
Drawing on the plate
There are many, many tools that you can use to create lines and textures in your plate. From drypoints (to create linear burr) to roulettes (creates areas of tone using dots) to scraper burnishers (scraping end and a burnishing end for polishing) to burnishers (making corrections to a bitten plate).
[caption id="attachment_1126" align="alignnone" width="584"] My drawn plate with some stop out varnish on it![/caption]
I used the knurled drypoint and a 5mm junior drypoint to create my lines. You don't need to press very hard. Remember, the lines are the bits that will print (it's the opposite to relief printing!).
[caption id="attachment_1145" align="aligncenter" width="584"] From top to bottom; Arteina knurled drypoint, Scraper burnisher USA, 5mm Arteina Junior Drypoint[/caption]
Biting and stopping out
Once you've completed your masterpiece (or in my case, simplistic shapes!) we move onto biting the plate (otherwise known as etching). Biting is where the acid eats away at the plate and incises your image.
Any areas of the plate that you want to appear lighter (white) you paint with stopping out varnish.
Etching times in the acid can vary immensely depending on the effect you want to create so I won't go into detail too much about time.
You can use ferric chloride as your etching solution if you are using copper plates and copper sulphate for zinc and steel plates as alternatives to acid. The advantage of using copper sulphate is that it doesn't produce harmful vapours (you still need to use gloves when handling any of these substances!). Please ensure you have read up on the health and safety of using these substances.
You can measure the saturation of your solution using a hydrometer.
Once the solution is created pour into an etching dish/bath. You need to use different baths for different metals as they will etch at different speeds. Lay your plate into the bath and gently rock the solution over so the whole plate is covered. If bubbles appear you can gently wipe them off with a feather. Etch to the desired depth (time varies), this will probably be an experimental process if you don't have access to a wizened printmaker. You can always bite the plate again so less is more!
Rinse with water once the plate is etched to the desired state to prevent the biting continuing. Pat dry with newspaper or rags, then clean the ground off the plate using white spirit.
Printing
Now, after all that prep, we are ready to print a proof.
You can use pre-prepared etching inks or create your own using pigment and copper plate oil.
We also need to soak the paper we are printing on for about 10 minutes. For etching we would recommend Somerset, BFK Rives, Hahnemuhle, Fabriano Rosaspina or Arches printmaking papers. I used the Fabriano Unica pad as I was only printing very small and could get two prints from one A4 sheet of the pad.
Once your ink is rolled out and ready on an inking slab you can apply it to your plate.Rest your plate back on a hot plate (a hot plate isn't required but it makes it a lot easier as the ink is easier to wipe!) and use thin paper or cardboard (a small square) to apply the ink to the plate and drag over the surface. You want to get an even level of ink all over the plate. Rub it into the lines using your fingers.
Next we wipe off the ink (and it should hold over the bitten lines).
Use stiff coarse wiping scrim to wipe the ink gently from the plate. Use very little pressure because we don't want to remove the ink from the lines. Wipe vertically then horizontally starting with one corner first. Once you have done that move in circular motions and you will begin to see the ink coming off.
Once you have gently taken off as much ink as you like you then use tissue paper to get the stubborn bits (you can use a bit more pressure here).
Your plate should begin looking like my one below.Now is probably a good time to change or remove your gloves so you don't ruin your paper.
Once the plate is ready dry your paper between some felts (you can use a leather roller) to roll when the paper is between these sheets.
You can use small bits of folded card to handle your paper so that no ink or other substance spoils it.
Over to the press. Make sure that your hands are clean so you don't spoil that lovely set of blankets! I used an electric press at BiP, here are some modern manual presses suitable for etching.
Lovely Harry Rochat manual press!
The electric press.
Newsprint is the first thing that goes down, followed by your plate, followed by the paper you're printing on, followed by your blankets (usually a combination of 3). Smooth it all down so there are no raised areas. Then let her go!
You should see an indent of the plate in your paper once you've pressed and voila!
[caption id="attachment_1150" align="aligncenter" width="584"] Zinc sheet proof[/caption]
My first proofs, you can quite clearly see the difference in tone between the zinc and steel sheets here.
[caption id="attachment_1116" align="aligncenter" width="584"] Steel sheet proof[/caption]
Congratulations, you've made a print! Make sure to clean your plate with white spirit and if you are not printing for a while use some oil (vegetable oil will do) and wrap in tissue to protect it (this will also prevent it from rusting quickly).
As you can see from the other images, this was only where my etching education began! But alas, this post is already a good dissertation length so I'll leave it at that.
In my next post we go on to: Aquatint, soft etching ground, more on stopping out and scraping/burnishing.


