Painting Flower Pots with Acrylics
My patio needed a good summer clean so to get in the mood I planned a craft project around it: painting flower pots! This step-by-step guide will explain how to use acrylic paint to decorate your pots and other terracotta ornaments. Patio before and after pictures - stay tuned!
 Make sure you get the gesso into the ridges and under the rim too, then end with applying a thick stripe to the inner rim of the pot, just enough to cover what you think will peek out when a plant is placed inside.
Put the pot aside for half an hour (or more)
Make sure you get the gesso into the ridges and under the rim too, then end with applying a thick stripe to the inner rim of the pot, just enough to cover what you think will peek out when a plant is placed inside.
Put the pot aside for half an hour (or more) 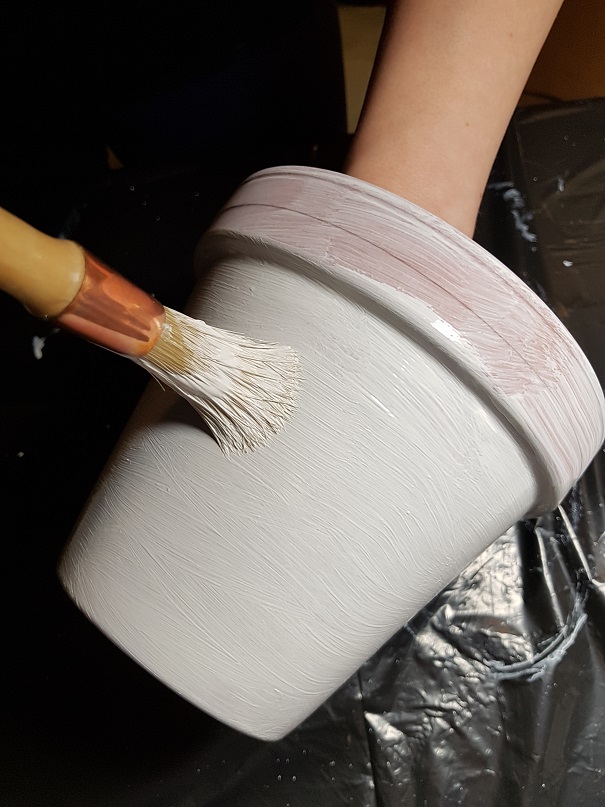 to dry then repeat the process. In my experience two layers of gesso is enough to create an even white surface (see picture) but some use three or more layers and sand the work in-between to achieve a smooth finish. I didn't mind the visible brush strokes but it's all down to personal preference.
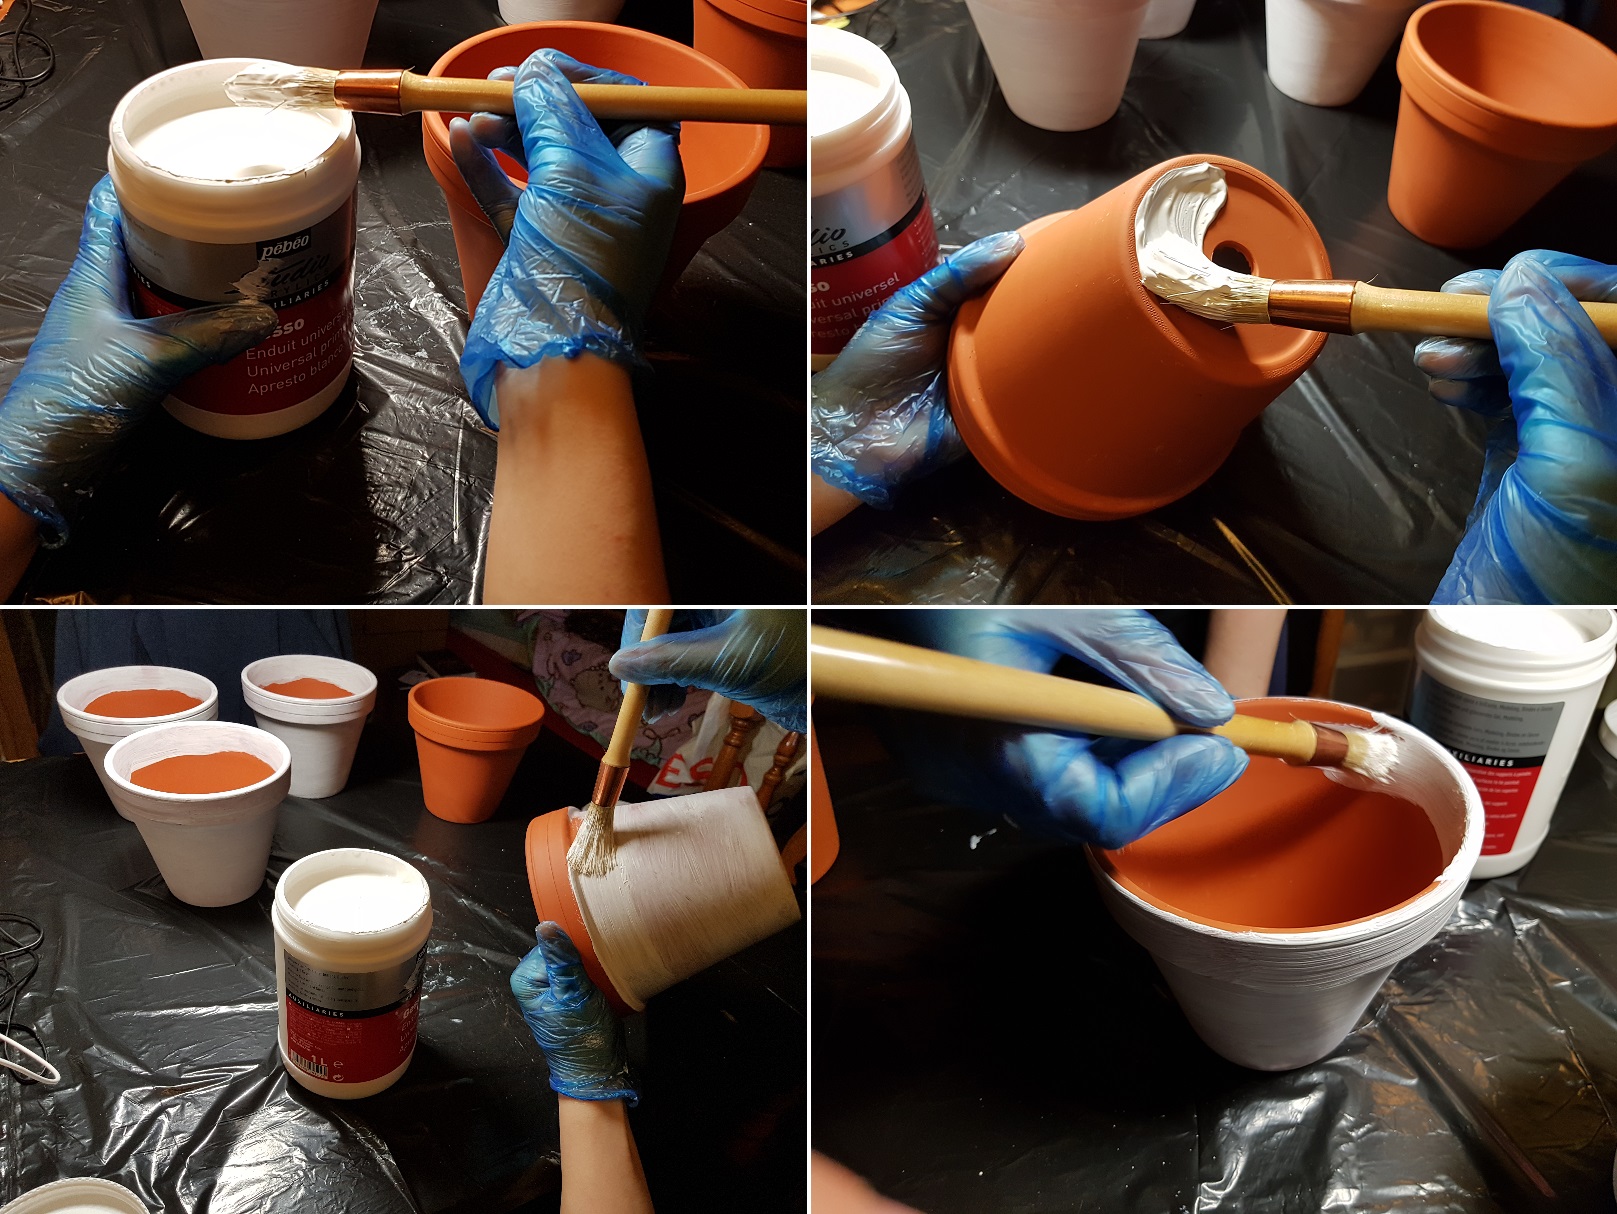
Tip: you can grab the pot from the inside and even utilise the small water hole on the bottom to stick a finger through: this will help you hold the pot and reach all areas.
to dry then repeat the process. In my experience two layers of gesso is enough to create an even white surface (see picture) but some use three or more layers and sand the work in-between to achieve a smooth finish. I didn't mind the visible brush strokes but it's all down to personal preference.
Tip: you can grab the pot from the inside and even utilise the small water hole on the bottom to stick a finger through: this will help you hold the pot and reach all areas.
 My first layer of variegated blues for my sea themed pot - with home made acrylic wet palette on the side[/caption]
You can invest in a specialised acrylic palette with a sponge insert such as the Sta-Wet Palette or you can simply make one yourself with an old plate and some wet paper towels (see picture).
Mix your base colour(s) and apply a thin first layer. No need to spend too much time on this as you will have plenty of time for fine tuning at a later stage.
Drying your Layers
Once your base colour is down, put the pot aside to completely dry it. Drying time may depend on the paint's brand, quality (student or artist), thickness and environmental conditions. The warmer and less humid the air is, the less time it takes for the paint to dry. To maximise drying, I put the drying pots on my patio and my cat kept watch:
[caption id="attachment_1254" align="aligncenter" width="584"]
My first layer of variegated blues for my sea themed pot - with home made acrylic wet palette on the side[/caption]
You can invest in a specialised acrylic palette with a sponge insert such as the Sta-Wet Palette or you can simply make one yourself with an old plate and some wet paper towels (see picture).
Mix your base colour(s) and apply a thin first layer. No need to spend too much time on this as you will have plenty of time for fine tuning at a later stage.
Drying your Layers
Once your base colour is down, put the pot aside to completely dry it. Drying time may depend on the paint's brand, quality (student or artist), thickness and environmental conditions. The warmer and less humid the air is, the less time it takes for the paint to dry. To maximise drying, I put the drying pots on my patio and my cat kept watch:
[caption id="attachment_1254" align="aligncenter" width="584"] Pots drying between layers and Abbey cat watching over them[/caption]
Once your layer is dry, you can apply
Pots drying between layers and Abbey cat watching over them[/caption]
Once your layer is dry, you can apply 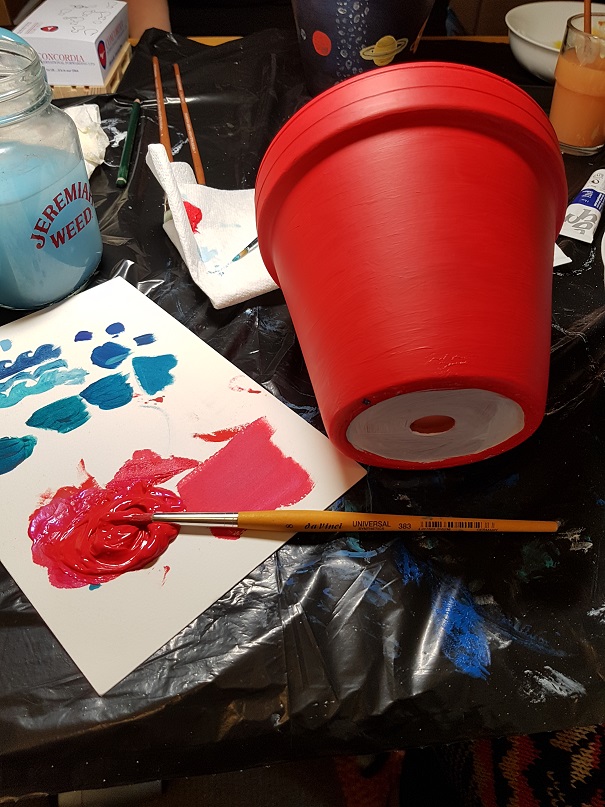 the next one. I painted three pots and two of those required a solid background which meant I had to apply the base colour three times by the time I was satisfied. The top layer also contained some iridescent colour as I wanted the pots to reflect sunlight.
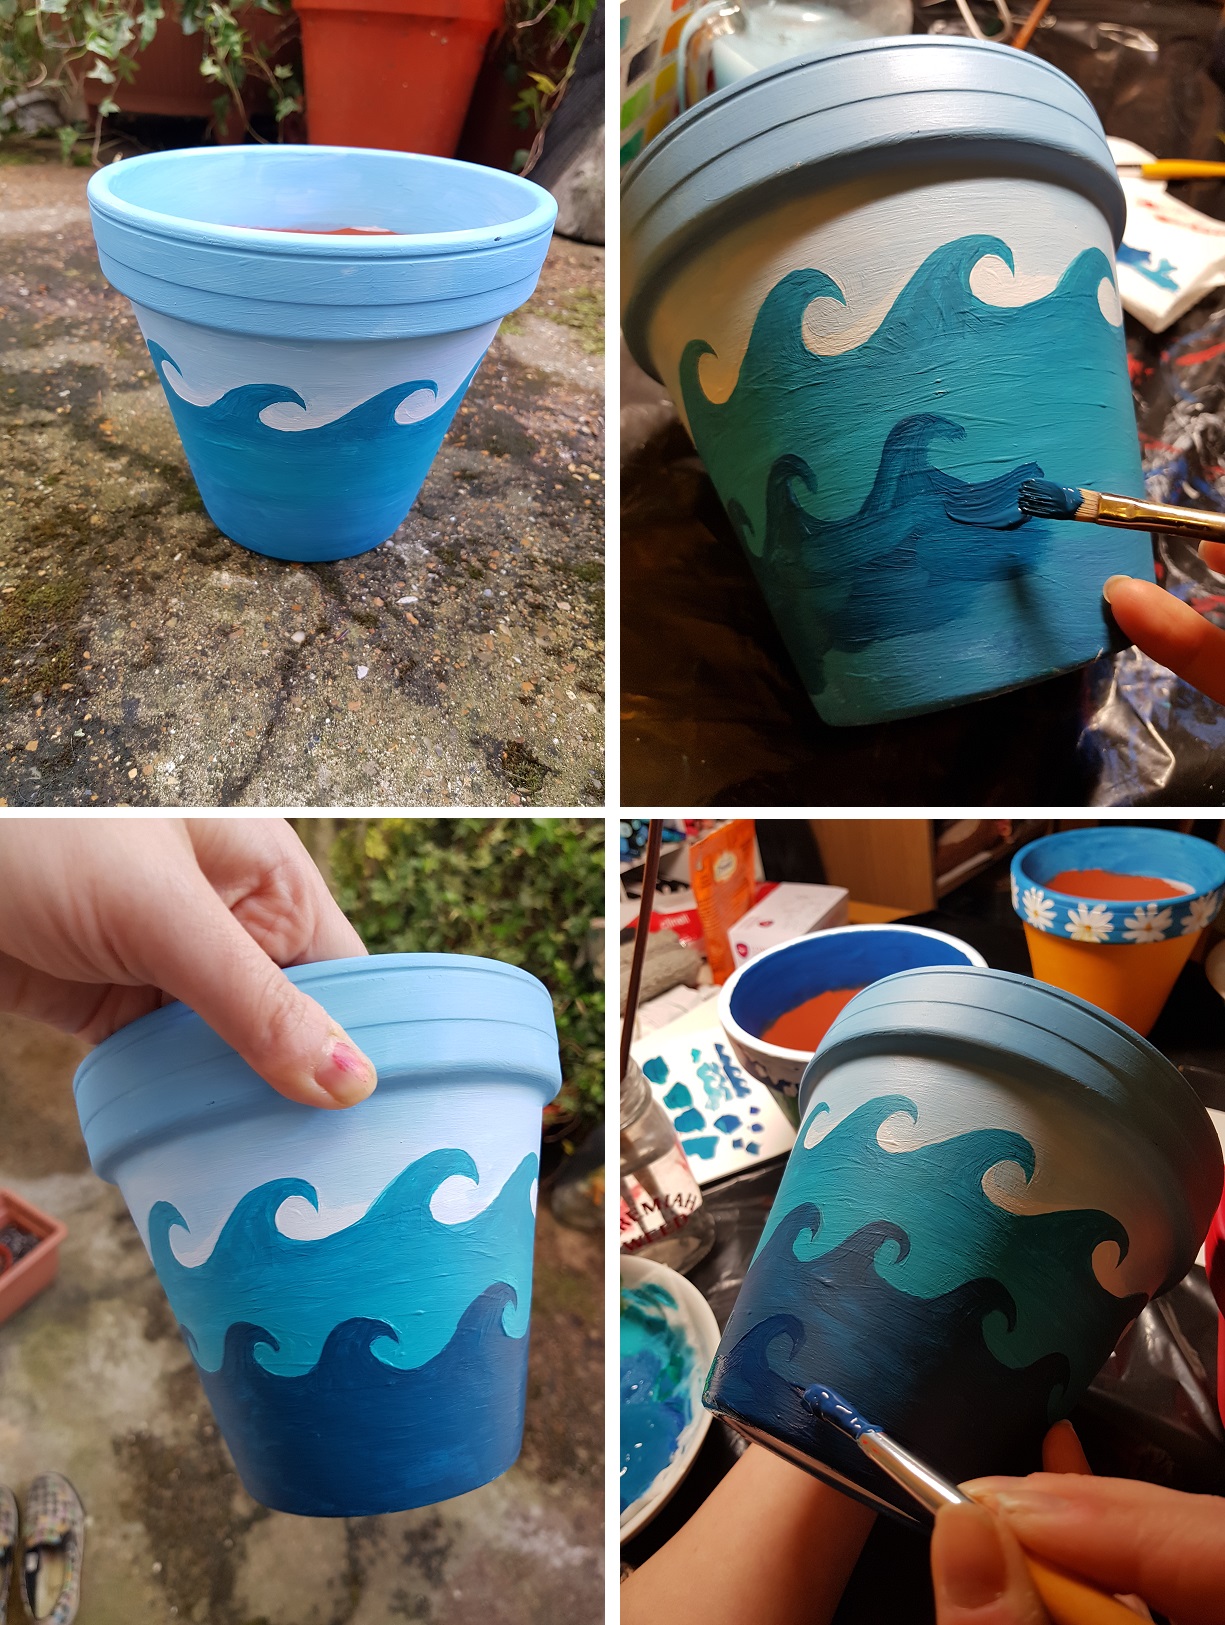
On the other hand, if you are painting white or some other light colour, you may only need one base layer of paint since you are working on an already white surface. This was the case with my sea themed pot. After the first layer dried I started painting the top wave a turquoise colour in two layers, then added the middle one (another two layers) and the bottom one (another two). I found it useful to go back and forth between layers as I inevitably made mistakes which needed correcting. The lighter colour helped clean up my edges and also made the foreground pop which I was very pleased with.
the next one. I painted three pots and two of those required a solid background which meant I had to apply the base colour three times by the time I was satisfied. The top layer also contained some iridescent colour as I wanted the pots to reflect sunlight.
On the other hand, if you are painting white or some other light colour, you may only need one base layer of paint since you are working on an already white surface. This was the case with my sea themed pot. After the first layer dried I started painting the top wave a turquoise colour in two layers, then added the middle one (another two layers) and the bottom one (another two). I found it useful to go back and forth between layers as I inevitably made mistakes which needed correcting. The lighter colour helped clean up my edges and also made the foreground pop which I was very pleased with.
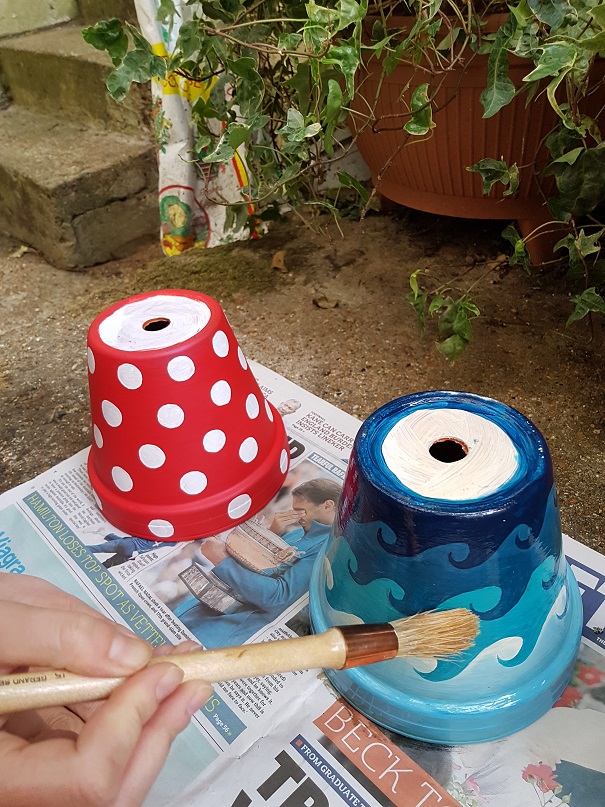
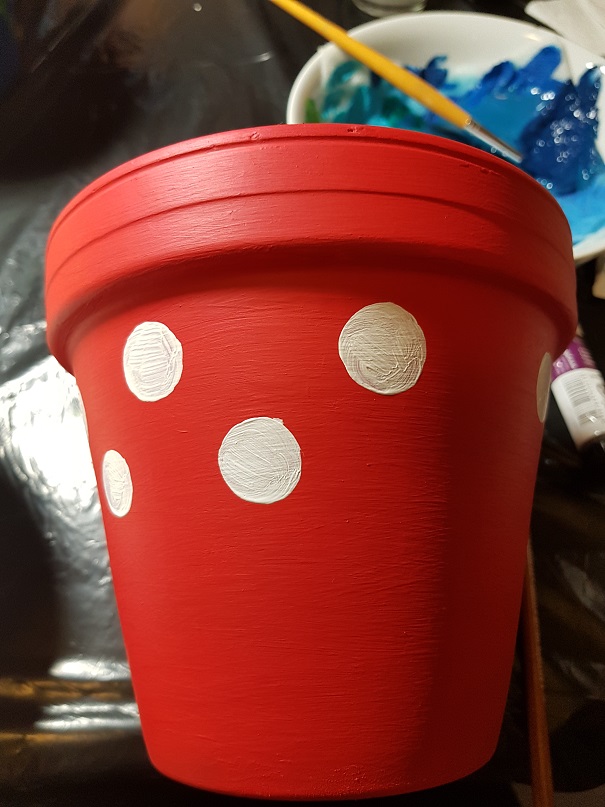 The red pot received its polka dots in two layers and the blue one will eventually turn into the world map. As the project progressed, I realised I will not be able to finish all, so I put that one aside for now.
I had the pleasure of doing this project with my partner and she painted the remaining two pots: one with a space theme, the other with cats and flowers. All there was left to do was to varnish the pots and put some flowers in them.
The red pot received its polka dots in two layers and the blue one will eventually turn into the world map. As the project progressed, I realised I will not be able to finish all, so I put that one aside for now.
I had the pleasure of doing this project with my partner and she painted the remaining two pots: one with a space theme, the other with cats and flowers. All there was left to do was to varnish the pots and put some flowers in them.
 Make sure you read the label before buying a particular varnish as each have different properties. They generally come in matte, satin and gloss varieties. Gloss gives you the most sheen and it is needed for any metallic or iridescent colour to pop. Matte, on the other hand, has no sheen and tends to dull down colours. Satin is the one in-between and I would recommend that for most flower pot projects. As we had a lot of iridescent colours and I wanted my pots shiny I went with the gloss varnish. Be warned, they can have a slight yellow tint and they are not recommended if a crisp white finish is what you are after.
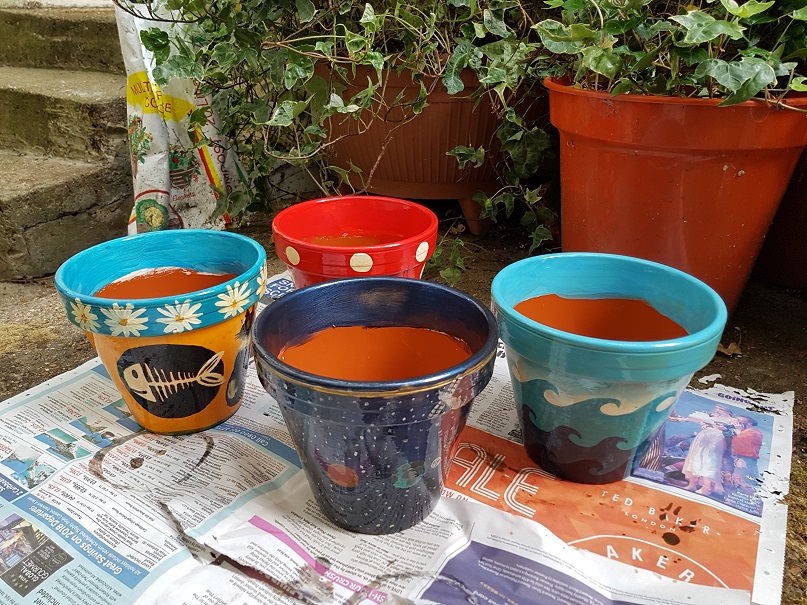 I laid out my pots on some newspaper on the patio upside down first. I applied the first coat with my gesso brush and gave them 24 hours to dry. Then I turned them and applied the second layer, making sure the inside of the pots are thoroughly varnished too. After the second coat dried they were ready to use!
 Here is our patio before and after cleaning with our new flower pots:
 And lastly, a closer look at our new arrangement:
 We hope you liked this post about painting pots with acrylic. Go ahead, grab some terracotta and start painting your own patio set, they make an amazing addition to any outdoor (and indoor) space. Have fun!
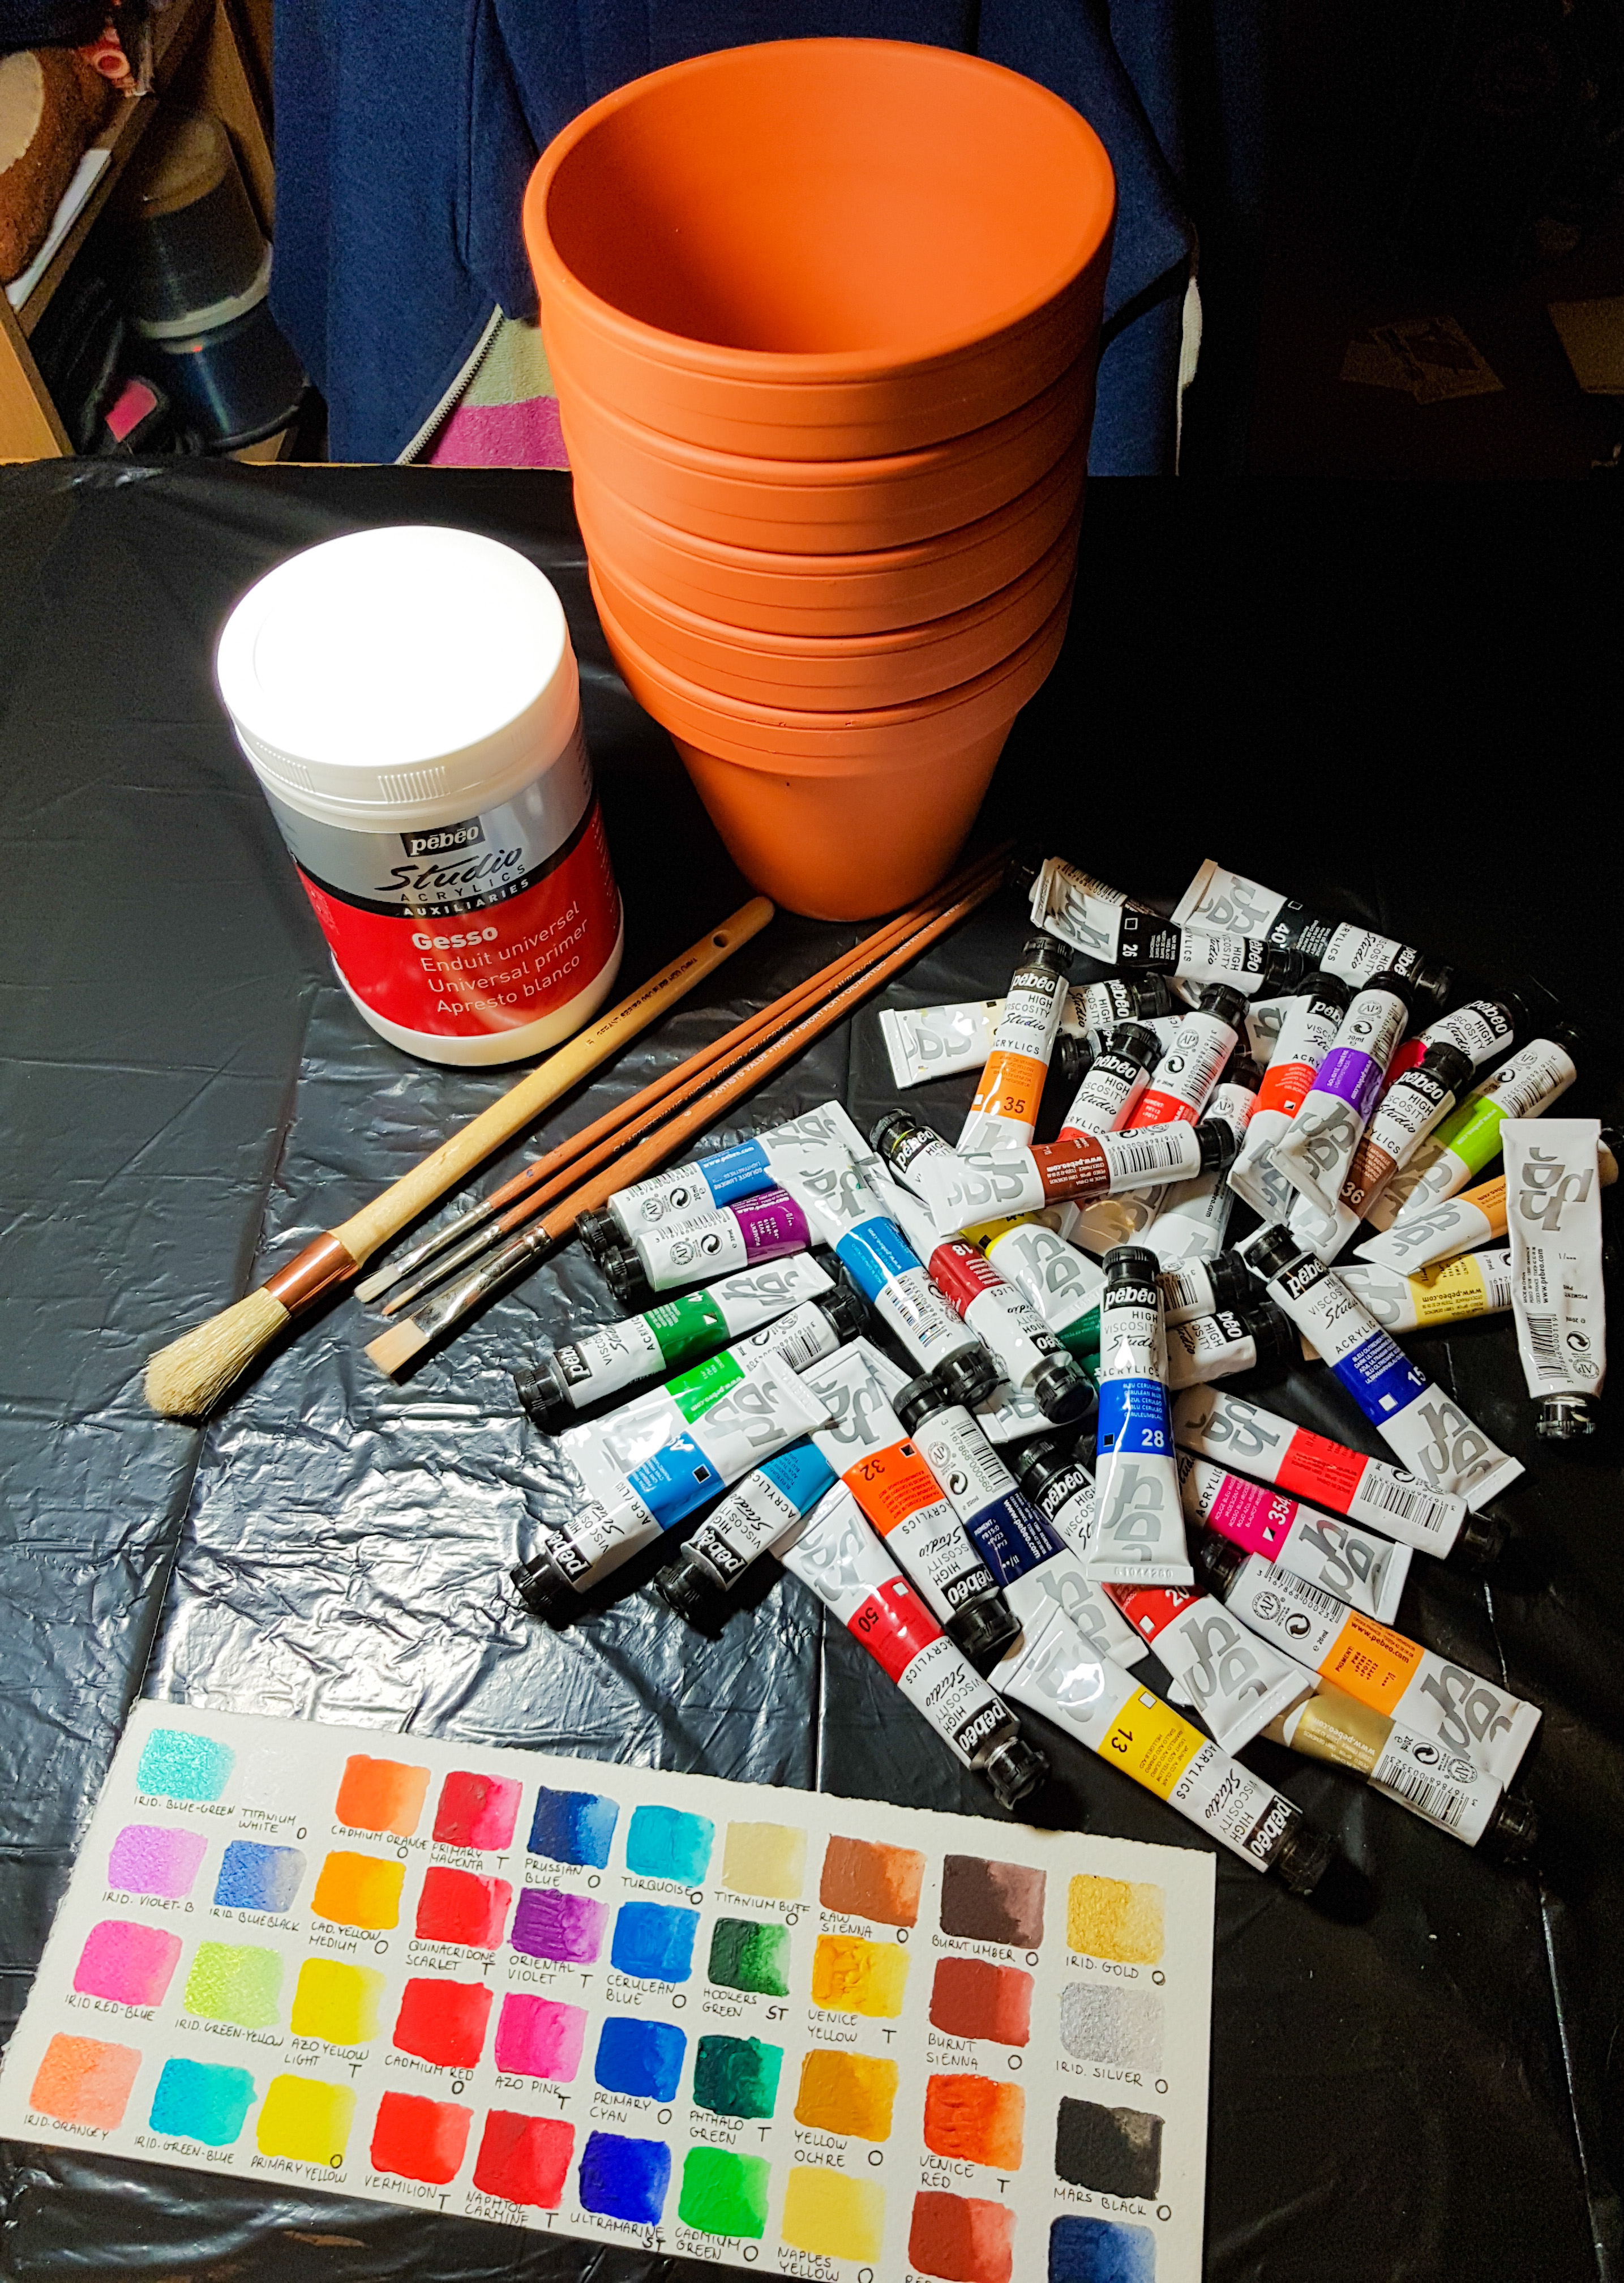
Materials Needed
Terracotta Pots You can buy these in any garden shop in many different sizes. If you are looking for smaller clay ornaments other than just pots, browse our website's terracotta section. Acrylic Primer/ Gesso You will find a lot on the market but they all do the same job: they prepare the surface so that it accepts the paint. Pebeo is an affordable brand and their 1 Litre Gesso will last me a long time! Varnish/Gesso Brush Any old brush will do, I used a Gerand GSO brush in 15mm size as it is great value for money. It's also large and rounded to reach all areas and its bristle hair is strong enough for the application of thick gesso. Acrylic Paints If you have a batch of student grade acrylics they are perfect for this job! I own a 40 set of Pebeo Studio Acrylics that I have not found much use for otherwise, complete with iridescent and metallic colours, so I was really excited to finally use them! Acrylic Brushes I mainly used my trusty Lawrence Acrylic/Oil brushes and a few synthetic Da Vinci brushes. They are both good value and quality brushes. Varnish You can buy a tub of yacht varnish in any hardware store or use artist grade varnish like the ones from Sennelier or Golden. A couple of layers will make sure your work will last years in humid weather, without chipping or buckling (although clay might crack in very cold weather so you might still want to keep your pots inside in the winter).Step 1: Applying Gesso
This is a crucial first step as gesso will make sure your pots are sealed from humidity and that your paint will stick to the surface well. It is wise to wear gloves to protect your skin and make sure your work surface is covered too (I just used a bin liner as I could not find any newspaper). Apply the first layer of gesso starting from the bottom of the pot and work your way up. This way, by the time you will have to put the pot down, it will have dried enough to not smear too much.
Make sure you get the gesso into the ridges and under the rim too, then end with applying a thick stripe to the inner rim of the pot, just enough to cover what you think will peek out when a plant is placed inside.
Put the pot aside for half an hour (or more) to dry then repeat the process. In my experience two layers of gesso is enough to create an even white surface (see picture) but some use three or more layers and sand the work in-between to achieve a smooth finish. I didn't mind the visible brush strokes but it's all down to personal preference.
Tip: you can grab the pot from the inside and even utilise the small water hole on the bottom to stick a finger through: this will help you hold the pot and reach all areas.
Step 2. Painting the Pots
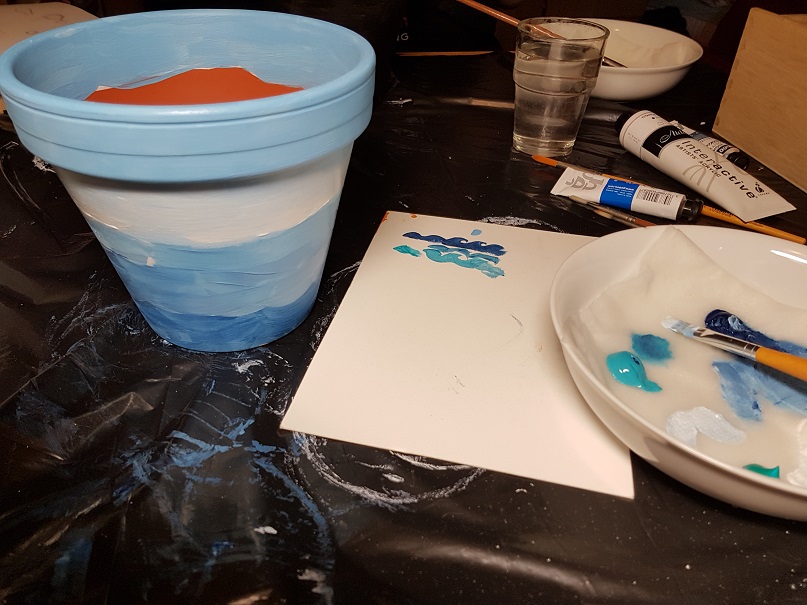
This is the time to let your imagination loose. Now that you essentially turned your terracotta pot into a primed canvas, you can really do whatever you like. Make it as elaborate as a Renaissance fresco or paint it just one colour, the sky is the limit! Acrylics dry to a waterproof finish, which makes building up your painting in layers and correcting mistakes easier. Palette Set-up and 1st Layer One thing to keep in mind if you never used this medium before: once your palette dries, you will not be able to re-activate the paint so better keep it moist! [caption id="attachment_1252" align="alignright" width="309"] My first layer of variegated blues for my sea themed pot - with home made acrylic wet palette on the side[/caption]
You can invest in a specialised acrylic palette with a sponge insert such as the Sta-Wet Palette or you can simply make one yourself with an old plate and some wet paper towels (see picture).
Mix your base colour(s) and apply a thin first layer. No need to spend too much time on this as you will have plenty of time for fine tuning at a later stage.
Drying your Layers
Once your base colour is down, put the pot aside to completely dry it. Drying time may depend on the paint's brand, quality (student or artist), thickness and environmental conditions. The warmer and less humid the air is, the less time it takes for the paint to dry. To maximise drying, I put the drying pots on my patio and my cat kept watch:
[caption id="attachment_1254" align="aligncenter" width="584"] Pots drying between layers and Abbey cat watching over them[/caption]
Once your layer is dry, you can apply the next one. I painted three pots and two of those required a solid background which meant I had to apply the base colour three times by the time I was satisfied. The top layer also contained some iridescent colour as I wanted the pots to reflect sunlight.
On the other hand, if you are painting white or some other light colour, you may only need one base layer of paint since you are working on an already white surface. This was the case with my sea themed pot. After the first layer dried I started painting the top wave a turquoise colour in two layers, then added the middle one (another two layers) and the bottom one (another two). I found it useful to go back and forth between layers as I inevitably made mistakes which needed correcting. The lighter colour helped clean up my edges and also made the foreground pop which I was very pleased with.
The red pot received its polka dots in two layers and the blue one will eventually turn into the world map. As the project progressed, I realised I will not be able to finish all, so I put that one aside for now.
I had the pleasure of doing this project with my partner and she painted the remaining two pots: one with a space theme, the other with cats and flowers. All there was left to do was to varnish the pots and put some flowers in them.
Step 3: Varnishing
Unvarnished paint does not do well outside, it tends to bubble up, crack and then slowly peel - not what you have in mind for something you made yourself! Even if you are only going to keep the pots inside varnishing will protect them from humidity and scratches and will give them a lovely finish.
Make sure you read the label before buying a particular varnish as each have different properties. They generally come in matte, satin and gloss varieties. Gloss gives you the most sheen and it is needed for any metallic or iridescent colour to pop. Matte, on the other hand, has no sheen and tends to dull down colours. Satin is the one in-between and I would recommend that for most flower pot projects. As we had a lot of iridescent colours and I wanted my pots shiny I went with the gloss varnish. Be warned, they can have a slight yellow tint and they are not recommended if a crisp white finish is what you are after.
I laid out my pots on some newspaper on the patio upside down first. I applied the first coat with my gesso brush and gave them 24 hours to dry. Then I turned them and applied the second layer, making sure the inside of the pots are thoroughly varnished too. After the second coat dried they were ready to use!
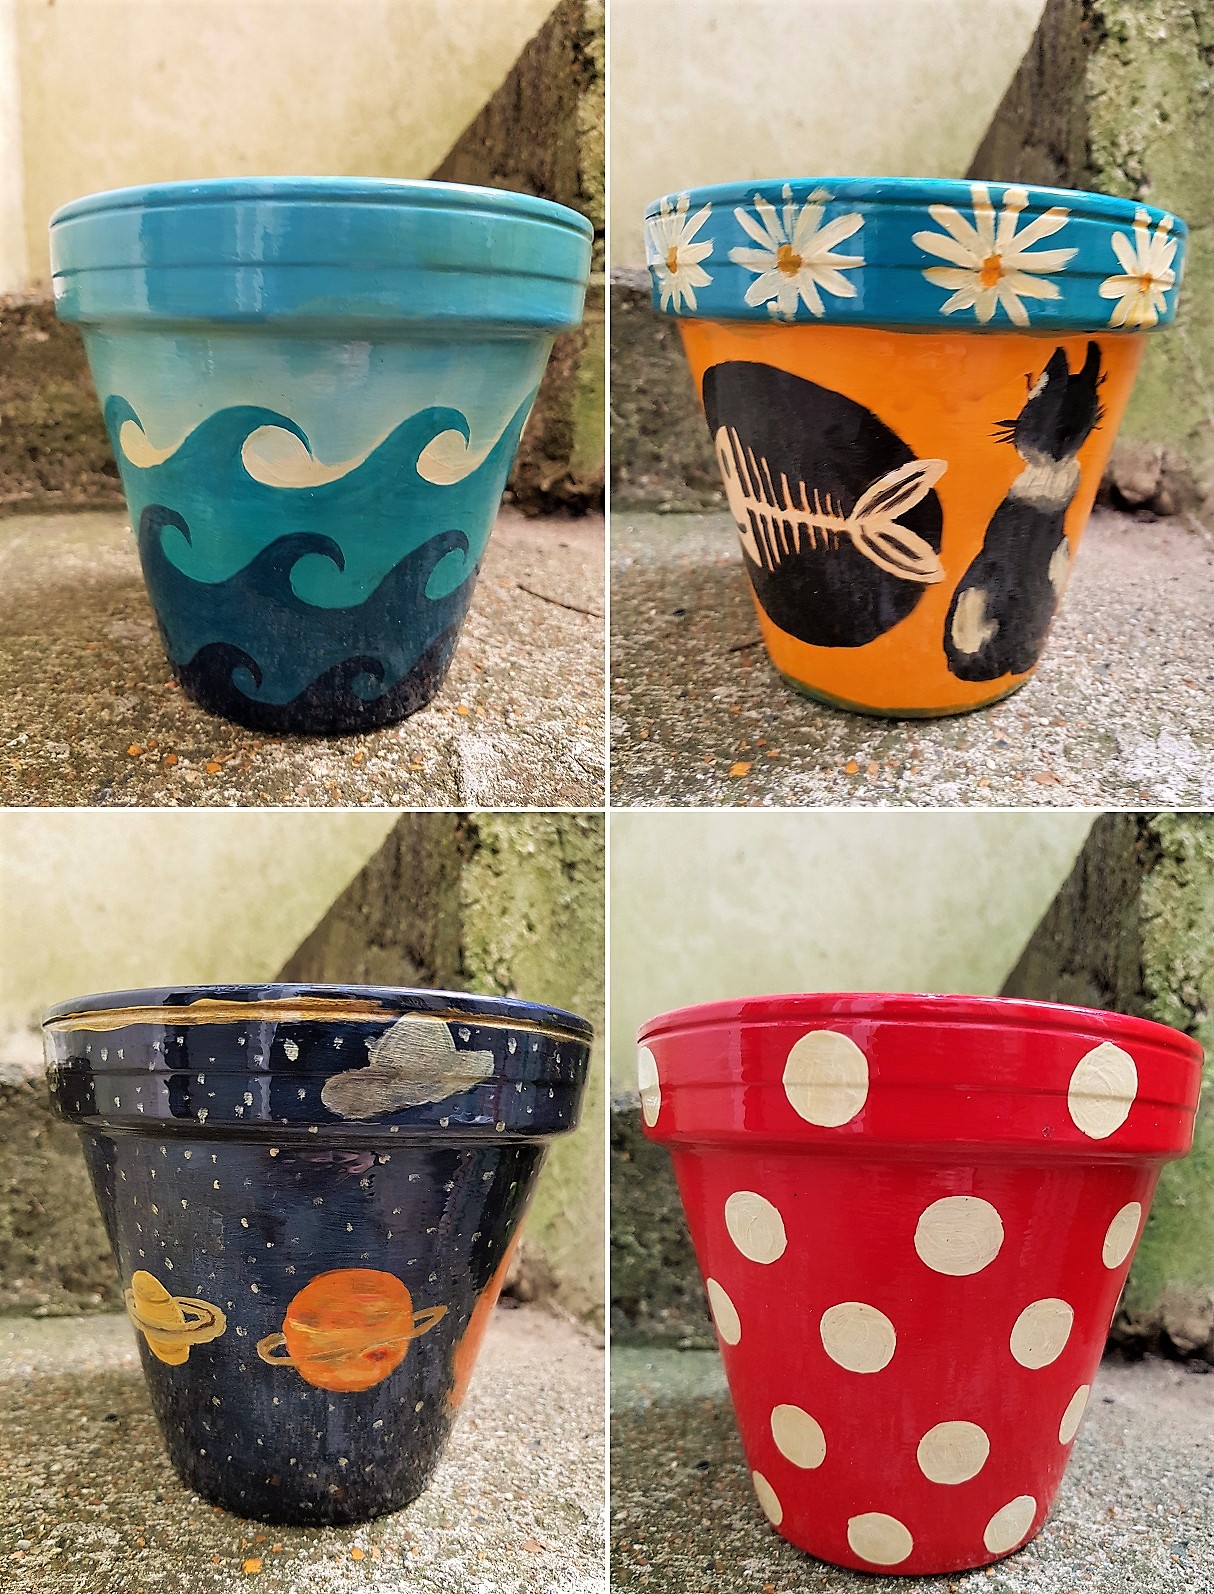
The Results
We were very happy with how the flower pots turned out and will likely do this again! I still have a world map to finish and we have the taste for replacing all our indoor pots too. Here are the finished pots:
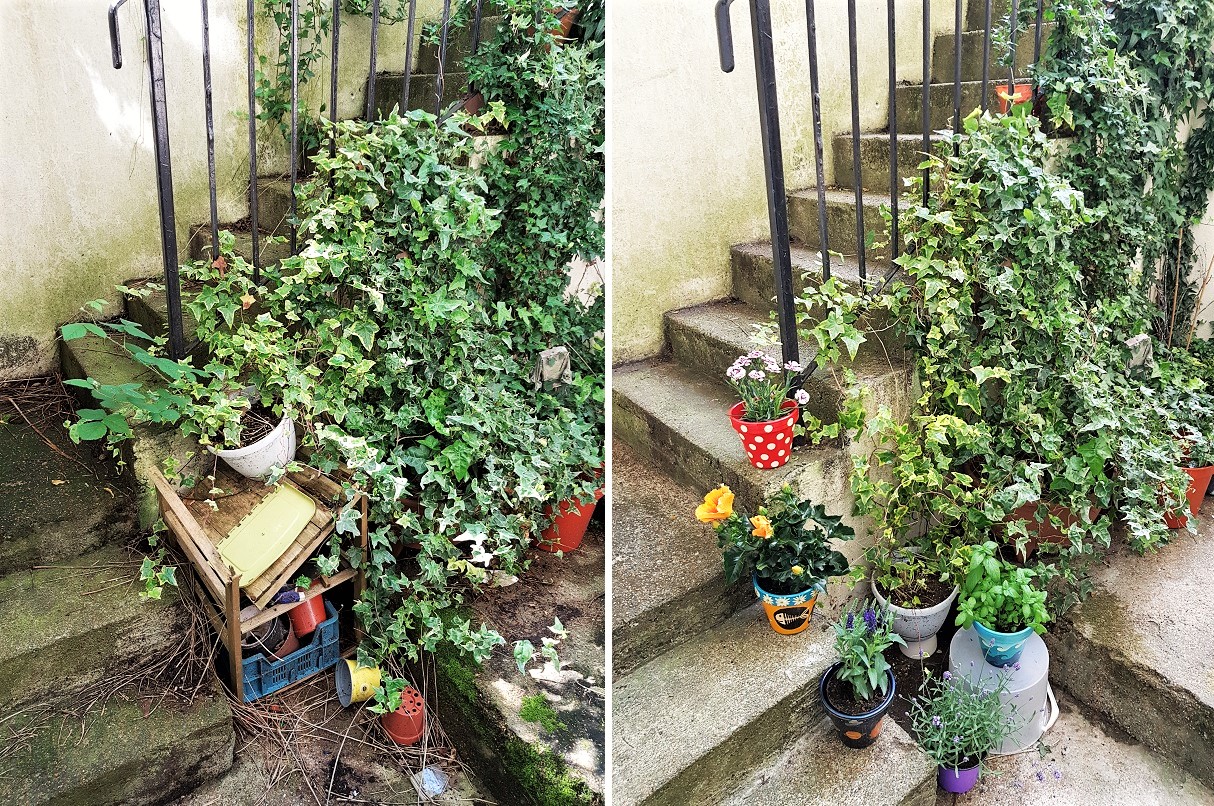
Here is our patio before and after cleaning with our new flower pots:
And lastly, a closer look at our new arrangement:
We hope you liked this post about painting pots with acrylic. Go ahead, grab some terracotta and start painting your own patio set, they make an amazing addition to any outdoor (and indoor) space. Have fun! 


