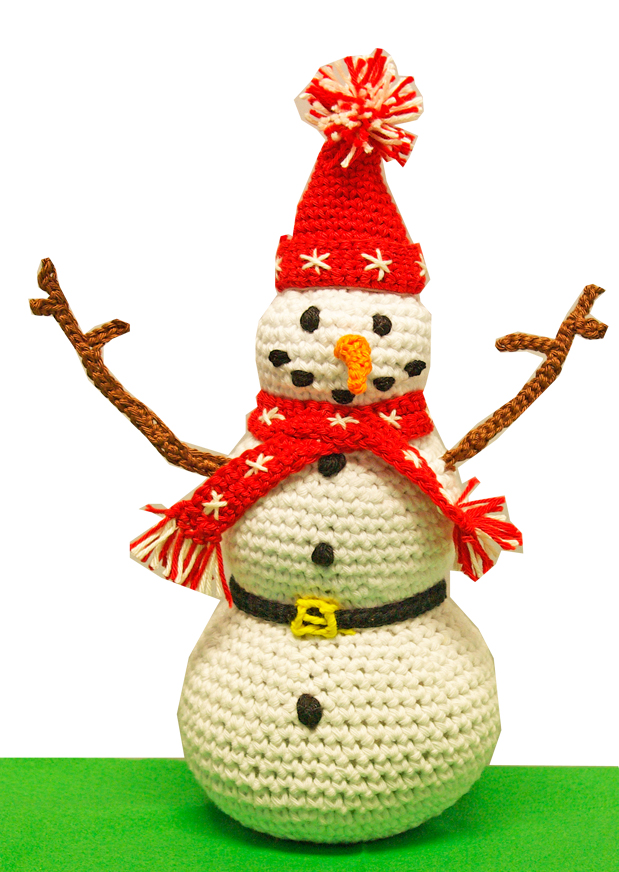
Phyllis the Snow Woman - Free Crochet Pattern
Phyllis is part of the #LiveAdventCalendar, our Christmas window display featuring new artwork for each day of the Advent period. This bubbly snow lady has so been popular with our customers (especially with children) that we decided to share Judy's pattern with all of you. You will need some basic crochet skills but even if you never attempted amigurumi before, you will find plenty of tutorials on YouTube to bring you up to speed and get you started on this lovely Christmas project!
 Materials needed (stock codes in brackets)
Crochet hook size 3-4 (C42253)
Sewing/Weaving needle (C42221)
1 ball of white yarn (C421310)
1 ball of red yarn (C421314)
some orange yarn for the carrot nose (C421322)
some black yarn for the belt and small detail (C421319)
some gold/yellow for buckle (C421313)
some brown yarn for the branch arms (C421327)
stuffing material
BODY
1. make a magic ring, chain (ch) 2; make 6 single crochets (sc) into magic ring (6)
2. 2 sc into each (12)
3. 2 sc, 1 sc repeat till end (*) (18)
4. 2 sc, 1 sc, 1 sc * (24)
5. 2 sc, 1 sc, 1 sc, 1 sc * (30)
6. 2 sc, 1 sc, 1 sc, 1 sc, 1 sc * (36)
7. 2 sc, 1 sc, 1 sc, 1 sc, 1 sc, 1 sc * (42)
8. 2 sc, 1 sc, 1 sc, 1 sc, 1 sc, 1 sc, 1 sc * (48)
9. 2 sc, 1 sc, 1 sc, 1 sc, 1 sc, 1 sc, 1 sc, 1 sc * (54)
Next 8 rows (10-17) sc * (54)
18. skip, 1 sc, 1 sc, 1 sc, 1 sc, 1 sc, 1 sc, 1 sc, 1 sc * (48)
19. skip, 1 sc, 1 sc, 1 sc, 1 sc, 1 sc, 1 sc, 1 sc * (42)
20. skip, 1 sc, 1 sc, 1 sc, 1 sc, 1 sc, 1 sc * (36)
21. skip, 1 sc, 1 sc, 1 sc, 1 sc, 1 sc * (30)
22. 2 sc, 1 sc, 1 sc, 1 sc, 1 sc * (36)
23. 2 sc, 1 sc, 1 sc, 1 sc, 1 sc, 1 sc * (42)
24. 2 sc, 1 sc, 1 sc, 1 sc, 1 sc, 1 sc, 1 sc * (48)
Next 6 rows (25-30) sc * (48)
31. skip, 1 sc, 1 sc, 1 sc, 1 sc, 1 sc, 1 sc, 1 sc * (42)
32. skip, 1 sc, 1 sc, 1 sc, 1 sc, 1 sc, 1 sc * (36)
33. skip, 1 sc, 1 sc, 1 sc, 1 sc, 1 sc * (30)
34. skip, 1 sc, 1 sc, 1 sc, 1 sc * (24)
35. 2 sc, 1 sc, 1 sc, 1 sc * (30)
36. 2 sc, 1 sc, 1 sc, 1 sc, 1 sc * (36)
Next 4 Rows (37-40) sc * (36)
41. skip, 1 sc, 1 sc, 1 sc, 1 sc, 1 sc * (30)
42. skip, 1 sc, 1 sc, 1 sc, 1 sc * (24) end - you will connect here with the hat
Tip: you can start stuffing the body when the first snowball is done and add more stuffing as you go. Make the body firm enough to hold its shape but don't over stuff it as it will make the stuffing visible.
HAT
1. make a magic ring, ch 2; 6 sc into magic ring (6)
2. 2 sc, sc till end (7)
Rows after: 2 sc, sc till end - this will gradually increase the hat (by 1 each row). Keep increasing until the hat has reached the required length and thickness and is ready to join the head.
Last 5 rows: sc till end - roll up the brim and finish off.
To make the snowflake pattern, load white yarn and sew into the brim. Keep a similar distance between the flakes and you can hide your tails on the back.
To make the bobble: grab the ends of both white and red yarns and loop them around 2 fingers till you reach the required thickness and cut both tails. Lead the red yarn between your fingers and tie the loops in the middle as if you were making a bow tie. Keep a tail and lead it through the tip of the hat and fasten it. When you trim the loops, the bobble will take a round shape.
To connect with the head, stuff the hat and sew it onto the brim of the head. Use white yarn as it will look more natural.
SCARF
1. Chain 60 (or as long as you want the scarf to be)
2. turn, chain 1, needle into 2nd and sc till end
3. turn, ch 1, sc till end
4. turn, ch 1, sc till end, finish off.
5. To make the tassels, load your needle with red yarn and sewing into the ends, start looping the yarn leaving a gap of about 1 cm. You can loop it around your finger, it will help keep the loops the same length. When finished, repeat with white yarn.
6. Sew the loops into the end of the scarf then trim the tassels to the same length.
7. Repeat 5 and 6 on the other end.
8. To make the snowflake pattern, load white yarn and sew into the scarf. Keep a similar distance between the flakes and you can hide your tails on the back.
BELT
1. Chain 40-44 (as long as the snow woman's waist requires)
2. turn, ch 1, sc till end, finish off and tie around the waist.
To make the buckle: load gold/yellow yarn into the needle and twine it so you get a spiral. Sew a rectangle onto the belt first, then a horizontal line in the middle.
ARMS/BRANCHES (make 2)
1. Chain 25, needle into 2nd and slip stitch (ss) 4 (Main Branch)
2. Ch 4, ss 3 (Side Branch 1)
3. Ss 4 (Main Branch)
4. Ch 4, ss 3 (Side Branch 2)
5. Ss till the end (to make a thicker end, use sc instead of ss), finish.
6. Sew them onto the sides of the middle snowball. Use a wire to elevate the branches and pose the arms.
CARROT NOSE
1. Make magic ring (leave a little tail), ch 2, 5 sc into magic ring (5)
2. sc till end (5)
3. sc till end (5)
4. skip 1, sc till end (4)
5. skip 1, sc till end (3)
6. skip 1, sc, sc, finish off
Use the tail on the other end of the carrot to fasten the nose to the face.
CHARCOAL DETAILS
Load the black yarn and sew into the body:
eyes, mouth and buttons
Of course, like with any creative project, you don't have to follow the pattern closely. You can make the snow woman (or snowman) smaller or larger, variate the colours and patterns on the accessories and make more elaborate arms. Get creative and customise!
You can order crochet needles and yarns by calling us on 01273 260260 ext 1 or visit our Hove shop. We are also happy to give further advice on this pattern in case you get stuck.
We hope you enjoyed this pattern and have a lovely creative Christmas!
Materials needed (stock codes in brackets)
Crochet hook size 3-4 (C42253)
Sewing/Weaving needle (C42221)
1 ball of white yarn (C421310)
1 ball of red yarn (C421314)
some orange yarn for the carrot nose (C421322)
some black yarn for the belt and small detail (C421319)
some gold/yellow for buckle (C421313)
some brown yarn for the branch arms (C421327)
stuffing material
BODY
1. make a magic ring, chain (ch) 2; make 6 single crochets (sc) into magic ring (6)
2. 2 sc into each (12)
3. 2 sc, 1 sc repeat till end (*) (18)
4. 2 sc, 1 sc, 1 sc * (24)
5. 2 sc, 1 sc, 1 sc, 1 sc * (30)
6. 2 sc, 1 sc, 1 sc, 1 sc, 1 sc * (36)
7. 2 sc, 1 sc, 1 sc, 1 sc, 1 sc, 1 sc * (42)
8. 2 sc, 1 sc, 1 sc, 1 sc, 1 sc, 1 sc, 1 sc * (48)
9. 2 sc, 1 sc, 1 sc, 1 sc, 1 sc, 1 sc, 1 sc, 1 sc * (54)
Next 8 rows (10-17) sc * (54)
18. skip, 1 sc, 1 sc, 1 sc, 1 sc, 1 sc, 1 sc, 1 sc, 1 sc * (48)
19. skip, 1 sc, 1 sc, 1 sc, 1 sc, 1 sc, 1 sc, 1 sc * (42)
20. skip, 1 sc, 1 sc, 1 sc, 1 sc, 1 sc, 1 sc * (36)
21. skip, 1 sc, 1 sc, 1 sc, 1 sc, 1 sc * (30)
22. 2 sc, 1 sc, 1 sc, 1 sc, 1 sc * (36)
23. 2 sc, 1 sc, 1 sc, 1 sc, 1 sc, 1 sc * (42)
24. 2 sc, 1 sc, 1 sc, 1 sc, 1 sc, 1 sc, 1 sc * (48)
Next 6 rows (25-30) sc * (48)
31. skip, 1 sc, 1 sc, 1 sc, 1 sc, 1 sc, 1 sc, 1 sc * (42)
32. skip, 1 sc, 1 sc, 1 sc, 1 sc, 1 sc, 1 sc * (36)
33. skip, 1 sc, 1 sc, 1 sc, 1 sc, 1 sc * (30)
34. skip, 1 sc, 1 sc, 1 sc, 1 sc * (24)
35. 2 sc, 1 sc, 1 sc, 1 sc * (30)
36. 2 sc, 1 sc, 1 sc, 1 sc, 1 sc * (36)
Next 4 Rows (37-40) sc * (36)
41. skip, 1 sc, 1 sc, 1 sc, 1 sc, 1 sc * (30)
42. skip, 1 sc, 1 sc, 1 sc, 1 sc * (24) end - you will connect here with the hat
Tip: you can start stuffing the body when the first snowball is done and add more stuffing as you go. Make the body firm enough to hold its shape but don't over stuff it as it will make the stuffing visible.
HAT
1. make a magic ring, ch 2; 6 sc into magic ring (6)
2. 2 sc, sc till end (7)
Rows after: 2 sc, sc till end - this will gradually increase the hat (by 1 each row). Keep increasing until the hat has reached the required length and thickness and is ready to join the head.
Last 5 rows: sc till end - roll up the brim and finish off.
To make the snowflake pattern, load white yarn and sew into the brim. Keep a similar distance between the flakes and you can hide your tails on the back.
To make the bobble: grab the ends of both white and red yarns and loop them around 2 fingers till you reach the required thickness and cut both tails. Lead the red yarn between your fingers and tie the loops in the middle as if you were making a bow tie. Keep a tail and lead it through the tip of the hat and fasten it. When you trim the loops, the bobble will take a round shape.
To connect with the head, stuff the hat and sew it onto the brim of the head. Use white yarn as it will look more natural.
SCARF
1. Chain 60 (or as long as you want the scarf to be)
2. turn, chain 1, needle into 2nd and sc till end
3. turn, ch 1, sc till end
4. turn, ch 1, sc till end, finish off.
5. To make the tassels, load your needle with red yarn and sewing into the ends, start looping the yarn leaving a gap of about 1 cm. You can loop it around your finger, it will help keep the loops the same length. When finished, repeat with white yarn.
6. Sew the loops into the end of the scarf then trim the tassels to the same length.
7. Repeat 5 and 6 on the other end.
8. To make the snowflake pattern, load white yarn and sew into the scarf. Keep a similar distance between the flakes and you can hide your tails on the back.
BELT
1. Chain 40-44 (as long as the snow woman's waist requires)
2. turn, ch 1, sc till end, finish off and tie around the waist.
To make the buckle: load gold/yellow yarn into the needle and twine it so you get a spiral. Sew a rectangle onto the belt first, then a horizontal line in the middle.
ARMS/BRANCHES (make 2)
1. Chain 25, needle into 2nd and slip stitch (ss) 4 (Main Branch)
2. Ch 4, ss 3 (Side Branch 1)
3. Ss 4 (Main Branch)
4. Ch 4, ss 3 (Side Branch 2)
5. Ss till the end (to make a thicker end, use sc instead of ss), finish.
6. Sew them onto the sides of the middle snowball. Use a wire to elevate the branches and pose the arms.
CARROT NOSE
1. Make magic ring (leave a little tail), ch 2, 5 sc into magic ring (5)
2. sc till end (5)
3. sc till end (5)
4. skip 1, sc till end (4)
5. skip 1, sc till end (3)
6. skip 1, sc, sc, finish off
Use the tail on the other end of the carrot to fasten the nose to the face.
CHARCOAL DETAILS
Load the black yarn and sew into the body:
eyes, mouth and buttons
Of course, like with any creative project, you don't have to follow the pattern closely. You can make the snow woman (or snowman) smaller or larger, variate the colours and patterns on the accessories and make more elaborate arms. Get creative and customise!
You can order crochet needles and yarns by calling us on 01273 260260 ext 1 or visit our Hove shop. We are also happy to give further advice on this pattern in case you get stuck.
We hope you enjoyed this pattern and have a lovely creative Christmas! 


